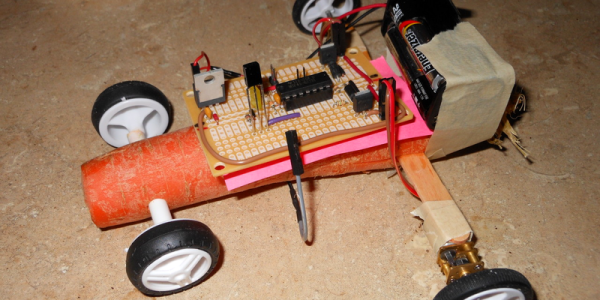
Who Needs The MSP430 When You Have TI’s Other Microcontroller, The TI-84?

We’re sure there are more expensive LED controllers out there, but the TI-84 has got to be up there. Unless you have one on hand, then it’s free. And then you’ll doubtless need an SPI library for the famously moddable graphing calculator.

[Ivoah] is using his library, written in assembly for the Z80 processor inside the TI, to control a small strip of DotStar LEDs from Adafruit. The top board in the photograph is an ESP8266 board that just happened to be on the breadboard. The lower Arduino is being used as a 5V power supply, relegated to such duties in the face of such a superior computing device.

Many of us entertained ourselves through boring classes by exploring the features of TI BASIC, but this is certainly a step above. You can see his code here on his GitHub.

After his proof-of-concept, [Ivoah] also made a video of it working and began to program a graphical interface for controlling the LEDs. Video after the break.

Continue reading “Who Needs The MSP430 When You Have TI’s Other Microcontroller, The TI-84?”

VFD 430 Clock, NYC Style

[Daniel] seems to have a lot of time on his hands for building clocks, and that’s fine by us. For his latest build, he used a vacuum fluorescent display (VFD) to display hours, minutes, and seconds using an MSP430 to drive it.

Like the analog meter clock he built recently, there is no RTC. Instead, [Daniel] used the 430’s watchdog timer to generate 1Hz interrupts from the 430’s 32KHz clock. [Daniel] wanted to try Manhattan-style board construction for this project, so he built each module on a punch-cut stripboard island and super glued them to a copper-clad board. We have to agree with [Daniel] that the bare-bones construction is a nice complement to the aesthetic of the VFD.

[Daniel] set out to avoid using a VFD display driver, but each of the segments require +50V. He ran through a couple of drawing board ideas, such as using 17 transistors to drive them all before eventually settling on the MAX6921 VFD driver. The +50V comes from an open-loop boost converter he built that steps up from 12V.

The time is set with two interrupt-triggering buttons that use the shift register example from TI as a jumping off point. All of the code is available on [Daniel]’s site. Stick around after the break for a quick demo of the clock.

Continue reading “VFD 430 Clock, NYC Style”

Web Connected Breathalyser With Phone Display

[spillsman] is working on a IoT startup and wanted to work and play while he tested their hardware. His company, WifiThing, is bundling the Texas Instruments toolchain and mesh networking with a sort of plug-and-play web interface. The board uses a MSP430 and two other TI Networking chips to make setting up, logging data, and controlling outputs simpler. The web interface looks interesting, but in our experience this sort of approach only saves time up to a point. Then it’s time to pull out the chip’s various bibles, ‘nomicons, spell manuals, and supporting religious documents to get the thing to work.

Though, there are some projects where you would like a simple way to log data from multiple sensors, if this can do that easily (and more importantly, cheaply) it might be very cool. We are interested to see if the open source software is easy to integrate without buying their hardware. Either way, after setting up a simple circuit to heat the coil in the breathalyzer, and translate the data into a signal usable for the chip, [spillsman] was able to record alcohol levels and even keep a, perhaps unwise to record, high-score from his phone.

Continue reading “Web Connected Breathalyser With Phone Display”

Current Meter Shows Current Time

This isn’t the first of its type, but [Daniel]’s MSP430 based Analog Gauge Clock certainly ticks off the “hack” quotient. He admits an earlier Voltmeter Clock we featured a while back inspired him to build his version.

[Daniel] was taking an Embedded systems class, and needed to build an MSP430G2553 microcontroller based final project. Which is why he decided to implement the real time clock using the micro-controller itself, instead of using an external RTC module. This also simplified the hardware used – the microcontroller, a crystal, three analog ammeters, and a few passives were all that he needed. Other than the Ammeters, everything else came from his parts bin. Fresh face plates were put on the ammeters, and the circuit was assembled on a piece of strip board. A piece of bent steel plate served as the housing.

The interesting part is the software. He wrote all of it in bare C, without resorting to using the Energia IDE. He walks through all of the important parts of his code on his blog post. Setting load capacitance for the timing crystal was important, so he experimented with an oscilloscope to see which value worked best. And TI’s Application Note on MSP430 32-kHz Crystal Oscillators (PDF) proved to be a useful resource. Three PWM output’s run the three ammeters which indicate hours, minutes and seconds. Push-button switches let him set the clock. See a short demo of the clock in the video below.

Continue reading “Current Meter Shows Current Time”

Hackaday Links: November 8, 2015

[Burt Rutan] is someone who needs no introduction. Apparently, he likes the look of the Icon A5 and is working on his own version.

Earlier this week, the US Air Force lost a few satellites a minute after launch from Barking Sands in Hawaii. This was the first launch of the three stage, solid fueled SPARK rocket, although earlier versions were used to launch nuclear warheads into space. There are some great Army videos for these nuclear explosions in space, by the way.

[Alexandre] is working on an Arduino compatible board that has an integrated GSM module and WiFi chip. It’s called the Red Dragon, and that means he needs some really good board art. The finished product looks good in Eagle, and something we can’t wait to see back from the board house.

The Chippocolypse! Or however you spell it! TI is declaring a lot of chips EOL, and although this includes a lot of op-amps and other analog ephemera (PDF), the hi-fi community is reeling and a lot of people are stocking up on their favorite amplifiers.

[Jeremy] got tired of plugging jumper wires into a breadboard when programming his ATMega8 (including the ‘168 and ‘328) microcontrollers. The solution? A breadboard backpack that fits right over the IC. All the files are available, and the PCB can be found on Upverter.

In case you haven’t heard, we’re having a Super Conference in San Francisco later this week. Adafruit was kind enough to plug our plug for the con on Ask an Engineer last week.

Measuring Tire Pressure By Cutting A Hole In An Inner Tube

RFID tags are really very primitive pieces of technology. Yes, they harvest energy from an RFID reader and are able to communicate a few bits of data, but for a long time these tags have been unable to provide useful data beyond a simple ID number. [CaptMcAllister] found a new RFID sensor platform from TI and managed to make a wireless pressure sensor that fits in the inner tube of his bike.

The sensor [Capt] is using comes from TI’s RF430 series that include a few neat sensors that don’t require batteries, but are still able to communicate sensor data to a cell phone or other RFID reader. With a pressure sensor, this tiny microcontroller can receive power from an RFID reader and send it back to a phone app, all without wires.

[CaptMcAllister] cut open an inner tube for his bike, epoxied his PCB to a patch, and sealed everything back up again. After a quick test for leaks, [Capt] found the data coming from the sensor was extraordinarily accurate, and should hold up well enough to be used in his bike.

New Part Day: The BeagleBoard Gets Bigger

Officially, the latest hardware revision we’ve seen from BeagleBoard is the BeagleBone Black, a small board that’s perfect for when you want to interface hardware to a Linux software environment. This last summer, the BeagleBone Green was introduced, and while it’s a newer hardware release, it’s really just a cost-reduced version of the BB Black. Over the entire BeagleBoard family, it’s time for an upgrade.

It’s been talked about for more than a year now, but the latest and greatest from the BeagleBoard crew is out. It’s called the BeagleBoard X15, and not only is it an extremely powerful Linux board, it also has more ports than you would ever need.

The new BeagleBoard features a dual-core ARM Cortex A15 running at 1.5GHz. There is 2GB of DDR3L RAM on board, and 4GB of EMMC Flash. Outputs include three USB 3.0 hosts, two Gigabit Ethernet controllers, one eSATA connector, LCD output, two PCIe connectors, and an HDMI connector capable of outputting 1920×1080 at 60 FPS. The entire board is open hardware, with documentation for nearly every device on the board available now. The one exception is the PowerVR SGX544 GPU which has a closed driver, but the FSF has proposed a project to create an open driver for this graphics engine so that could change in the future.

The expected price of the BeagleBoard X15 varies from source to source, but all the numbers fall somewhere in the range of $200 to $240 USD, with more recent estimates falling toward the high end. This board is not meant to be a replacement for the much more popular BeagleBone. While the development and relationship between the ~Board and ~Bone are very much related, the BeagleBone has always and will always be a barebone Linux board, albeit with a few interesting features. The BeagleBoard, on the other hand, includes the kitchen sink. While the BeagleBoard X15 hardware is complete, so far there are less than one hundred boards on the planet. These are going directly to the people responsible for making everything work, afterwards orders from Digikey and Mouser will be filled. General availability should be around November, and certainly by Christmas.

While it’s pricier than the BeagleBone, the Raspberry Pi, or dozens of other ARM Linux boards out there, The BeagleBone has a lot of horsepower and plenty of I/Os. It’s an impressive piece of hardware that out-competes just about everything else available. We can’t wait to see it in the wild, but more importantly we can’t wait to see what people can do with it.

Title image credit: Vladimir Pantelic