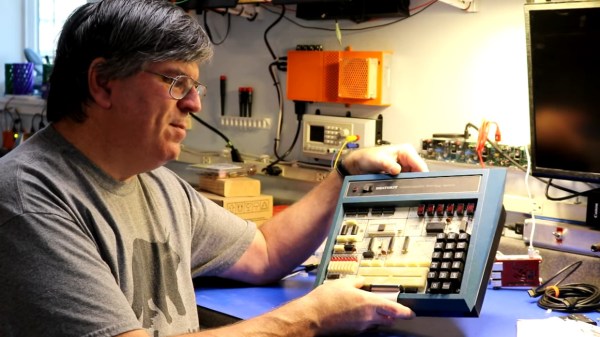
[Scott] acquired this broken trainer on eBay and then set about restoring it. The trainer provides I/O for programming, probing, and debugging an attached CPU. The first problem discovered when opening the case is that the CPU board is missing. The original board was an 80/10 but [Scott] ended up installing a newer 80/10A board he scored for fifty bucks. Later he upgraded to an 80/10B which increased the RAM and added a multimodule slot.
[Scott] has some luck fixing the failed power supply by recapping some of the smaller electrolytic capacitors which were showing high ESR. Once he had the board installed and the power supply functional he was able to input his first assembly program: a Cylon LED program! Making artistic use of the LEDs attached to the parallel port. You can see the results in the video embedded below.
Once upon a time, RC planes were expensive models that took months to build and big money to equip with electronics. Since the 20th century though, powerful batteries have become cheap, as have servos and radio controllers. Combine them with a bit of old packing material and you can get a little RC trainer up and running for peanuts, as [Samm Sheperd] demonstrates.
[Samm] started referring to this as the “$5 trainer,” though he admits that it will cost more than that if you don’t have some bits and pieces laying around. He demonstrates how to cut cheap foamboard with a hot guitar string, and how to form it into a viable wing. That’s the most crucial part, with the fuselage and tail surfaces relatively simple by comparison. With that complete, it’s as simple as bolting on a motor, some servos, and control horns, and you’re up and running. You can even whip up a landing gear if you’re so inclined! Then, figure out your center of gravity, get it right, and then you’re pretty much ready to fly.
It’s a great primer on how to build a basic RC model, and if you do it right, it should have pretty forgiving handling, too. Plus, it’s so cheap that it should be easy to repair if you crash. Happy modelling! Video after the break.
Morse code, often referred to as continuous wave (CW) in radio circles, has been gradually falling out of use for a long time now. At least in the United States, ham radio licensees don’t have to learn it anymore, and the US Coast Guard stopped using it even for emergencies in 1999. It does have few niche use cases, though, as it requires an extremely narrow bandwidth and a low amount of power to get a signal out and a human operator can usually distinguish it even if the signal is very close to the noise floor. So if you want to try and learn it, you might want to try something like this Morse trainer from [mircemk].
While learning CW can be quite tedious, as [mircemk] puts it, it’s actually fairly easy for a computer to understand and translate so not a lot of specialized equipment is needed. This build is based around the Arduino Nano which is more than up for the job. It can accept input from any audio source, allowing it to translate radio transmissions in real time, and can also be connected to a paddle or key to be used as a trainer for learning the code. It’s also able to count the words-per-minute rate of whatever it hears and display it on a small LCD at the front of the unit which also handles displaying the translations of the Morse code.
Accessibility devices are a wonder of modern technology, allowing people with various needs to interact more easily with the world. From prosthetics to devices to augment or aid someone’s vision or hearing, devices like these can open up many more opportunities than would otherwise exist. A major problem with a wide array of these tools is that they can cost a fortune. [3D Printy] hoped to bring the cost down for Braille trainers which can often cost around $1000.
Braille trainers consist of a set of characters, each with six pins or buttons that can be depressed to form the various symbols used in the Braille system. [3D Printy]’s version originally included six buttons, each with a set of springs, that would be able to pop up and down. After some work and real-world use, though, he found that his device was too cumbersome to be effective and redesigned the entire mechanism around flexible TPU filament, allowing him to ditch the springs in favor of indentations and buttons that snap into place without a dedicated spring mechanism.
The new design is modular, allowing many units to be connected to form longer trainers than just a single character. He’s also released his design under the Creative Commons public domain license, allowing anyone to make and distribute these tools as they see fit. The design also achieves his goal of dramatically reducing the price of these tools to essentially just the cost of filament, provided you have access to a 3D printer of some sort. If you need to translate some Braille writing and don’t want to take the time to learn this system, take a look at this robotic Braille reader instead.
If you want to program a microcontroller today, you pop open your editor of choice, bang out some code, and flash it over USB. But back in ancient times, when your editor was a piece of paper and you didn’t even have a computer of your own, things were a bit different. In that case, you might have reached for a “trainer”: a PCB that included the chip you wanted to program along with an array of switches, LEDs, and maybe even a hex keypad for good measure. Grab yourself the programming manual (printed on paper, naturally), and you’re good to go.
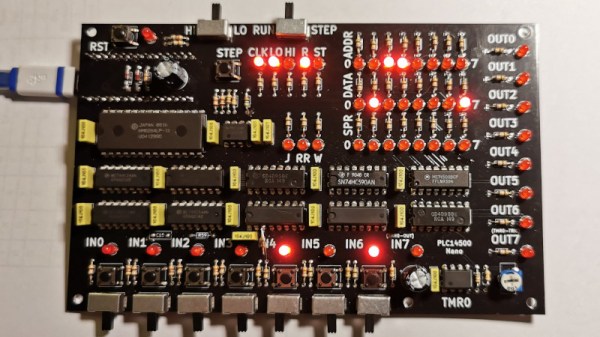
So when [Nicola Cimmino] became curious about the Motorola MC14500, a 1-bit ICU (Industrial Control Unit) from the 1970s, he could think of no more appropriate way to get up close and personal with the chip than to design an era-appropriate trainer for it. The resulting board, which he’s calling the PLC14500 Nano, is festooned with LEDs that show the status of the system buses and registers. Thanks to the chip’s single-step mode, this gives you valuable insight into what’s happening inside this piece of classic silicon.
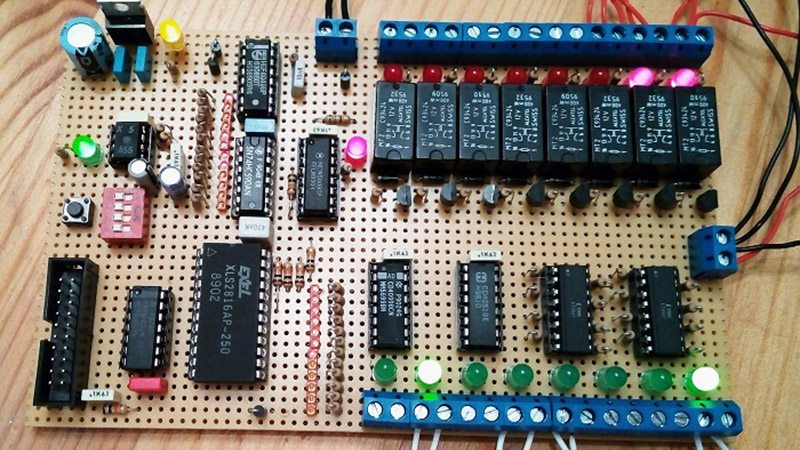
An early breadboard version of the trainer.
But just because the board looks like it could have come from the 1970s doesn’t mean you have to live in the past. There’s an Arduino Nano on the backside of the trainer that handles communicating with a modern computer. [Nicola] even provided an assembler that lets you write your code in ASM before shuttling the binary off to the board for execution.
Interested in getting your hands on one? Not a problem. The design is completely open source for anyone who wants to build one at home. In fact, [Nicola] even got his trainer OSHW Certified. He’s also selling kits on Tindie, though at the time of this writing, they’re sold out.
This project has actually been a long time coming. We covered an early breadboard prototype of the concept back in 2015. We’re glad to see that [Nicola] was finally able to bring this one across the finish line. It’s a beautiful piece of hardware, and thanks to its open-source nature, something that the whole community can enjoy and learn from.
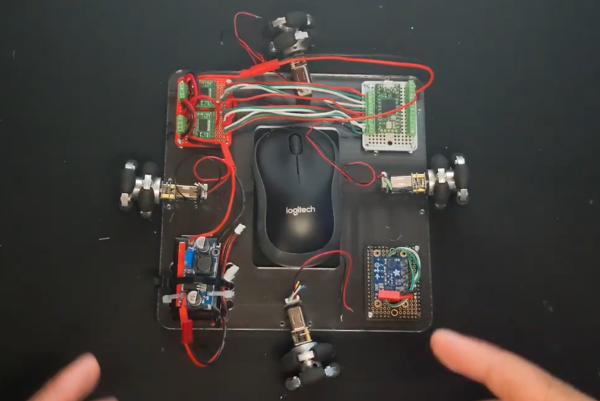
Anyone who has played an online shooter game in the past two or three decades has almost certainly come across a person or machine that cheats at the game by auto-aiming. For newer games with anti-cheat, this is less of a problem, but older games like Team Fortress have been effectively ruined by these aimbots. These types of cheats are usually done in software, though, and [Kamal] wondered if he would be able to build an aim bot that works directly on the hardware instead.
First, we’ll remind everyone frustrated with the state of games like TF2 that this is a proof-of-concept robot that is unlikely to make any aimbots worse or more common in any games. This is mostly because [Kamal] is training his machine to work in Aim Lab, a first-person shooter training simulation, and not in a real multiplayer videogame. The robot works by taking a screenshot of his computer in Python and passing the information through a computer vision algorithm which recognizes high-contrast targets. From there a PID controller is used to tell a series of omniwheels attached to the mouse where to point, and when the cursor is in the hitbox a mouse click is triggered.
While it might seem straightforward, building the robot and then, more importantly, tuning the PID controller took [Kamal] over two months before he was able to rival pro-FPS shooters at the aim trainer. It’s an impressive build though, and if one of his omniwheel motors hadn’t burned out it may have exceeded the top human scores on the platform. If you would like a bot that makes you worse at a game instead of better, though, head over to this build which plays Valorant by using two computers to pass game information between.
We know what you’re thinking: this is yet another one of those “Gut the retro gear for its cool old case and then fill it up with IoT junk” projects. Well, rest assured that extending and enhancing this 1970s computer trainer is very much an exercise in respecting the original design, and while there’s a Pi inside, it doesn’t come close to spoiling the retro goodness.
Like many of a similar vintage as [Scott M. Baker], the Heathkit catalog was perhaps only leafed through marginally less than the annual Radio Shack catalog. One particularly desirable Heathkit item was the ET-3400 microcomputer learning system, which was basically a 6800-based computer surrounded by a breadboarding area for experimentation. [Scott] got a hold of one of these, but without the optional expansion accessory that would allow it to do interesting things such as running BASIC or even supporting a serial port. So [Scott] decided to roll his own expansion board.
The expansion card that [Scott] designed is not strictly a faithful reproduction, at least in terms of the original BOM. He turned to more modern — and more readily available — components, but still managed to provide the serial port, cassette interface, and RAM/ROM expansion of the original unit. The Raspberry Pi is an optional add-on, which just allows him to connect wirelessly if he wants. The card fits into a 3D-printed case that sits below the ET-3400 and maintains the original trainer’s look and feel. The longish video below shows the build and gives a tour of the ET-3400, both before and after the mods.
It looks as though trainers like these and other artifacts from the early days of the PC revolution are getting quite collectible. Makes us wish we hadn’t thrown some things out.