Blinking LEDs On The Internet Of Printers

When you ask for recommendations on which 3D printer to buy, damn the cost, the Ultimaker is consistently at the top of the list. There’s a reason for the popularity of this printer — it’s easy to use, extremely high quality, and has an entire freakin’ Linux system running somewhere under the hood. That last bit is opening up a few doors to some interesting hacks, like using a 3D printer as an RGB LED.

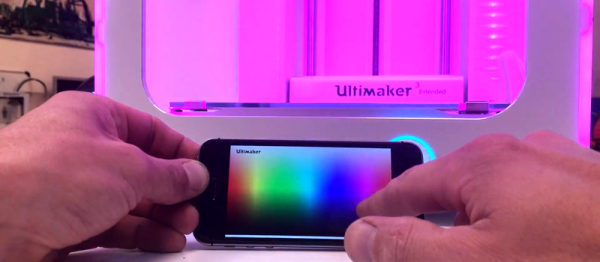
The Doodle3D team has been playing around with the Ultimaker API to see if they can make their software work with the Ultimaker printer. The Ultimaker has RGB LEDs, so obviously the simplest proof of concept in futzing around with an API is to blink a few LEDs. The actual code was written in HTML, JavaScript, and Node in just two hours. The author admits it’s ugly, but it works. Can’t go wrong with that.

While this is just a simple test of the Ultimaker API, it’s surprisingly high up on the Google results when you search, ‘Ultimaker API’. That’s a shame, because there’s a lot of power under the hood of this printer. If you have some sort of mod you’d like to throw into the ring, here’s the Hackaday Tip Line.

You can check out the demo video of this hack below.

Continue reading “Blinking LEDs On The Internet Of Printers”

3D Printed Door Latch Has One Moving Part – Itself!

A group at the Hasso-Plattner Institute in Germany explored a curious idea: using 3D printed material not just as a material – but as a machine in itself. What does this mean? The clearest example is the one-piece door handle and latch, 3D printed on an Ultimaker 2 with pink Ninjaflex. It is fully functional but has no moving parts (besides itself) and has no assemblies. In other words, the material itself is also the mechanism.

The video (embedded below) showcases some similar concept pieces: door hinges, a pair of pliers, a pair of walker legs, and a pantograph round out the bunch. Clearly the objects aren’t designed with durability or practicality in mind – the “pliers” in particular seem a little absurd – but they do demonstrate different takes on the idea of using a one-piece item’s material properties as a functional machine in itself.

Continue reading “3D Printed Door Latch Has One Moving Part – Itself!”

Tribed 3D Printer Configuration Doesn’t Ever Need To Be Leveled

[Jeremie Francois] has been thinking about ways to improve tool height adjustment and bed leveling in his 3D printer for a long time. His dream was to never ever think about Z height again. A dream that’s shared by many. These days, a lot of 3D printers have a mechanism for auto leveling in the software of the 3D printer. This works pretty well, but for various mechanical reasons, it’s better to have the bed itself be level.

[Jeremie]’s approach is pretty clever. Since you can define any plane mathematically with three points, he has three Z-axis lead screws. This lets him tilt the bed at any angle he likes. Once he had the mechanics in place, he added some force sensitive resistors, an Arduino, and wrote an extension for the popular Marlin firmware. That’s when the problems started.

It turns out that solidly mounting the bed to the resistors transmitted way too many vibrations. The solution was a layer of neoprene rubber. The neoprene also acts as a cushion, so the nozzle won’t break the glass bed during the leveling procedure.

The video after the break is a bit wavy, due to YouTube’s terrible auto-stabilizing software, but if you watch closely, you can see the system at work.

Continue reading “Tribed 3D Printer Configuration Doesn’t Ever Need To Be Leveled”

The 3D Printers Of CES

CES, the Consumer Electronics Show, is in full swing. That means the Hackaday tip line is filled to the brim with uninteresting press releases, and notices that companies from the world over will be at CES.

3D printing has fallen off the radar of people who worship shiny new gadgets of late, and this is simply a function of 3D printing falling into the trough of disillusionment. The hype train of 3D printing is stuck on a siding, people are bored, but this is the time that will shape what 3D printing will become for the next ten years. What fascinating news from the 3D printing industry comes to us from CES?

Continue reading “The 3D Printers Of CES”

Injecting SD Card Bootloaders

[Frank] has a Ultimaker2 and wanted to install a new bootloader for the microcontroller without having physical access to the circuitry. That means installing a new bootloader for the ATMega2560 without an In System Programmer, and as is usual on AVRs, the bootloader can only be edited with an ISP. Additionally, modifying the bootloader in any way runs the risk of corruption and a bricked circuit. That’s okay, because [Frank] knows how to do it, and he’s here to show you how.

You can think of the memory layout of the ATMega in the Ultimaker as being split in half, with the printer firmware in the first half and the bootloader in the second half. There’s extra space in both halves, and that’s something that comes in very useful. When the circuit powers up, it jumps to the bootloader, does it’s thing, then jumps to the very beginning of the application code – a vector table – that starts up the actual firmware.

[Frank]’s trick to adding on to the bootloader is to place the SD card bootloader in the space normally reserved for applications, not where you would expect to find a bootloader. This code is accessed by the stock bootloader jumping into a modified vector table at the beginning of the application data that points to new executable code. That code is the actual SD card bootloader, but because it is in the application part of the memory, it can’t perform Flash writing or erasing. To fix that, a tiny bit of code is tacked onto the end of the bootloader for performing Flash writes and jumps back to the application part of memory.

Hackaday Links Column Banner

Hackaday Links: March 8, 2015

Nintendo is well known for… odd… hardware integration, but this video takes it to a new level. It’s a Gamecube playing Zelda: Four Swords Adventure, a game that can use a Game Boy Advance as a controller. [fibbef] is taking it further by using the Gamecube Game Boy Advance player to play the game, and using another GBA to control the second Gamecube. There’s also a GBA TV tuner, making this entire setup a Gamecube game played across two Gamecubes, controlled with a Game Boy Advance and displayed on a GBA with a TV tuner. The mind reels.

TI just released a great resource for analog design. It’s the Analog Engineer’s Pocket Reference, free for download, if you can navigate TI’s site. There are print copies of this book – I picked one up at Electronica – and it’s a great benchtop reference.

A few months ago, a life-size elephant (baby elephants are pretty small…) was 3D printed at the Amsterdam airport. A model of the elephant was broken up into columns about two meters tall. How did they print something two meters tall? With this add-on for a Ultimaker. It flips an Ultimaker upside down, giving the printer unlimited build height. The guy behind this – [Joris van Tubergen] – is crazy creative.

And you thought TV was bad now. Here’s the pitch: take a show like Storage Wars or American Pickers – you know, the shows that have people go around, lowball collectors, and sell stuff on the Internet – and put a “Tech” spin on it. This is happening. That’s a post from a casting producer on the classic cmp message boards. Here’s the vintage computer forums reaction. To refresh your memory, this is what happens when you get ‘tech’ on Storage Wars. Other examples from Storage Wars that include vastly overpriced video terminals cannot be found on YouTube. Here’s a reminder: just because it’s listed on eBay for $1000 doesn’t mean it’ll sell on eBay for $1000.

PS4 NES

Add Extra Storage To Your PS4 With Retro Flair

[Frank] came up with a clever way to extend the storage of his PS4. He’s managed to store his digital PS4 games inside of storage devices in the shape of classic NES cartridges. It’s a relatively simple hack on the technical side of things, but the result is a fun and interesting way to store your digital games.

He started out by designing his own 3D model of the NES cartridge. He then printed the cartridge on his Ultimaker 3D printer. The final print is a very good quality replica of the old style cartridge. The trick of this build is that each cartridge actually contains a 2.5″ hard drive. [Frank] can store each game on a separate drive, placing each one in a separate cartridge. He then prints his own 80’s style labels for these current generation games. You would have a hard time noticing that these games are not classic NES games at first glance.

Storing the game in cartridge form is one thing, but reading them into the PS4 is another. The trick is to use a SATA connector attached to the PS4’s motherboard. [Frank’s] project page makes it sound like he was able to plug the SATA cable in without opening the PS4, by attaching the connector to a Popsicle stick and then using that to reach in and plug the connector in place. The other end of the SATA cable goes into a custom 3D printed housing that fits the fake NES cartridges. This housing is attached to the side of the PS4 using machine screws.

Now [Frank] can just slide the cartridge of his choice into the slot and the PS4 instantly reads it. In an age where we try to cram more and more bits into smaller and smaller places, this may not be the most practical build. But sometimes hacking isn’t about being practical. Sometimes it’s simply about having fun. This project is a perfect example. Continue reading “Add Extra Storage To Your PS4 With Retro Flair”