Bringing The Hinge To A 1990s Game Boy

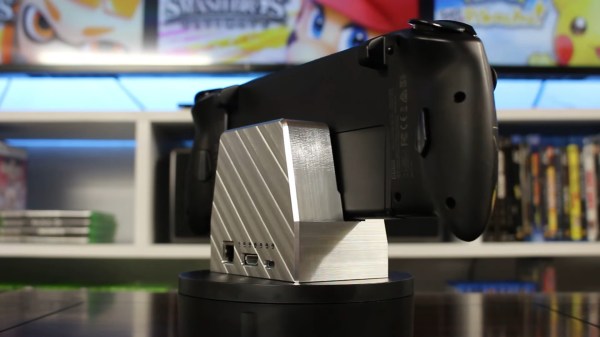
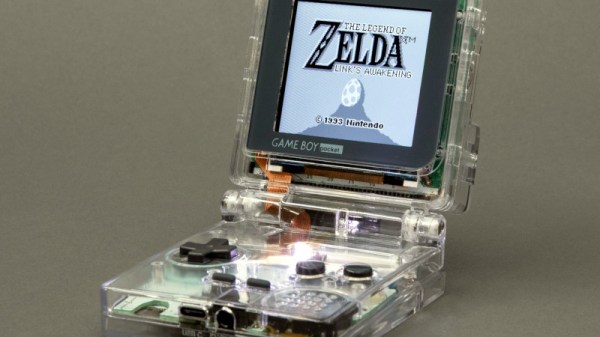
The new hotness in mobile phones is it seems a hinge, and an ever-so-fragile flexible LCD display. There’s nothing new in a hinge of course, a couple of decades ago they were all the rage in feature phones, and of course Nintendo got in on the act with the ever-so-cute Game Boy Advance SP. This hinged design caught the attention of [Allison Parrish], who has brought it to an earlier generation of Game Boy with the Game Boy Pocket SP. It’s a late-1990s Game Boy Pocket whose PCB has been carefully cut in half, in a custom case that looks for all the world like the hinged case of the Advance SP.

The case is a neat bit of CAD work very nicely 3D printed and fitted with a set of Advance SP hinges, but perhaps the neatest part of this build is the se of a set of flexible PCBs to connect the two halves of the unit together. This looks for all the world as though it came this way from the factory, which is an achievement above many console mods.

The whole thing is a little lumpy compared to the SP to make space for the Pocket’s full-size cartridge, but not so much as to make it ugly. Any 1990s kid with one of these would have been the envy of all their classmates!

You may not be surprised to know that this isn’t the first respin of a Nintendo console into an SP-style case.

Robot Gets A Life-Sized Pokemon Costume For Halloween

Quadruped robots are everywhere now that companies like Boston Dynamics are shipping smaller models in big numbers. [Dave’s Armoury] had one such robot, and wanted to give it a Pokemon Halloween costume. Thus, the robot dog got a Jolteon costume that truly looks fantastic. (Video, embedded below.)

You would think that covering a quadruped robot in foam would ruin it, but somehow it didn’t stop it moving too badly at all.

The robot in question is a Unitree Go1, which [Dave] had on loan from InDro robotics. Thus, the costume couldn’t damage or majorly alter the robot in any way. Jolteon was chosen from the original 150 Pokemon as it had the right proportions to suit the robot, and its electric theme fitted [Dave’s] YouTube channel.

A  3D model of Jolteon was sourced online and modified to create a printable head for the robot application. Two 3D printers and 200 hours of printing time later, and [Dave] had all the parts he needed. Plenty of CA glue was used to join all the parts together with some finishing required to make sure seams and edges didn’t spoil the finish too much. Wood filler and spray paint were used to get the costume looking just like the real Pokemon. Continue reading “Robot Gets A Life-Sized Pokemon Costume For Halloween”

An M1 Mac mini sits next to a white Wii on a wooden table. In the background are various Edison-style LED light fixtures with an incadescent-like light profile.

This Wii Has An Apple M1 Inside

The conveniently tiny logic board of the M1 Mac mini has lead to it giving the Mini ITX format a run for its money in case mods. The latest example of this is [Luke Miani]’s M1 Wii. (Youtube via 9to5Mac)

[Miani] chose the Wii as a new enclosure for this Mac mini given its similar form factor and the convenient set of doors in the top to maintain access to the computer’s I/O, something he wasn’t able to do with one of his previous M1 casemods. The completed build is a great stealth way to have a Mac mini in your entertainment center. [Miani] even spends the last several minutes of the video showing the M1 Wii running Wii, GameCube, and PS2 games to really bring it full circle.

A Microsoft Surface power brick was spliced into the original Wii power cable since the Wii PSU didn’t have enough wattage to supply the Mac mini without significant throttling. On the inside, the power runs through a buck converter before making its way to the logic board. While the Mini’s original fan was too big to fit inside the Wii enclosure, a small 12V fan was able to keep performance similar to OEM and much higher than running the M1 fanless without a heat spreader.

If you’d like to see some more M1 casemods, check out this Lampshade iMac or the Mac Mini Mini.

Continue reading “This Wii Has An Apple M1 Inside”

How Those NES DIP Chips Were Reduced To QFNs

The world of console modding leads us to some extremely impressive projects, and a recent one we featured of note was a portable NES produced by [Redherring32]. It was special because the original NES custom DIP chips had been sanded down to something like a surface-mount QFN package. Back when our colleague [Arya] wrote up the project there wasn’t much information, but since then the full details have been put up in a GitHub repository. Perhaps of most interest, it includes a full tutorial for the chip-sanding process.

To take irreplaceable classic chips and sand them down must take some guts, but the premise is a sound enough one. Inside a DIP package is a chip carrier and a web of contact strips that go to the pins, this process simply sands away the epoxy to expose those strips for new contacts. The result can then be reflowed as would happen with any QFN, and used in a new, smaller NES.

Along the way this provides a fascinating insight into DIP construction that most of us never see. If any of you have ever managed to fatigue a pin off a DIP, you’ll also no doubt be thinking how the technique could be used to reattach a conductor.

You can read our original coverage of the project here.

Old CRT Television playing Luigi's Mansion on a rusted out bike (Original Photo by Anete Lusina)

Luigi’s Mansion First Person Mod Brings Spooky New Perspective

The Nintendo GameCube in many ways defied expectations. It was purple, it had buttons shaped like beans, and it didn’t launch with a Mario game. What we got instead was the horror-adjacent ghost adventure game starring Mario’s brother — Luigi’s Mansion. The game was a graphical showpiece for the time, however, the camera angles were all fixed like an early Resident Evil game. Not satisfied with playing within those bounds, modder [Sky Bluigi] created a first person camera patch for the game that finally let players see why Luigi was so freaked out all the time.

The patch dubbed Luigi’s Mansion FPO (First Person Optimized) does a lot to drive home the game’s child-friendly, spooky aesthetic. Along with the ability to explore environments with a new lens, it provides the ability to turn the flashlight on and off manually if you want. Though the most impressive part of Luigi’s Mansion FPO is that it runs on real hardware. All that’s needed to play the mod is clean image of the North American release of Luigi’s Mansion and a .xdelta patching utility like Delta Patcher. GameCube games can be ripped directly to a USB thumb drive using a soft-modded Nintendo Wii console running Clean Rip or similar backup tool.

Luigi’s Mansion FPO actually provides a collection of patches that offer revised controls and increased field of view depending on which patch is used. The original game had inverted controls for aiming Luigi’s ghost vacuum, so the “Invert C-Stick Controls” patch will install a more modern aiming scheme where up on the right stick will aim upwards and vice versa. The “Better FOV” pulls the camera a little further back from where Luigi’s head would be while the original aiming scheme is retained. Though no matter which patch you decide to go with, a mod like this is always a good excuse to revisit a cult classic.

For another fresh GameCube mod check out this post about a Raspberry Pi Pico based modchip for the system.

Continue reading Luigi’s Mansion First Person Mod Brings Spooky New Perspective”

Back of the dock shown. You can see that the dock is milled out of a massive chunk of aluminium, and you can see the charging, HDMI and Ethernet ports being accessible on the back.

Nintendo Switch Stock Dock Imperfect? Mill Your Own!

Despite the seat of honor it enjoys in literally millions of households, the official Nintendo Switch Dock is certainly far from perfect. For one, it’s not milled out of a hefty block of aluminum. A less apparent but no less important issue is that the ports are positioned kind of awkward – [Kevin] from Modified believes that the USB ports should be facing the front side, while the HDMI, Ethernet, and charging inputs should be on the backside — a reasonable position. He set out to fix both of these problems at the same time, and tells us the CNC-heavy rebuild story in a short but captivating video.

The original dock consists of two PCBs, and these two boards are the only thing [Kevin] didn’t redesign from scratch. As they’re connected with a flexible cable, he could freely rotate and thus completely reposition the ports-equipped board without soldering. He added some standoffs to secure this board to the case, and after 3D printing a few iterations for test-fitting, the milling went on for all of us to marvel at.

The resulting dock is pretty, functional, and even has some extra features — for instance, the “i” in the embossed Nintendo logo lights up when the dock is in use. In no small part due to the Nintendo logo, we don’t expect this one to grace store shelves, but we hope that it provides inspiration to other makers to do their builds. If you like this rebuild and crave more, whether you’re looking for inspiration, CNC work insights, or pretty milling videos, [Kevin]’s milled Xbox case project is an excellent “Watch next” choice.

Continue reading “Nintendo Switch Stock Dock Imperfect? Mill Your Own!”

Picture showing the way the cut-down piece of chip is soldered onto the mainboard - looking, indeed, like a QFN package.

Making A Handheld NES By Turning DIP Chips Into…QFN?

You can achieve a lot with a Dremel. For instance, apparently you can slim the original NES down into the hand-held form-factor. Both the CPU and the PPU (Picture Processing Unit) are 40-pin DIP chips, which makes NES minification a bit tricky. [Redherring32] wasn’t one to be stopped by this, however, and turned these DIP chips into QFN-style-mounted dies (Nitter) using little more than a Dremel cutting wheel. Why? To bring his TinyTendo handheld game console project to fruition, of course.

DIP chip contacts go out from the die using a web of metal pins called the leadframe. [Redherring32] cuts into that leadframe and leaves only the useful part of the chip on, with the leadframe pieces remaining as QFN-like contact pads. Then, the chip is mounted onto a tailored footprint on the TinyTendo PCB, connected to all the other components that are, thankfully, possible to acquire in SMD form nowadays.

This trick works consistently, and we’re no doubt going to see the TinyTendo being released as a standalone project soon. Just a year ago, we saw [Redherring32] cut into these chips, and wondered what the purpose could’ve been. Now, we know: it’s a logical continuation of his OpenTendo project, a mainboard reverse-engineering and redesign of the original NES, an effort no doubt appreciated by many a NES enthusiast out there. Usually, people don’t cut the actual chips down to a small size – instead, they cut into the mainboards in a practice called ‘trimming’, and this practice has brought us many miniature original-hardware-based game console builds over these years.

Continue reading “Making A Handheld NES By Turning DIP Chips Into…QFN?”