The Pinouts Book Is Here, And It’s Just What You Need

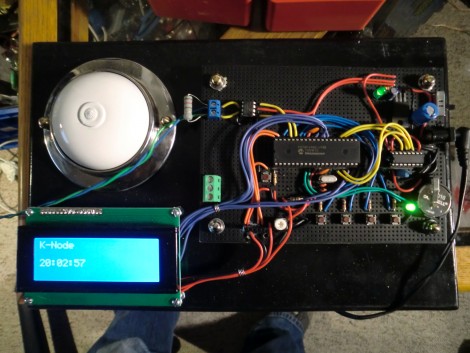
Updates from the enigmatic [NODE] are unfortunately few and far between these days. In fact his latest post is only the second time we’ve heard from the hacker in 2021. But as we’ve come to expect from his white-on-sorta-black releases, it certainly doesn’t disappoint.

Just in time to ring in whatever holiday you may celebrate, [NODE] has unveiled The Pinouts Book. A project he’s been working on for some time now with colleague [Baptiste], the free PDF download contains over 300 pages of high-contrast hardware diagrams and their respective pinouts. It’s about as straightforward as you can get, beyond the dedication page in the beginning, there’s not a word of fluff in the entire document. This is a work of hacker minimalism at its best, and we’re all about it.

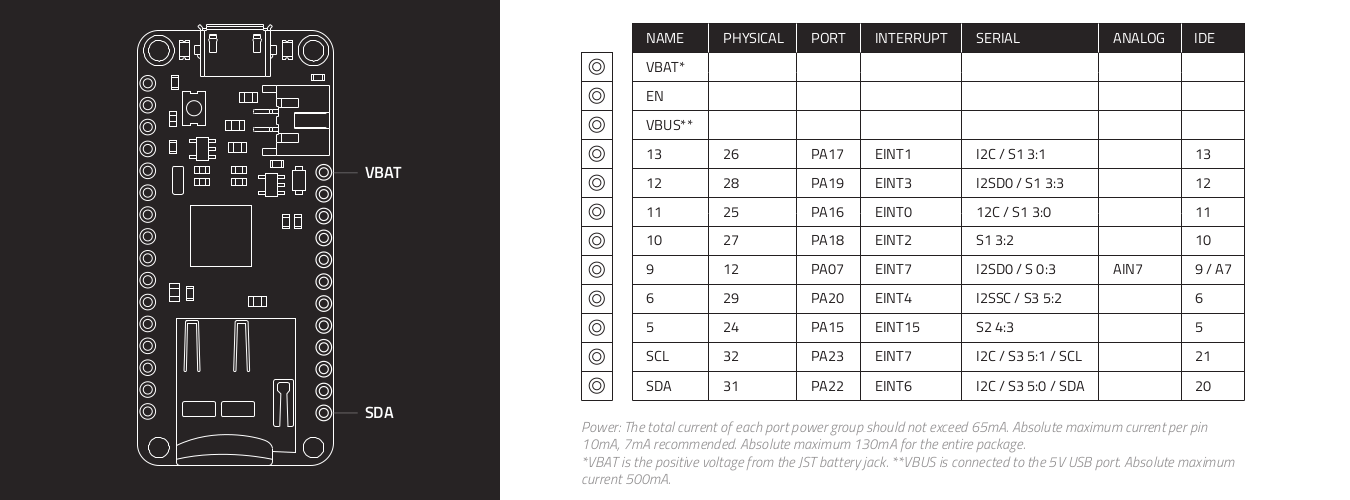
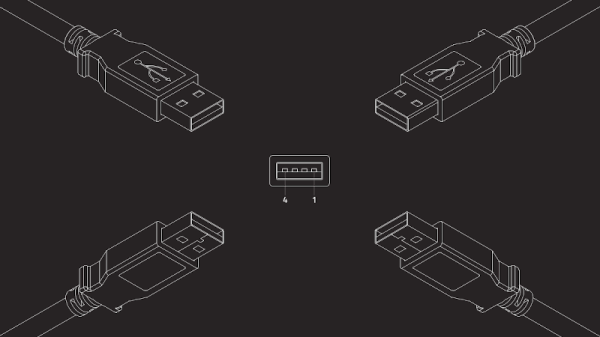
From audio/video connectors all the way to development boards and single-board computers, The Pinouts Book sticks to the same format of a diagram and accompanying chart, making it exceptionally easy to find what you’re looking for. If you need more information than this streamlined layout can provide, each entry includes a link to a dedicated page on the book’s companion website. This will redirect you to supplemental data such as the manufacturer’s website, the part’s full datasheet, etc.

According to [NODE], the original plan for the Creative Commons BY-SA licensed work was to release it as a physical book, but the project ballooned up to such a scale that they realized it would be much easier to navigate and use as a digital document. While we don’t disagree, a physical release would certainly look lovely on our bookshelf. In the meantime, those who want to support the effort financially can purchase shirts emblazoned with diagrams pulled straight from the book’s pages.

We’ve long believed that a large-format electronic paper device would be an ideal gadget for the hacker’s workbench, as it allows for browsing through schematics and datasheets with a minimum of eye strain. Now we can also add a copy of The Pinouts Book to the list of things we’d install on our hacker-friendly e-ink compendium.

Continue reading The Pinouts Book Is Here, And It’s Just What You Need”

Voice-Controlled Smart Home From The Foundation Up

Smart homes are becoming an increasingly popular way to automate one’s home, whether it’s turning on lights, closing blinds, or even feeding pets. But the commercial offerings often rely on an internet connection to reach servers in order to work, which invites a lot of privacy concerns for a large percentage of us as well as being inconvenient when the internet is down. Essentially the only way to have a privacy-respecting, self-sufficient smart home is to build one on your own from the ground up, which is exactly what [Xasin] has done with this project.

This build is based on ESP32 modules with a Raspberry Pi as a hub, but it’s not as simple as a MQTT implementation. Not only does the self-contained home automation setup not rely on any outside services, but a failure of the central Pi server will not impact the nodes either as they are configured to continue operating independently even without central control. This allows for a robust home automation implementation without a single point of failure, and also includes some other features that are helpful as well including voice control, all while retaining a core design philosophy that makes it relatively easy to build.

Not only is the build technologically impressive for its standalone capabilities and its elimination of privacy concerns, but [Xasin] also did an excellent job with the physical design as well, adding plenty of RGB and a hexagonal enclosure that gives it a unique look wherever its is placed. If you’re renting right now or otherwise unable to interface any automation with your current home, be sure to take a look at some projects that do home automation without making any permanent changes.

Continue reading “Voice-Controlled Smart Home From The Foundation Up”

An Elegant Modular Enclosure System For The Raspberry Pi 4

[NODE] has been experimenting with Raspberry Pi servers and mini computers for a long time, and knows all too well how the wiring can quickly turn into a rat’s nest. His latest creation is  the Mini Server version 3, a modular enclosure system for the Raspberry Pi 4, is designed to turn it into practical computing box.

The basic enclosure is a 92 mm x 92 mm x 26 mm 3D printed frame with a custom PCB top cover. One of the main goals was to collect all the major connectors on one side and make the micro SD slot easily accessible. To do this [NODE] created a set of custom PCB adaptors to route the USB-C and an HDMI port to the same side as the other USB ports, and move the micro SD slot to the bottom of the enclosure. A low profile adaptor was also designed to connect a mSATA SSD to one of the USB 3 ports, and there is space inside the enclosure for one or two cooling fans. Unlike previous version of the mini server, no hardware modifications are required on the Pi itself.

The only downside that we can see is that it doesn’t allow external access to the GPIO ports, but the entire project is open source specifically to allow people to make their own modifications.

[NODE] is a big fan of turning Raspberry Pis into custom computing devices, ranging from small terminal devices and pocket servers, to complete laptops.

What Does GitHub’s Npm Acquisition Mean For Developers?

Microsoft’s open-source shopping spree has claimed another victim: npm. [Nat Friedman], CEO of GitHub (owned by Microsoft), announced the move recently on the GitHub blog.

So what motivated the acquisition, and what changes are we likely to see as a result of it? There are some obvious upsides and integrations, but these will be accompanied by the usual dose of skepticism from the open-source community. The company history and working culture of npm has also had its moments in the news, which may well have contributed to the current situation. This post aims to explore some of the rationale behind the acquisition, and what it’s likely to mean for developers in the future.

Continue reading “What Does GitHub’s Npm Acquisition Mean For Developers?”

Turning That Old Hoverboard Into A Learning Platform

[Isabelle Simova] is building Hoverbot, a flexible robotics platform using Ikea plastic trays, JavaScript running on a Raspberry Pi and parts scavenged from commonly available hoverboards.

Self-balancing scooters a.k.a. Hoverboards are a great source of parts for such a project. Their high torque, direct drive brushless motors can drive loads of 100 kg or more. In addition, you also get a matching motor controller board, a rechargeable battery and its charging circuit. Most hoverboard controllers use the STM32F103, so flashing them with your own firmware becomes easy using a ST-link V2 programmer.

The next set of parts you need to build your robot is sensors. Some are cheap and easily available, such as microphones, contact switches or LDRs, while others such as ultrasonic distance sensors or LiDAR’s may cost a lot more. One source of cheap sensors are car parking assist transducers. An aftermarket parking sensor kit usually consists of four transducers, a control box, cables and display. Using a logic analyzer, [Isabelle] shows how you can poke around the output port of the control box to reverse engineer the data stream and decipher the sensor data. Once the data structure is decoded, you can then use some SPI bit-banging and voltage translation to interface it with the Raspberry Pi. Using the Pi makes it easy to add a cheap web camera, microphone and speakers to the Hoverbot.

Ikea is a hackers favourite, and offers a wide variety of hacker friendly devices and supplies. Their catalog offers a wide selection of fine, Swedish engineered products which can be used as enclosures for building robots. [Isabelle] zeroed in on a deep, circular plastic tray from a storage table set, stiffened with some plywood reinforcement. The tray offers ample space to mount the two motors, two castor wheels, battery and the rest of the electronics. Most of the original hardware from the hoverboard comes handy while putting it all together.

The software glue that holds all this together is JavaScript. The event-driven architecture of Node.js makes it a very suitable framework to use for Hoverbot. [Isabelle] has built a basic application allowing remote control of the robot. It includes a dashboard which shows live video and audio streams from the robot, buttons for movement control, an input box for converting text to speech, ultrasonic sensor visualization, LED lighting control, message log and status display for the motors. This makes the dashboard a useful debugging tool and a starting point for building more interesting applications. Check the build log for all the juicy details. Which other products from the Ikea catalog can be used to build the Hoverbot? How about a robotic Chair?

Continue reading “Turning That Old Hoverboard Into A Learning Platform”

Quick And Easy IoT Prototyping With Involt

IoT, web apps, and connected devices are all becoming increasingly popular. But, the market still resembles a wild west apothecary, and no single IoT ecosystem or architecture seems to be the one bottle of snake oil we’ll all end up using. As such, we hackers are keen to build our own devices, instead of risking being locked into an IoT system that could become obsolete at any time. But, building an IoT device and interface takes a wide range of skills, and those who are lacking skill in the dark art of programming might have trouble creating a control app for their shiny new connected-thing.

Enter Involt, which is a framework for building hardware control interfaces using HTML and CSS. The framework is built on Node-Webkit, which means the conventions should be familiar to those with a bit of web development background. Hardware interactions (on Arduinos) are handled with simple CSS classes. For example, a button might contain a CSS class which changes an Arduino pin from high to low.

Involt can take that CSS and convert it into a function, which is then sent to the Arduino via serial or Bluetooth communication. For more advanced functionality, Javascript (or really any other language) can be used to define what functions are generated — and, in turn, sent to the Arduino. But, all that is needed for the basic functionality necessary for many IoT devices (which might only need to be turned on and off, or set to a certain value) is a bit of HTML and CSS knowledge. You’ll create both the interface and the underlying hardware interactions all within an HTML layout with CSS styling and functionality.

While Involt isn’t the only framework to simplify hardware interaction (it’s not even the only Node.js based method), the simplicity is definitely laudable. For those who are just getting started with these sorts of devices, Involt can absolutely make the process faster and less painful. And, even for those who are experienced in this arena, the speed and efficiency of prototyping with Involt is sure to be useful.

CAN Bus For Home Automation

Here’s one node on the new home automation system on which [Black Rynius] is working. So far he’s testing out the system with just two nodes, but plans to build more as the project progresses. He’s chosen to use the CAN bus for communications; a protocol which is most commonly found in automotive applications.

The biggest plus about using the CAN bus is that it requires just one pair of wires for communications. As you can see, there’s an old doorbell included on this board and he’s hoping to use the existing doorbell wire to connect between nodes. Each unit includes a PIC 18F4580 which has a CAN engine built into it for easy protocol translation. There is also an MCP2551 which handles the transmissions. You can read a bit more about the hardware choices in his breadboarding post.

So far almost everything is working as planned. He’s able to send and receive data between the two boards including temperature from a sensor and time from a DS1305 RTC chip. The one thing that vexes him is that doorbell. It draws too much current for the wall wart that’s powering the board, browning out the microcontroller and causing a reset. That’s not a hard fix and we look forward to more developments in the near future.

[via Dangerous Prototypes]