Ballpoint Switch Is Oh-So Satisfying

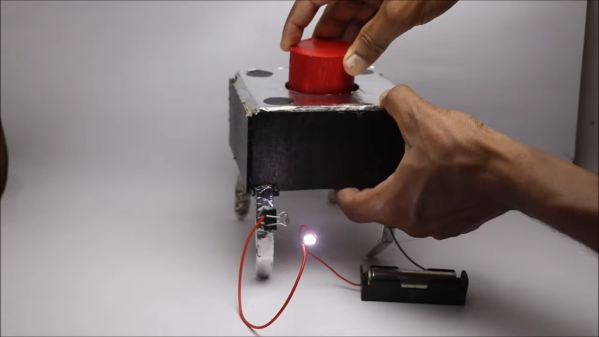
Alright, here’s your quick and dirty hack for the day. The astute among you may recall [Peter Waldraff]’s bookshelf train build of a few days ago, and the fact that he used a switch made from a dead ballpoint pen to light up the scene. Fortunately, [Peter] wrote in to give us the details of this low-voltage sub-build, which you can see in the video after the break.

Essentially, [Peter] starts by making a shortened version of the pen. He modifies nearly every bit of it, including cutting down the ink cartridge, so if you try this, make sure the thing is all dried up first. Then, as he is screwing the point holder back on the barrel, he wraps elastic cord around the inside barrel in lieu of having sewing thread lying around. This cord along with some hot glue will hold a pair of paper clips to the sides of the point holder. When the pen is clicked into the writing position, it makes a connection between the paper clips and closes the circuit on whatever is wired into it.

What types of little hacks like this have gotten you through the build? Let us know in the comments, or better yet, write it up and drop us a tip. By the way, here is that bookshelf train build in case you missed it.

Continue reading “Ballpoint Switch Is Oh-So Satisfying”

Increasing System Memory With The Flick Of A Switch

There’s an apocryphal quote floating around the internet that “640K ought to be enough memory for anybody” but it does seem unlikely that this was ever actually said by any famous computer moguls of the 1980s. What is true, however, is that in general more computer memory tends to be better than less. In fact, this was the basis for the Macintosh 512k in the 1980s, whose main feature was that it was essentially the same machine as the Macintosh 128k, but with quadruple the memory as its predecessor. If you have yet to upgrade to the 512k, though, it might be best to take a look at this memory upgrade instead.

The Fat Mac Switcher, as it is called by its creator [Kay Koba], can upgrade the memory capability of these retro Apple machines with the simple push of a switch. The switch and controller logic sit on a separate PCB that needs to be installed into the computer’s motherboard in place of some of the existing circuitry. The computer itself needs its 16 memory modules replaced with 41256 DRAM modules for this to work properly though, but once its installed it can switch seamlessly between 512k and 128k modes.

Another interesting quirk of the retro Macintosh scene is that the technically inferior 128k models tend to be valued higher than the more capable 512k versions, despite being nearly identical otherwise. There are also some other interesting discussions on one of the forum posts about this build as well. This module can also be used in reverse; by installing it in a Macintosh 512k the computer can be downgraded to the original Macintosh 128k. For this the memory modules won’t need to be upgraded but a different change to the motherboard is required.

A product like this certainly would have been a welcome addition in the mid 80s when these machines were first introduced, since the 512k was released only months after the 128k machines were, but the retrocomputing enthusiasts should still get some use out of this device and be more able to explore the differences between the two computers. If you never were able to experience one of these “original” Macintosh computers in their heyday, check out this fully-functional one-third scale replica.

Big Tactile Button Is Silly But Cool

Every hacker is familiar with those teeny little tactile buttons that are so enjoyable to click over and over again. [ROBO HUB] has built a giant version as a tribute, and it works just like the real thing!

The giant button has been scaled up 20 times compared to the original. For simplicity’s sake, [ROBO HUB] designed this replica to use materials readily available around the home. Thanks to its cardboard construction, it’s easy to replicate with a minimum of tools. One need merely cut out the various sections before assembling them together with hot glue, with popsicle sticks serving as the legs. A juice bottle is used as the primary button itself, with aluminium foil serving as the contacts and rubber bands standing in for the spring.

It’s not the most useful button, given that it it’s quite fragile and has a weak spring return. However, it would be a great teaching tool to show students exactly what’s going on inside an actual button. As a bonus, it looks like it would be remarkably fun to pound on to activate some kind of massive air horn. Just an idea.

Continue reading “Big Tactile Button Is Silly But Cool”

Homebrew Telephone Exchange Keeps The Family In Touch, In The House And Beyond

It doesn’t happen often, but every once in a while we stumble upon someone who has taken obsolete but really cool phone-switching equipment and built a private switched telephone in their garage or basement using it. This private analog phone exchange is not one of those, but it’s still a super cool build that’s probably about as ambitious as getting an old step-by-step or crossbar switch running.

Right up front, we’ll stipulate that there’s absolutely no practical reason to do something like this. And hacker [Jon Petter Skagmo] admits that this is very much a “because I can” project. The idea is to support a bunch of old landline phones distributed around the house, and beyond, in a sort of glorified intercom system. The private exchange is entirely scratch-built, with a PIC32 acting as the heart of the system, performing such tasks as DTMF decoding, generating ring voltage, and even providing a CAN bus interface to his home automation system.

The main board supports five line interface daughterboards, which connect each phone to the switch via an RJ11 jack. The interface does the work of detecting when a phone goes off-hook, and does the actual connection between any two phones. A separate, special interface card provides an auto-patch capability using an RDA1846S RF transceiver module; with it, [Jon Petter] can connect to any phone in the system from a UHF handy-talkie. Check out the video below for more on that — it’s pretty neat!

We just love everything about this overengineered project — it’s clearly a labor of love, and the fit and finish really reflect that. And even though it’s not strictly old school, POTS projects like this always put us in the mood to watch the “Speedy Cutover” video one more time.

Continue reading “Homebrew Telephone Exchange Keeps The Family In Touch, In The House And Beyond”

Custom Calculator Brings Us Back To The 70s

There are certain design aesthetics from every era that manage to survive the fads of their time and live throughout history. Ancient Greek architecture is still drawn upon for design inspiration in modern buildings, the mid-century modern style from the 60s still inspires various designs of consumer goods, and the rounded, clean looking cars from the 90s are still highly desirable qualities in automotive design. For electronics, though, we like this 70s-inspired calculator that [Aaron] recently built.

The calculator hearkens back to the days of calculators like the HP-29C with its large buttons and dot-matrix display. [Aaron] built the case out of various woods with a screen angled towards the user, and it uses a LCD display similar to those found in antique calculators. The brain of the calculator is an Arduino which fits easily into the case, and [Aaron] also built the keyboard from scratch with Cherry MX-style mechanical keys soldered together into a custom shape.

The software to run the calculator is fairly straightforward, but we are most impressed with the woodworking, styling, and keyboard design in this build. [Aaron] is also still ironing out some bugs with the power supply as it uses a DC-DC converter to power the device from a single lithium battery. For those who are more fond of early 2000s graphing calculators instead, be sure to take a look at this graphing calculator arcade cabinet.

Continue reading “Custom Calculator Brings Us Back To The 70s”

Surprisingly Stomp-able Soft Switches

Competition sure brings out the brute in people, doesn’t it? So what do you do when you need a bunch of switches you can let people fist-pound or stomp on repeatedly without them taking damage? You could look to the guitar pedal industry and their tough latching switches, or you could simply build your own smash-resistant buttons as [wannabemadsci] has done.

The main thing about these switches is that they aren’t easily destroyed by shoes or angry fists. That’s because the shiny red push-me part of the button is made by cutting a foam ball in half.

Not easily crush-able Styrofoam, mind you — squishy, coated foam like an indoor football. This is mounted to the top of a sandwich made of hardboard and a couple pieces of easily-compressible foam from craft paintbrushes.

A brass washer is mounted to the middle of both pieces of hardboard, and these have wires soldered to them to read button presses. Then it’s just a matter of hooking it to a microcontroller like any other momentary.

There are all kinds of things you could cut in half for the top, like maybe tennis balls. Or, do what [Sprite_TM] did and use inverted plastic bowls.

Custom Macro Keyboard With Sweet Backlighting

From the smallest 60% keyboards for those with no desk space to keyboards with number pads for those doing data entry all day, there’s a keyboard size and shape for just about everyone. The only problem, even with the largest keyboards, is that they’re still fairly limited in what they can do. If you find yourself wishing for even more functionality, you might want to build something like this custom macro keyboard with built-in LED backlighting.

Rather than go with a standard mechanical keyboard switch like a Cherry MX, this build is based around TS26-2 pushbuttons with built-in LED lighting. [atkaper] only really needed one button for managing the mute button on MS Teams, but still built a total of eight switches into this keyboard which can all be individually programmed with different functions. The controller is an Arduino Leonardo and the enclosure was 3D printed.

Paired with the classic IBM Model M keyboard, this new macro keyboard adds plenty of functionality while also having control over LED backlighting. Macro keyboards are incredibly useful, especially with their ability to easily change function with control over the software that runs on them. The key to most builds is the 32U4 chip found in some Atmel microcontrollers which allows it to easily pass keyboard (and mouse) functionality to any computer its plugged in to.