A Handheld CNC Router

Over the last few years, the state of the art in handheld routers has been tucked away in the back of our minds. It was at SIGGRAPH in 2012 and we caught up to it at Makerfair last year. Now, it’s getting ready for production.

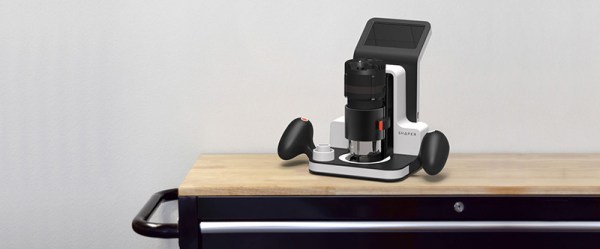
Originally called Taktia, the Shaper router looks a lot like a normal, handheld router. This router is smart, though, with the ability to look at a work piece marked with a tape designed for computer vision and slightly reposition the cutter in response to how the user is moving it. A simple description doesn’t do this tool justice, so check out the video the Shaper team recently uploaded.

With the user moving the Shaper router over a work piece and motors moving the cutter head, this tool is able to make precision cuts – wooden gears and outlines of the United States – quickly, easily, and accurately. Cutting any shape is as easy as loading a file into Shaper, calling that file up on a touch screen display, and turning on the cutter. Move the router around the table, and the Shaper takes care of the rest.

Accuracy, at least in earlier versions, is said to be on the order of a hundredth of an inch. That’s good enough for wood, like this very interesting bit of joinery that would be pretty hard with traditional tools. Video below.

Thanks [martin] for the tip.

Continue reading “A Handheld CNC Router”

The Three Dollar Frequency Standard

[Paulie] over on the EEVBlog forums picked up an inexpensive frequency counter on eBay and realized it was just a little bit off. As a result, he decided to build a frequency standard. His build wound up costing him about $3 and he shared the design and the software for it.

The hardware design is very simple: a TCXO (also from eBay), an ATMega8, a pushbutton, and a AA battery with DC to DC converter to power the whole thing. The software does all the work, providing frequencies from 10MHz down to a few hundred hertz (including some common audio test frequencies).

If you haven’t worked with a TCXO before, it is a crystal oscillator that includes a temperature compensation circuit to pull the crystal frequency up or down depending on temperature. Although crystal oscillators are pretty accurate already, adding this temperature compensation improves accuracy over the design temperature dramatically (typically, 10 to 40 times better than a naked crystal oscillator). If you want to learn more about TCXOs, here’s a good write-up.
A TCXO isn’t as good as an OCXO (where the first O stands for Oven). However, OCXOs cost more, are larger, and drain batteries (after all, it is running an oven). You can even hack your own OCXO, but it is going to cost more than $3.

If you want to see the real guts of one TCXO, check out the video.

Continue reading “The Three Dollar Frequency Standard”

Hackaday Prize Entry: Smart Low Voltage Lighting

A common theme around Internet of Things things is connecting a relay to the web. It’s useful for everything from turning on a lamp from across the country to making sure your refrigerator is still running without the twice-hourly calls from the International Refrigeration Commission. For his Hackaday Prize project, [Matt] is turning lights on and off with an ESP8266 WiFi module, but not just any lights: he’s focusing on low-voltage lighting with the ESPLux.

Most downlights and landscape lights run off a 12 or 24 V transformer, and because [Matt] wanted to add dimming to his lighting box, he’s rectifying the low voltage AC to DC; PWMing an output to light an LED is a much better idea than chopping AC with a triac.

With a rectifier, MOSFET, and an ESP8266, the ESPLux is a simple build, but the project doesn’t end with electronics. for automation and control of these lights, [Matt] is turning to OpenHAB, automation software that works with everything you would ever use to make your home smart.

The 2015 Hackaday Prize is sponsored by:

Field Expedient Stick Welder From Cordless Tool Battery Packs

The self-proclaimed and actual “smartest idiot on YouTube” is back with another entry from the “don’t try this at home” file. [AvE] recently did a teardown of a new DeWalt cordless drill-driver, and after managing to get everything back together, he was challenged by a viewer to repurpose the 20V battery packs into an impromptu stick welder.

AvE_short[AvE] delivered – sort of. His first attempt was with the two battery packs in parallel for higher current, but he had trouble striking an arc with the 1/8″ rod he was using. A freeze-frame revealed an incredible 160A of short-circuit current and a welding rod approaching the point of turning into plasma. Switching to series mode, [AvE] was able to strike a reasonable arc and eventually lay down a single splattery tack weld, which honestly looks better than some of our MIG welds. Eventually his rig released the blue smoke, and the postmortem teardown of the defunct packs was both entertaining and educational.

While we can’t recommend destroying $100 worth of lithium-ion battery packs for a single tack weld, it’s interesting to see how much power you’re holding in the palm of your hand with one of these cordless drills. We saw a similar technique a few years back in a slightly more sophisticated build; sadly, the YouTube video in that post isn’t active anymore. But you can always stay tuned after the break for the original [AvE] DeWalt teardown, wherein blue smoke of a different nature is released.

Continue reading “Field Expedient Stick Welder From Cordless Tool Battery Packs”

Trying To Set Things On Fire, You Know…for Science.

This video from [Just Think] caught our attention for open-flame testing of 6 different commonly used liquid fuels: Jet-A, diesel, heating oil, kerosene, avgas (100LL), and gasoline (or petrol, for our international readers). We love his low-tech approach to testing – just some mason jars and a back yard. The results are quite interesting.

He starts with testing Jet-A fuel. Yep, the same stuff you’d fill up your Boeing 737 with. We flinched for a second as he drops a match into it – then nothing happened. It’s a common misconception that jet fuel will sustain a flame by its self. It needs to be atomized to burn, as he shows in the video. He moves on to test both diesel and heating oil – making note that both are exactly same, except for color. Heating oil has a red dye added to it, to mark it “not for sale” for cars and trucks, as it’s not taxed. Neither would keep a flame.

Next up is kerosene, and it would just barely keep a flame. kerosene is commonly used as a replacement for diesel in extremely cold climates, were diesel fuel would gel and clog fuel systems. Finally, he tests avgas and gasoline. Both would sustain a flame quite well.

We think this small experiment is interesting, in that the results are kind of counter-intuitive. All these different fuels are used in different applications because of their different properties, and of course there is some really interesting science behind that, if you want to learn more.

We don’t need to tell you to be safe when working with fuels. Even though something like Jet-A fuel won’t carry a flame in a container on its own, doesn’t mean that it won’t burn aggressively when combined with other things (like clothing) and in other situations. So we’re filing this one under “don’t try this at home” – instead, sit back and enjoy the YouTube video after the break.

Continue reading “Trying To Set Things On Fire, You Know…for Science.”

Get Biohacking With A DIY CO2 Incubator

The [Pelling Lab] have been iterating over their DIY CO2 incubator for a while now, and it looks like there’s a new version in the works.

incubator3

We’ve covered open source Biolab equipment before including incubators but not a CO2 incubator. Incubators allow you to control the temperature and atmosphere in a chamber. The incubator built by the [Pelling Lab] regulates the chambers temperature and CO2 levels allowing them to culture cells under optimal conditions.

While commercial incubators can cost thousands of dollars the [Pelling Lab] used a Styrofoam box, space blanket, and SodaStream tank among other low cost parts. The most expensive component was a CO2 sensor which cost $230. The rig uses an Arduino for feedback and control. With a total BOM cost of $350 their solution is cost effective, and provides an open platform for further development.

The original write up is full of useful information, but recent tweets suggest a new and improved version is on the way and we look forward to hearing more about this exciting DIYBio project!

Control Nest Devices With Amazon Echo

[ZPriddy] was looking for a way to control his Nest thermostats with Amazon Echo. He didn’t want to settle for using AWS or some other hosted service. [ZPriddy] wanted something that he could host and manage completely on his own. The end result is what he calls EchoNestPy.

[ZPriddy] started by learning how to use the Alexa Skills Kit (ASK). ASK is the official SDK that allows enthusiasts to add functionality to their Amazon Echo. Unfortunately for [ZPriddy], most of the example code he found was designed to be used on Amazon Lambda, but that didn’t stop him. After finding a few examples of Amazon Echo requests and responses, he was on his way.

[ZPriddy] chose to implement a simple web server using Flask. The web server listens for the Amazon requests and responds appropriately. It also Oauth2 authentication to ensure some level of security. The server is capable of synchronizing the temperature of multiple Nest devices in the same home, but it can also increment or increment the temperature across the board. This is accomplished with some simple voice commands such as “Tell Nest that I’m a little bit chilly”. If you like Amazon Echo hacks, be sure to check out this other one for controlling WeMo devices. Continue reading “Control Nest Devices With Amazon Echo”