Years Don’t Dim The Shine Of These Curious Gadgets

[Maarten Tromp] recently took the time to document some of the unusual and creative electronic projects he received as gifts over the years. These gadgets were created in the early 2000’s and still work flawlessly today. Two of our favorites are shown here: Hardware Tetris Unit (shown in the image above) and Heap of Electronic Parts.

The “Heap of Electronic Parts” makes sounds when in sunlight.

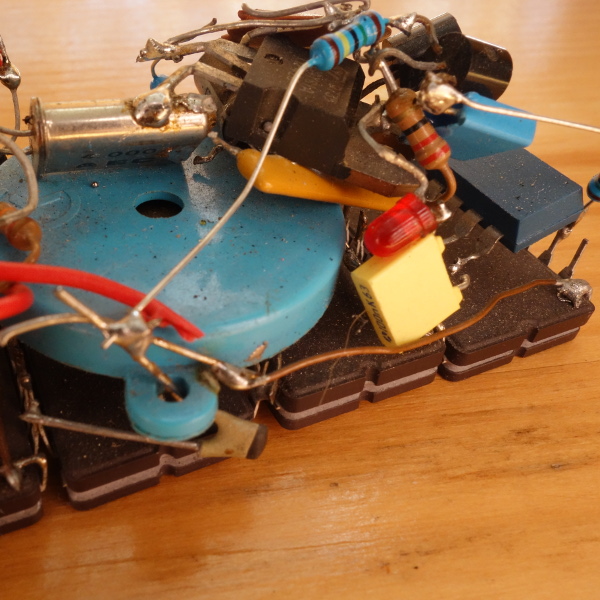
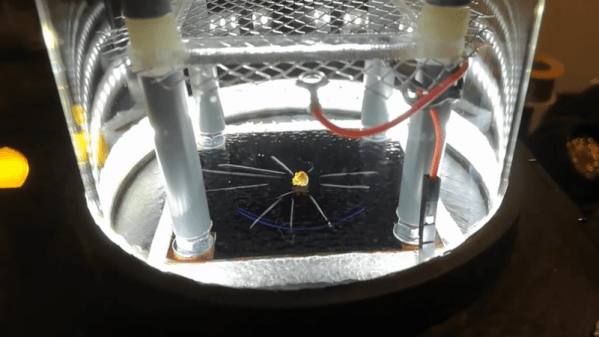
Heap of Electronic Parts was a kind of hardware puzzle and certainly lives up to its name. It’s a bunch of parts soldered in a mystifying way to the backs of four old EPROMs — the chips with the little window through which UV is used to erase the contents. Assured that the unit really did have a function, [Maarten] eventually figured out that when placed in sunlight, the device ticks, buzzes, and squeals. [Jeroen] had figured out that the EPROMs could act like tiny solar cells when placed in sunlight, and together the four generate just enough power to drive an oscillator connected to a piezo speaker. It still chirps happily away, even today.

Hardware Tetris plays in a terminal window.

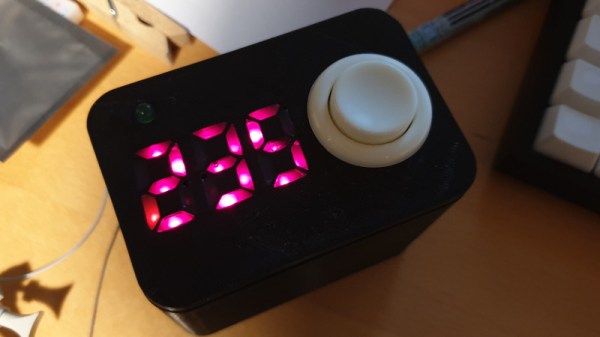
Hardware Tetris Unit was a black box intended to be plugged into a serial port. With a terminal opened using the correct serial port settings, a fully-functional Tetris game using ASCII-art graphics could be played. It was even self-powered from the serial port pins.

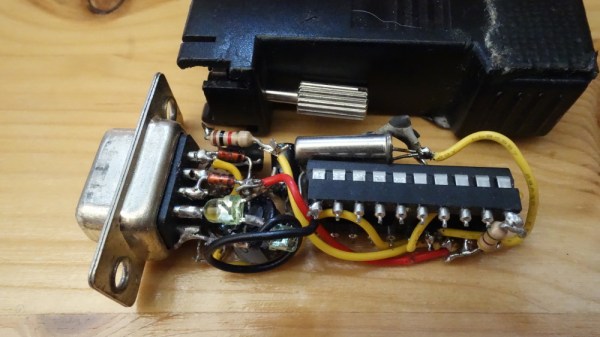
Inside Hardware Tetris is an AVR microcontroller with some level shifters, and the source code and schematics are available for download. 14 years later, computers no longer have hardware serial ports but [Maarten] says a USB-to-serial converter worked just fine and the device still functions perfectly.

There are a couple more devices documented on [Maarten]’s gifts page, including a Zork-inspired mini text adventure and a hardware board that does some trippy demos on an old Nokia color LCD.  [Maarten]’s friend [Jeroen Domburg] (aka Sprite_tm) had a hand in creating most of the gadgets, and he’s someone whose brilliant work we have had the good fortune to feature many times in the past.

A Fully Automatic Electric Can Crusher

Those of us who recycle our empty drink cans know the annoying storage problem these containers present. For an object with very little metal, a can takes up a huge amount of space, and should you possess a greater than average thirst you can soon end up with a lot of space taken up with stacks of cans. The solution of course is to crush them, and while there are many simple solutions involving hinged blocks of wood or lever systems, this is 2019! We have Machines to that kind of thing for us! [All Things Electro-Mechanical] thinks so anyway, for he has created an automatic can crusher that is a joy to behold.

At its heart is a 120V AC powered linear actuator, which crushes a can held in a welded steel guide. As the can is crushed it drops into a waiting bin, and when the actuator retracts a fresh can drops down from a hopper. Control is handled by a Raspberry Pi, and there are end sensors for the actuator and an optical sensor for the can hopper. As it stands, once the last can is in place the machine stops due to the optical sensor registering no can in the hopper, but no doubt a software change could cause it to execute a single crush cycle after the last can it detects.

This machine would be an ideal candidate for a simple industrial automation system, but however it is controlled it would save its owner from an embarrassing test of strength. Take a look, we’ve posted the two videos showing it in action below the break.

Thanks [Baldpower] for the tip.

Continue reading “A Fully Automatic Electric Can Crusher”

See The Radioactive World With This Peltier Cloud Chamber

Remember when a homemade cloud chamber was a science fair staple? We haven’t participated for decades, but it seemed like every year someone would put a hunk of dry ice in a fish tank, add a little alcohol, and with the lighting just right – which it never was in the gymnasium – you might be lucky enough to see a few contrails in the supersaturated vapor as the occasional stray bit of background radiation whizzed through the apparatus.

Done right, the classic cloud chamber is a great demonstration, but stocking enough dry ice to keep the fun going is a bit of a drag. That’s where this Peltier-cooled cloud chamber comes into its own. [mosivers] spares no expense at making a more permanent, turn-key cloud chamber, which is perched atop a laser-cut acrylic case. Inside that is an ATX power supply which runs a Peltier thermoelectric cooling module. Coupled with a CPU cooler, the TEC is able to drive the chamber temperature down to a chilly -42°C, with a strip of white LEDs providing the required side-lighting. The video below gives a tour of the machine and shows a few traces from a chunk of pitchblende; it’s all pretty tame until [mosivers] turns on his special modification – a high-voltage grid powered by a scrapped electronic fly swatter. That really kicks up the action, and even lets thoriated TIG welding electrodes be used as a decent source of alpha particles.

It’s been a while since we’ve seen a Peltier cloud chamber build around here, which is too bad because they’re great tools for engaging young minds as well as for discovery. And if you use one right, it just might make you as famous as your mother.

Continue reading “See The Radioactive World With This Peltier Cloud Chamber”

Blowing The Dust Off Of An IBM AS/400 Server

If you’ve never seen an IBM AS/400 machine, don’t feel bad. Most people haven’t. Introduced in 1988 as a mid-range server line, it used a unique object-based operating system and was geared specifically towards business and enterprise customers. Unless you’re a particularly big fan of COBOL you probably won’t have much use for one today, but that doesn’t mean they aren’t worth playing around with if the opportunity presents itself.

So when a local IT company went belly up and was selling their old hardware, including a late 90’s era IBM AS/400e Series, [Rik te Winkel] jumped at the chance to take this unique piece of computing history home. He knew it was something of a risk, as maintenance and repair tasks for these machines were intended to be done by IBM certified technicians rather than the DIYer, leaving little in the way of documentation or even replacement parts. But in the end it worked out, and best of all, he documented the successful process of dragging this 90’s behemoth into the blinding light of the twenty-first century for all the world to see.

After getting the machine home and sitting through its thirty minute boot process, [Rik] was relieved to see the code 01 B N pop on the server’s display. This meant the system passed all the internal checks and was ready to go, he just had to figure out how to talk to the thing. Built to be a pure server, the machine didn’t offer any video output so he’d have to log into it over the network.

[Rik] noted that there was no new DHCP entry in his router for the server, but of course that was hardly surprising as the machine would have certainly had a static IP when it was in use. So he shut the server down, plugged it directly into his laptop’s Ethernet port, and watched the output of Wireshark as it went through its arduous boot sequence. Eventually he started to pick up packets coming from the IP address 10.10.10.9, and he had his target.

There are a few clients out there that allow you to remotely log into an AS/400, so he downloaded one and pointed it to the server’s IP. He was surprised to see the operating system was apparently in Dutch, but at least he was in. He tried a few common usernames and passwords, helped along by the fact that this OS from a somewhat more innocent era will actually tell you if you have the username right or wrong, and eventually managed to hack the Gibson with the classic admin/admin combo.

So he was in, but now what? [Rik] decided that he couldn’t truly call this machine bested until he could pull up the Hackaday Retro Edition, so he started work on writing a program to let him pull down the page directly on the AS/400 in IBM’s proprietary Report Program Generator (RPG) programming language. You know, as one does. He didn’t quite feel up to writing a whole HTML parser, but he got as far as generating a HTTP GET request, downloading the page’s source, and opening it up as a local file. That’s good enough for us.

Our very own [Al Williams] documented his adventures poking around an Internet-connected AS/400 machine, which might serve as a helpful primer if you ever find one of these delightfully oddball computers kicking around the local recycling center.

Hot Glue Makes These Segments Glow

It’s safe to say that hot-melt glue is a staple of the projects we see here at Hackaday. There won’t be many readers who don’t have a glue gun, and a blob of the sticky stuff will secure many a project. But it’s not so often we see it used as an integral component for a property other than its stickiness, so [DusteD]’s reaction timer project is interesting for having hot glue as a translucent light guide and diffuser for its LED seven-segment display.

The timer is simple enough, being driven by an Arduino board, while the display is pre-formed into the 3D-printed case. The hot glue fills the enclosures behind each segment, and after several experiments it was found that the best filling method was from behind against a piece of Kapton tape. The LEDs were wired into a common cathode array, and along with the arcade-style button and the Arduino the whole fitted neatly in the box. You can see the result in action in the video below the break.

Of course, this display is unusual for its use of hot glue, but not unique. We’ve seen a different take on a hot glue light pipe display before.

Continue reading “Hot Glue Makes These Segments Glow”

DIY Guided Telescope Mount Tracks Like A Barn Door

Astrophotography is an expensive hobby. When assembling even a basic setup consisting of a telescope, camera, guiding equipment and mount, you can easily end up with several thousand dollars worth of gear. To reduce the monetary sting a little, [td0g] has come up with an innovative homebrew mount and guiding solution that could be assembled by almost any dedicated amateur, with the parts cost estimated around $100. The accuracy required to obtain high-quality astrophotographs is quite demanding, so we’re impressed with what he’s been able to achieve on a limited budget.

The inspiration for this design comes from an incredibly simple star tracking device known as a barn-door tracker, or Haig mount. Invented by George Haig in the 1970’s, this mount is essentially nothing more than a hinge aligned with the Earth’s axis of rotation. A threaded rod or screw, turned at a constant rate, is used to slowly open the hinge so that a mounted camera tracks the apparent motion of the heavens. As a result, long exposures can show pinpoint images of stars and sharp details of deep-sky objects, instead of curved star trails. [td0g] adapted this technique to drive a more traditional telescope mount, using barn-door-like drive screws on both the right ascension and declination axes. A pair of NEMA 17 stepper motors drive 4-mm pitch Acme threaded rods through toothed pulleys 3D printed from PETG.

Speaking of 3D-printed parts, this build is a good example of judicious use of the technology: where metal parts are warranted, metal parts are used, and printed plastic is relegated to those places where it can adequately do the job. [td0g] has placed the STL files for the printed parts on Thingiverse in case you want to replicate the drive.

The non-linear relationship between the threaded rod rotation and right ascension drive rate usually limits the length of exposure you can reasonably achieve with a barn-door tracker. To adjust for this, [td0g] created a lookup table in firmware to compensate the drive and allow longer exposures. He mentions that the drive will operate for three hours before it hits the end of the screw’s travel and needs to be reset, but if he can manage three hour exposures, his skies must be much darker than ours!

Continue reading “DIY Guided Telescope Mount Tracks Like A Barn Door”

The Coco-Nutcracker

Coconut is a delicious and versatile food but if you’ve ever tried to open one you know they can be a hard nut to crack. Those of us who live in the tropics where they are common might reach for a machete, drill, or saw to open them, which is often a messy and sometimes dangerous ordeal. Realizing that a coconut is just a large nut with a shell like any other, [Paul] of [Jackman Works] decided to build a nutcracker big enough to crack a coconut, which turns out to be almost exactly human-sized.

The nutcracker is built almost entirely out of reclaimed wood. Several rings made of many blocks of wood were constructed on the table saw before being glued and clamped together. Once the rings were stacked and glued to each other, [Paul] put them on a lathe to get a smooth finish. Then the arms, legs, body, and head were all assembled. The actual nutcracking mechanism is one of the few metal parts in this build, a long threaded rod which is needed to handle the large forces required for cracking the coconut.

Once the finishing touches were put on the nutcracker, including boots, a beard, some hair, and of course a pom-pom for his hat, [Paul] successfully tested it by cracking a coconut open. This build is exceptionally high quality and is definitely worth scrolling through. He runs a wood shop in DC where he builds all sorts of interesting things like this, including a giant wooden utility knife.