Vintage Print Processor Fixed With 3D Printing

If you don’t know what a print processor is, don’t feel bad. There’s precious few people out there still running home darkrooms, and the equipment used for DIY film development is about as niche as it gets today. For those looking to put together their own darkroom in 2019, buying second hand hardware and figuring out how to fix it on your own is the name of the game, as [Austin Robert Hermann] found out when he recently purchased a Durst Printo Print Processor on eBay.

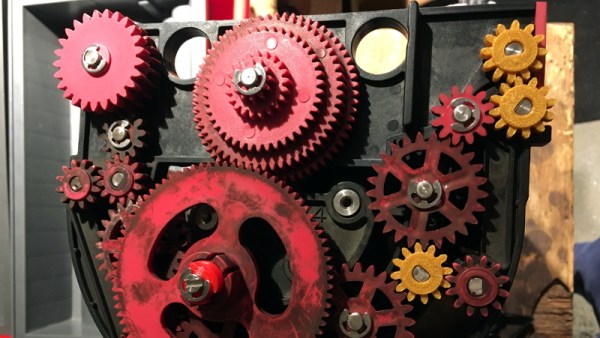
The auction said the hardware was in working order, but despite the fact that nobody would ever lie on the Internet, it ended up being in quite poor condition. Many of the gears in the machine were broken, and some were simply missing. The company no longer supports these 1990’s era machines, and the replacement parts available online were predictably expensive. [Austin] determined his best course of action was to try his hand at modeling the necessary gears and having them 3D printed; two things he had no previous experience with.

Luckily for [Austin], many of the gears in the Printo appeared to be identical. That meant he had several intact examples to base his 3D models on, and with some educated guesses, was able to determine what the missing gears would have looked like. Coming from an animation background, he ended up using Cinema 4D to model his replacement parts; which certainly wouldn’t have been our first choice, but there’s something to be said for using what you’re comfortable with. Software selection not withstanding, he was able to produce some valid STLs which he had printed locally in PLA using an online service.

Interestingly, this is a story we’ve seen play out several times already. Gears break and wear down, and for vintage hardware, that can be a serious problem. But if you’ve got a couple intact gears to go by, producing replacements even on an entry level desktop 3D printer is now a viable option to keep these classic machines running.

Brain Hacking With Entrainment

Can you electronically enhance your brain? I’m not talking about surgically turning into a Borg. But are there electronic methods that can improve various functions of your brain? Fans of brainwave entrainment say yes.

There was an old recruiting ad for electrical engineers that started with the headline: The best electronic brains are still human. While it is true that even a toddler can do things our best computers struggle with, it is easy to feel a little inadequate compared to some of our modern electronic brains. Then again, your brain is an electronic device of sorts. While we don’t understand everything about how it works, there are definitely electric signals going between neurons. And where there are electric signals there are ways to measure them.

The tool for measuring electric signals in the brain is an EEG (electroencephalograph). While you can’t use an EEG to read your mind, exactly, it can tell you some pretty interesting information, such as when you are relaxed or concentrating. At its most basic we’ve seen toys and simple hobby projects that purport to be “mind controlled” but only at an incredibly rudimentary level.

Brainwave entrainment is a hypothesis that sending low frequency waves to your brain can give your mind a nudge and sync up brain activity with the equipment measuring it. The ability to synchronize with the brain could yield much better measurements for a meaningful interface between modern electronics and electric storm of thought happening in your head.

Continue reading “Brain Hacking With Entrainment”

Give Your Raspberry Pi SD Card A Break: Log To RAM

The fragility of SD cards is the weak link in the Raspberry Pi ecosystem. Most of us seem to have at least one Pi tucked away somewhere, running a Magic Mirror, driving security cameras, or even taking care of a media library. But chances are, that Pi is writing lots and lots of log files. Logging is good — it helps when tracking down issues — but uncontrolled logging can lead to problems down the road with the Pi’s SD card.

[Erich Styger] has a neat way to avoid SD card logging issues on Raspberry Pi, he calls it a solution to reduce “thrashing” of the SD card. The problem is that flash memory segments wear out after a fairly low number of erase cycles, and the SD card’s wear-leveling algorithm will eventually cordon off enough of the card to cause file system issues. His “Log2Ram” is a simple Unix shell script that sets up a mount point for logging in RAM rather than on the SD card.

The idea is that any application or service sending log entries to /var/log will actually be writing them to virtual log files, which won’t rack up any activity on the SD card. Every hour, a cron job sweeps the virtual logs out to the SD card, greatly reducing its wear. There’s still a chance to lose logging data before it’s swept to disk, but if you have relatively stable system it’s a small price to pay for the long-term health of a Pi that’s out of sight and out of mind.

One thing we really like about [Erich]’s project is that it’s a great example of shell scripting and Linux admin concepts. If you need more information on such things, check out [Al Williams’] Linux-Fu series. It goes back quite a way, so settle in for some good binge reading.

Fooling Fingerprint Scanners With A Resin Printer

Biometrics have often been used as a form of access control. While this was initially limited to bank vaults in Hollywood movies, it’s now common to see such features on many laptops and smartphones. Despite the laundry list of reasons why this is a bad idea, the technology continues to grow in popularity. [darkshark] has shown us an easy exploit, using a 3D printer to fool the Galaxy S10’s fingerprint scanner.

The Galaxy S10 is interesting for its use of an ultrasonic fingerprint sensor, which continues to push to hardware development of phones minimal-to-no bezels by placing the sensor below the screen. The sensor is looking for the depth of the ridges of your fingerprint, while the touchscreen verifies the capacitive presence of your meaty digit. This hack satisfies both of those checks.

[darkshark] starts with a photograph of a fingerprint on a wineglass. This is then manipulated in Photoshop, before being used to create geometry in 3DSMAX to replicate the original finger. After making the part on an AnyCubic Photon LCD resin printer, the faux-finger pad is able to successfully unlock the phone by placing the print on the glass and touching your finger on top of it.ster

[darkshark] notes that the fingerprint was harvested at close range, but a camera with the right lenses could capture similar detail at a distance. The other thing to note is that if your phone is stolen, it’s likely covered in greasy fingerprints anyway. As usual, it serves as an excellent reminder that fingerprints are not passwords, and should not be treated as such. If you need to brush up on the fundamentals, we’ve got a great primer on how fingerprint scanners work, and another on why using fingerprints for security is a bad plan.

[via reddit, thanks to TheEngineer for the tip!]

Get Great 3D Scans With Open Photogrammetry

Not long ago, photogrammetry — the process of stitching multiple photographs taken from different angles into a 3D whole — was hard stuff. Nowadays, it’s easy. [Mikolas Zuza] over at Prusa Printers, has a guide showing off cutting edge open-source software that’s not only more powerful, but also easier to use. They’ve also produced a video, which we’ve embedded below.

Basically, this is a guide to using Meshroom, which is based on the AliceVision photogrammetry framework. AliceVision is a research platform, so it’s got tremendous capability but doesn’t necessarily focus on the user experience. Enter Meshroom, which makes that power accessible.

Meshroom does all sorts of cool tricks, like showing you how the 3D reconstruction looks as you add more images to the dataset, so that you’ll know where to take the next photo to fill in incomplete patches. It can also reconstruct from video, say if you just walked around the object with a camera running.

The final render is computationally intensive, but AliceVision makes good use of a CUDA on Nvidia graphics cards, so you can cut your overnight renders down to a few hours if you’ve got the right hardware. But even if you have to wait for the results, they’re truly impressive. And best of all, you can get started building up your 3D model library using nothing more than that phone in your pocket.

If you want to know how to use the models that come out of photogrammetry, check out [Eric Strebel]’s video. And if all of this high-tech software foolery is too much for you, try a milk-based 3D scanner.

Continue reading “Get Great 3D Scans With Open Photogrammetry”

A Petite Pico Projector For Portable Pi

A few years ago, new, innovative pico projectors, influenced by one of the TI development kits, started appearing in Kickstarter projects and other various DIY endeavours. Those projects fizzled out, most likely due to the cost of the projectors, but we got a few laughs out of it: that wearable smartphone that projected a screen onto your wrist used the same technology.

But there’s a need for a small projector, a pico projector, or in this case a femto projector. It’s the Nebra Anybeam, and it’s a small projector that uses lasers, and it comes in the form of a Raspberry Pi hat. We would like to congratulate the team for shipping the ideal use case of their product first.

The key features of this pico projector address the shortcomings of existing projectors that can fit in your pocket. This uses a laser, and there’s no bulb, and the power consumption can be as low as 3 Watts. Power is provided over a micro USB cable. The resolution of this projector is 720p, which is sufficient for a quick setup for watching a movie, but the brightness is listed as equivalent to 150 ANSI lumens, about the same as small projectors from a few years ago.

But of course the big selling point isn’t the brightness or resolution, it’s all about the smallness of the projector itself. There is a developer’s kit, a Pi Hat, a fit-in-your-pocket version with an enclosure, and a ‘monster ball’ version of the Anybeam.

Hackaday Links Column Banner

Hackaday Links: April 7, 2019

It’s April, which means all the people responsible for doubling the number of badges at DEF CON are hard at work getting their prototypes ready and trying to fund the entire thing. The first one out of the gate is Da Bomb, by [netik] and his crew. This is the same team that brought you the Ides of DEF CON badge, a blinky wearable multiplayer game that’s SPQR AF. Da Bomb is now a Kickstarter campaign to get the funding for the run of 500, and you’re getting a wearable badge filled with puzzles, Easter eggs, and a radio-based sea battle game that obviously can’t be called Battleship, because the navy doesn’t have battleships anymore.

Speaking of badges and various badge paraphernalia, there’s a new standard for add-ons this year. The Shitty Add-On V.1.69bis standard adds two pins and a very secure shrouded connector that solves all the problems of last year’s standard. [AND!XOR] just released a Shitty Brooch that powers all Shitty Add-Ons with a CR2032 battery. All the files are up on the Gits, so have fun.

You can 3D print anything if you don’t mind dealing with supports. But how to remove supports? For that [CCecil] has a great tip: use Chap stick. This is a print that used supports and it’s perfectly clean, right off the bed. By inserting a suspend (M600) command at the z-height of the top of the interface layer, then adding Chap stick on the top layer, everything comes off clean. Neat.

Speaking of 3D printing, here’s a project for anyone with the patience to do some serious modeling. It’s a pocket Soviet record player, although I think it’s more properly called a gramophone. It’s crank powered, so there’s a spring in there somewhere, and it’s entirely acoustic with zero electronics. Yes, you’re going to need a needle, but I’d be very interested in seeing somebody remake this using modern tools and construction materials.