Logitech Joystick Gets A Mechanical Sidekick

The mechanical keyboard rabbit hole is a deep one, and can swallow up as much money and time as you want to spend. If you’ve become spoiled on the touch and responsiveness of a Cherry MX or other mechanical switch, you might even start putting them on other user interfaces as well, such as this Logitech joystick that now sports a few very usable mechanical keys for the touch-conscious among us.

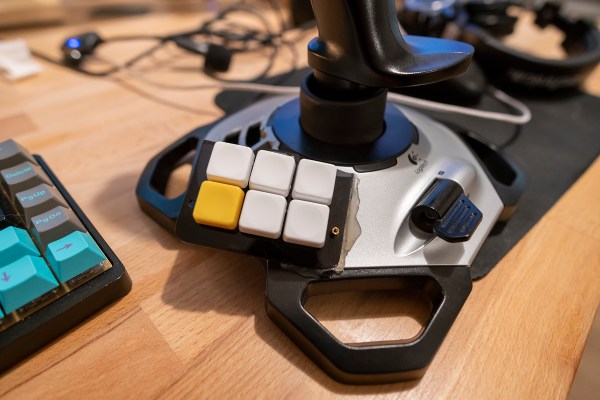
The Logitech Extreme 3D Pro that [ErkHal] and friend [HeKeKe] modified to accept the mechanical keys originally had a set of input buttons on the side, but these were unreliable and error-prone with a very long, inconsistent push. Soldering some mechanical switches directly on the existing board was a nice improvement, but the pair decided that they could do even better and rolled out an entire custom PCB to mount the keys more ergonomically. The switches are Kailh Choc V2 Browns and seem to have done a great job of improving the responsiveness of the joystick’s side buttons. If you want to spin up your own version, they’ve made the PCBs available on their GitHub page.

While [ErkHal] notes the switches aren’t the best and were only used since they were available, they certainly appear to work much better than what the joystick shipped with originally. In fact, we recently saw similar switches used to make a custom mechanical keyboard made for the PinePhone.

Protect Your Tomatoes With A 9V Battery

Growing fresh vegetables at home is a popular pastime, even moreso in a year when we’ve all been locked inside. However pests can easily spoil a harvest, potentially putting a lot of hard work down the drain. [Matt] of [DIY Perks] isn’t one to give up his tomatoes without a fight, however, and came up with a solution to protect his plants.

The trick is to take advantage of the mildly conductive slime excreted by snails as they travel along the ground. To protect potted plants, [Matt] places two strips of copper tape around the perimeter of the pot, spaced about a centimeter apart. Each strip is connected to one terminal of a 9 V battery. When a snail attempts to cross the strips, it completes a circuit between the two, and the electrical current that flows irritates the snail, forcing it to retreat.

[Matt] notes that no snails were harmed in the making of the video, and that the solution is far kinder to the slimy critters than poisons or traps. He also goes so far as to demonstrate alternative solutions for garden beds, as well. We’ve more commonly seen [Matt] working with lighting, though it’s great to see he has a bit of a green thumb, too. Video after the break.

Continue reading “Protect Your Tomatoes With A 9V Battery”

A Camera Slider With A Twist

“Scope creep” is often derided as an obstacle between your idea and the delivery of a finished project. That may be, but sometimes the creep is the whole point. It’s how we end up with wonderful builds like this multi-axis differential camera slider.

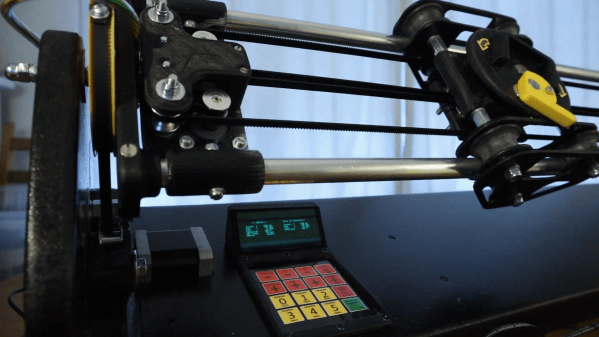
We mention scope creep because that’s what [Jan Derogee] blames for this slider’s protracted development time, as well as its final form. The design is a bit unconventional in that it not only dollies the camera left and right but also works in pan and tilt axes, and it does this without putting any motors on the carriage. Instead, the motors, which are located near the end of the slider rails, transmit power to the carriage via loops of 217timing belt. It’s a little like the CoreXY mechanism; rotating the motors in the same direction and speed slides the carriage, while moving them in opposite directions pans the camera. A Sparkfun Pro Micro in the controller coordinates the motors for smooth multi-axis motion, and the three steppers — there’s a separate motor for the tilt axis — sound really cool all working at the same time. Check out the video below for the full story.

We’ve seen a few fun projects from [Jan] before. Check out his linear clock, the persistence of phosphorescence display, or his touchpad for retrocomputers.

Continue reading “A Camera Slider With A Twist”

A Bullet For The Digital You

Harkening back to a not-so-distant past where duels settled arguments, [Joris Wegner] put a twist on the idea of quarrels with a gun that damages your online persona rather than your physical one. The controversy of social media is nothing new, but most people today have a large percentage of their lives online. A gun that can destroy your social media by deleting your account feels far more potent than most would like to admit.

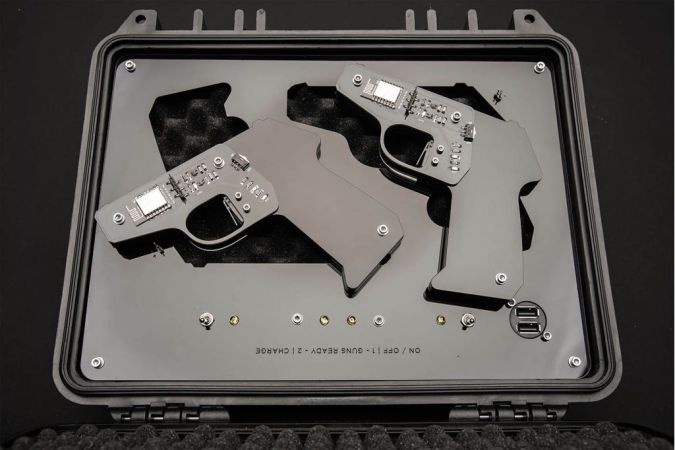
At the heart of this build, each gun contains a battery-powered ESP8266 that connects to another ESP8266 in the gun case, which in turn is connected to a computer. When a trigger is pulled, the computer deletes the Facebook account with the credentials stored on the gun. It offers a new look at the importance of one’s social media presence. While the concept of being attacked on social media is nothing new, the idea of digitally dying on social media is perhaps something new. This particular project was put on hold when [Joris] realized that Facebook accounts can be reactivated after 30 days, which renders the gesture less potent.

Playful and interesting twists on the idea of a gun are nothing new here on Hackaday. We’ve seen also [Joris’] work before with a MIDI-controlled video distortion box.

Machining Without Machines

It’s a luxury to be able to access a modern machine shop, complete with its array of lathes, mills, and presses. These tools are expensive though, and take up a lot of space, so if you want to be able to machine hard or thick metals without an incredible amount of overhead you’ll need a different solution. Luckily you can bypass the machines in some situations and use electricity to do the machining directly.

This project makes use of a process known as electrochemical machining and works on the principle that electricity passed through an electrolyte solution will erode the metal that it comes in contact with. With a well-designed setup, this can be used to precisely machine metal in various ways. For [bob]’s use this was pretty straightforward, since he needed to enlarge an existing hole in a piece of plate steel, so he forced electrolyte through this hole while applying around half an amp of current in order to make this precise “cut” in the metal, avoiding the use of an expensive drill press.

There are some downsides to the use of this process as [bob] notes in his build, namely that any piece of the working material that comes in contact with the electrolyte will be eroded to some extent. This can be mitigated with good design but can easily become impractical. It’s still a good way to avoid the expense of some expensive machining equipment, though, and similar processes can be used for other types of machine work as well.

Over-Engineered Bottle Opener Takes The Drudgery Out Of Drinking

Some projects take but a single glance for you to know what inspired them in the first place. For this over-engineered robotic bottle opener, the obvious influence was a combination of abundant free time and beer. Plenty of beer.

Of course there are many ways to pop the top on a tall cold one, depending on the occasion. [Matt McCoy] and his cohorts selected the “high-impulse” method, which when not performed by a robot is often accomplished by resting the edge of the cap on a countertop and slapping the bottle down with the palm of one’s hand. This magnificently pointless machine does the same thing, except with style.

The bottle is placed in a cradle which grips it, gently but firmly, and presents it to the opening mechanism in a wholly unnecessary motion-control ballet. Once in place, a lead screw moves a carriage down, simultaneously storing potential energy in a bundle of elastic surgical tubing while tripping a pawl on the edge of the cap. A lever trips at the bottom of the carriage’s travel, sending the pawl flying upward to liberate the libation, giving the robot a well-deserved and sudsy showers. Behold the wonderful interplay of 190 custom parts — and beer — in the video below.

Hats off to [Matt] et al for their tireless efforts on behalf of beleaguered beer-openers everywhere. This seems like the perfect accessory to go along with a game of mind-controlled beer pong.

Continue reading “Over-Engineered Bottle Opener Takes The Drudgery Out Of Drinking”

Remoticon Video: How To 3D Print Onto Fabric With Billie Ruben

We’re impressed to see the continued flow of new and interesting ways to utilize 3D printing despite its years in the hacker limelight. At the 2020 Hackaday Remoticon [Billie Ruben] came to us from across the sea to demonstrate how to use 3D printing and fabric, or other flexible materials, to fabricate new and interesting creations. Check out her workshop below, and read on for more detail about what you’ll find.

The workshop is divided into two parts, a hands-on portion where participants execute a fabric print at home on their own printer, and a lecture while the printers whirr away describing ways this technique can be used to produce strong, flexible structures.

The technique described in the hands on portion can be clumsily summarized as “print a few layers, add the flexible material, then resume the printing process”. Of course the actual explanation and discussion of how to know when to insert the material, configure your slicer, and select material is significantly more complex! For the entire process make sure to follow along with [Billie]’s clear instructions in the video.

The lecture portion of the workshop was a whirlwind tour of the ways which embedded materials can be used to enhance your prints. The most glamourous examples might be printing scales, spikes, and other accoutrement for cosplay, but beyond that it has a variety of other uses both practical and fashionable. Embedded fabric can add composite strength to large structural elements, durable flexibility to a living hinge, or a substrate for new kinds of jewelry. [Billie] has deep experience in this realm and she brings it to bear in a comprehensive exposition of the possibilities. We’re looking forward to seeing a flurry of new composite prints!