Perlin Noise Helps Make Trippy Typographic Art

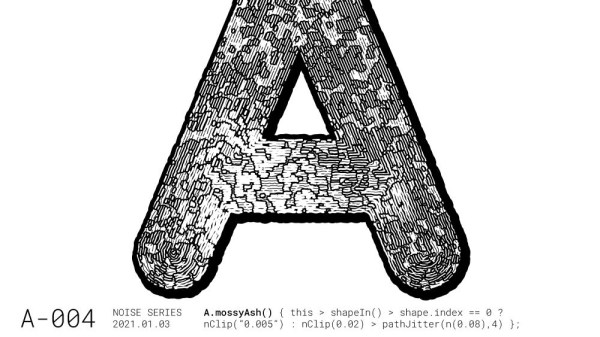
Perlin noise is best explained in visual terms: if a 2D slice of truly random noise looks like even and harsh static, then a random 2D slice of Perlin noise will have a natural-looking blotchy structure, with smooth gradients. [Jacob Stanton] used Perlin noise as the starting point for creating some interesting generative vector art that shows off all kinds of different visuals. [Jacob] found that his results often exhibited a natural quality, with the visuals evoking a sense of things like moss, scales, hills, fur, and “other things too strange to describe.”

The art project [Jacob] created from it all is a series of posters showcasing some of the more striking examples, each of which displays an “A” modified in a different way. A few are shown here, and a collection of other results is also available.

Perlin noise was created by Ken Perlin while working on the original Tron movie in the early 80s, and came from a frustration with the look of computer generated imagery of the time. His work had a tremendous and lasting impact, and was instrumental to artists creating more natural-looking textures. Processing has a Perlin noise function, which was in fact [Jacob]’s starting point for this whole project.

Noise, after all, is a wide and varied term. From making generative art to a cone of silence for smart speakers, it has many practical and artistic applications.

Our Curious Relationship With Caffeine

If you were to paint a few stereotypes surrounding our community, where would you start? Maybe in apparel habits: the t-shirt from a tech conference, or the ubiquitous hoodie. Or how about leisure pursuits: gaming, or even D&D? There’s one thing I can think of that unites most of us, we have a curious affinity for caffeine. Is it a propensity for working into the dark of the night that’s responsible, or perhaps those of us with ADHD find the alertness helpful, but whatever it is we like our coffee and energy drinks. Rare is the hackerspace without a coffee machine and a fridge full of energy drinks, and I have lost count of the times I have been derided by the coffee cognoscenti among my peers for my being satisfied with a mug of mere instant. Deprived of my usual socialisation over the festive period by the pandemic, and contemplating my last bottle of Club-Mate as I drank it, I took a while to ponder on our relationship with this chemical.

Continue reading “Our Curious Relationship With Caffeine”

High-Altitude Balloon Tracker Does Landing Prediction With Pi Pico

[Dave Akerman]’s ongoing high altitude balloon (HAB) work is outstanding, and we’re all enriched by the fact that he documents his work like he does. Recently, [Dave] wrote about his balloon tracker based on the Raspberry Pi Pico, whose capabilities brought a couple interesting features to the table.

In a way, HAB trackers have a fairly simple job: read sensors such as GPS and constantly relay that data to someone on the ground so that the balloon’s location can be tracked, and the hardware recovered when it ultimately returns to Earth. There are a lot of different ways to do this tracking, and one thing [Dave] enjoys is getting his hands on a new board and making a HAB tracker out of it. That’s exactly what he has done with the Raspberry Pi Pico.

Nothing builds familiarity like actually using a part, and the Pico had some useful things to contribute to a HAB tracker application. For one thing, the Pico has an onboard buck-boost converter that allows it to be powered from a relatively wide voltage range (~1.8 V to 5.5 V), so running it directly from batteries is both possible and desirable from a tracker perspective. But a really useful feature was possible thanks to the large amount of memory on the Pico: dynamic landing prediction.

[Dave] does landing prediction prior to launch based on environmental conditions, but it’s always better if the HAB tracker can also calculate its own prediction based on actual observed events and conditions. A typical microcontroller board like an Arduino doesn’t have enough memory to store the required data upon which to do such calculations, but the Pico does so easily. [Dave]’s new board transmits an updated landing site prediction along with all the rest of the telemetry, making the retrieval process much more reliable.

Want to see a completely different approach to HAB recovery? Check out a payload guided by steerable parachutes.

ESP8266-Powered Receipt Printer Puts RESTful API On Dead Trees

Taking his digital information into the real-world, [Davide Gironi] has built his own note transcriber from a point-of-sale receipt printer and an ESP8266.

You’ve seen these receipt printers at the order window of restaurants. A server puts in an order from any of the machines throughout the restaurant and a paper summary spits out for the chef line to start in on (and even cuts itself off from the roll).  Why shouldn’t we have this convenience in our own lives?

The printer communicates using a variant of the Epson Standard Code for Printers, for which [Davide] has written a library and thankfully shared the code. Adding an ESP8266 using a couple voltage regulators and some passive components makes this wireless, except for power. It has all the fun bells and whistles to set up the WiFi credentials and once running, just push the button on the base and it’ll spit out your data.

But wait, where is that data coming from? The web-based settings page lets you configure a URI to the RESTful source of your choosing. (XKCD has one, don’t they?) It also lets you configure header, footer, error messages, and of course your company hacker logo.

One of our favorite receipt-printer moments was when Hackaday editor of yore [Eliot Phillips] brought a selfie receipt printer to Supercon. We couldn’t find any pictures of that one, so we’ll leave you with the excellent hack [Sam Zeloof] pulled off by cramming one of these into a Polaroid camera.

Continue reading “ESP8266-Powered Receipt Printer Puts RESTful API On Dead Trees”

Put More Scoot In Yer Scooter

We have a scooter hack that is odd for a couple of reasons. First, the vehicle in question is a Doc Green EWA 6000, a German clone of a Xiaomi M365, so Country stereotypes be darned. Second, it is about increasing the performance, and when we think of scooters, we get hung up on scoot. The link between these peculiarities is the speed limiter Germany requires on all scooters, which the Chinese model lacks. Despite the law, [Nikolaj] wanted a higher top speed and Bluetooth connectivity. Wireless unlocks advanced features, like cruise control, which are absent in the stock model.

The mainboard is responsible for speed control, but that is merely a component, and you can find third-party replacements. [Nikolaj] found a new part with a German forum member’s help, then recorded his work in English for our sake. The speed boost is nice, but the Bluetooth functionality is a massive improvement by itself. If you live in an area where the law doesn’t allow this sort of thing, think before you upgrade. Aftermarket parts aren’t always drop-in replacements, and in this case, the controller and display needed some finessing to fit, so measure twice and buy once.

If tearing into a brand new scooter isn’t for you, consider breathing new life into a retiree, and don’t forget that stopping is the other half of the battle.

Laser Focus Made Easier With IR Filter

If you’ve used a diode laser engraver or cutter, you know that focus is critical. You’d think it would be relatively simple to get a sharp focus, but it isn’t that simple. [Makers Mashup] shows in a video how to use an adjustable IR filter to cut out all the light bleed to get a sharp image to make focusing simpler.

The filter he shows adjusts from 530nm to 750nm and is made to screw into a 72mm lens, but it works fine with your eyeballs, too. [Makers Mashup] says he’ll eventually make a stand for it so he can look through it with both hands free.

Continue reading “Laser Focus Made Easier With IR Filter”

DIY Furnace Smelts Magnetite Sand Into An Impressive Chef’s Knife

Some people order their raw materials from a factory, missing out on 99% of the fun… or suffering, we’re not sure which. To make that call, you need to look in on the process [IllyriaD] used to collect magnetite sand and turn it into a wicked-looking chef’s knife.

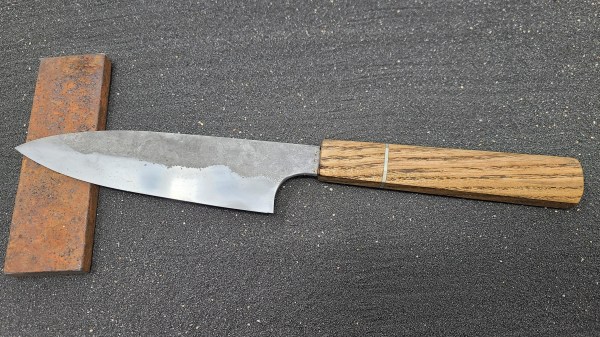
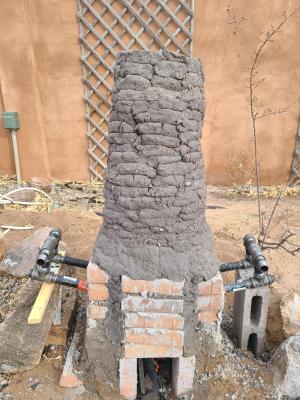
This began by collecting 150 pounds (!) of magnetic dirt from dry lake beds while hiking using a magnet pickup tool with release lever that he got from Harbor Freight. Several repeated magnetic refining passes separated the black ore from non-metallic sands ready for the furnace that he built. That is used to fire up the raw materials using 150 pounds of charcoal, changing the chemical composition by adding carbon and resulting in a gnarly lump of iron known as a bloom.

From there, it’s just a matter of beating the iron bloom into submission over at the anvil. [IllyriaD] details the process of flattening it out to a bar shape, then folding it over. Seven total folds are made for 128 layers, and in the gallery there’s a fantastic image that captures the striation when viewed on end. After being sharpened and polished, you can see where the bevel descends through those layers.

It’s delightful to see people working through the old ways and proving you don’t need a factory, as long as your true goal is to explore the process itself. Does this leave you wanting even more? [IllyriaD] left some insight about the process in the comments of the reddit thread. You probably also want to check out the tile-roofed hut built by [PrimitiveTechnology] without any modern tools.