Mining And Refining: Sulfur

When you think of the periodic table, some elements just have a vibe to them that’s completely unscientific, but nonetheless undeniable. Precious metals like gold and silver are obvious examples, associated as they always have been with the wealth of kings. Copper and iron are sturdy working-class metals, each worthy of having entire ages of human industry named after them, with silicon now forming the backbone of our current Information Age. Carbon builds up the chemistry of life itself and fuels almost all human endeavors, and none of us would get very far without oxygen.

But what about sulfur? Nobody seems to think much about poor sulfur, and when they do it tends to be derogatory. Sulfur puts the stink in rotten eggs, threatens us when it spews from the mouths of volcanoes, and can become a deadly threat when used to make gunpowder. Sulfur seems like something more associated with the noxious processes and bleak factories of the early Industrial Revolution, not a component of our modern, high-technology world.

And yet despite its malodorous and low-tech reputation, there are actually few industrial processes that don’t depend on massive amounts of sulfur in some way. Sulfur is a critical ingredient in processes that form the foundation of almost all industry, so its production is usually a matter of national and economic security, which is odd considering that nearly all the sulfur we use is recovered from the waste of other industrial processes.

Continue reading “Mining And Refining: Sulfur”

Arduino IDE v2.0 screen with callout tags to identify features

Arduino IDE 2.0 Is Here

Arduino have released the latest version of their Integrated Development Environment (IDE), Version 2.0 and it is a big step up from the previous release, boasting plenty of new features to help you to develop your code more easily.

As the de-facto way for beginners to get into programming hardware, more experienced users have sometimes complained about what they see as the over-simplistic IDE — even lacking relatively basic features such as autocomplete. The new version provides this, and much more besides. Continue reading “Arduino IDE 2.0 Is Here”

laser cut acrylic coaster with rgb leds inside

Your Mug Will Like This Glowy Coaster

[Charlyn] wanted to highlight their friends beautiful mug collection, so the Glowy Coaster was born.

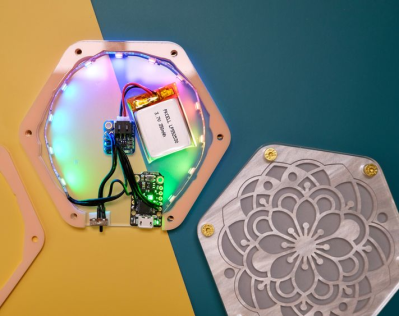
The coaster is made up of six layers of laser cut acrylic. The top and bottom layer are cut out of clear acrylic, providing a flat surface for the coaster. A top pattern layer made of pearl acrylic has a thin piece of vellum put underneath it to provide diffusion for the LED strip sandwiched inside. The middle layers are made of peach acrylic and have their centers hollowed out to provide room for the electronics inside. The top pearl acrylic layer gives the coaster, as [Charlyn] writes, a “subtle touch of elegance”. The coaster itself is screwed together by an M3 screw at each point of the hexagon that feed through to heat-set inserts.

inside of glowy coaster with electronics exposed

The electronics consist of a short NeoPixel strip, cut to include 12 LEDs pointed in towards the center of the coaster. The LEDs are driven by a Trinket M0 microcontroller with a LiPo “backpack” to provide power, attachment points for the exposed power switch and recharging capability to the 110 mAh 3.7 V battery. The code is a slightly modified NeoPixel “rainbow” wheel loop (source available as a gist). The design files are available through Thingiverse.

Creations like these highlight how much care and work goes into a project with minimal beauty, where decisions, like the opacity and thickness of the acrylic or countersinking the M3 screws, can have huge consequences for the overall aesthetic. [Charlyn] has an attention to detail that brings an extra touch of professionalism and polish to the project.

Coasters are a favorite for laser cutting and we’ve covered many different types, including
coaster bots, coaster engravers and even a color changing, drink sensing coasters.

Continue reading “Your Mug Will Like This Glowy Coaster”

24 Hours Of Le Airplanes

There’s no more famous road endurance race than the 24 Hours of Le Mans, where teams compete to see how far they can drive in a single 24-hour window. The race presents unique challenges not found in other types of racing. While RC airplanes may not have a similar race, [Daniel] a.k.a. [rctestflight] created a similar challenge for himself by attempting to fly an RC airplane non-stop for as long as he could, and a whole host of interesting situations cropped up before and during flight.

In order for an RC plane to fly for an entire day, it essentially needs to be solar powered. A large amount of strategy goes into a design of this sort. For one, the wing shape needs to be efficient in flight but not reduce the amount of area available for solar panels. For another, the start time of the flight needs to be balanced against the position of the sun in the sky. With these variables more or less fixed, [Daniel] began his flight.

It started off well enough, with the plane in an autonomous “return to home” mode which allowed it to continually circle overhead without direct human control. But after taking a break to fly it in FPV mode, [Daniel] noticed that the voltage on his battery was extremely high. It turned out that the solar charge controller wasn’t operating as expected and was shunting a large amount of solar energy directly into the battery. He landed and immediately removed the “spicy pillow” to avoid any sort of nonlinear event. With a new battery in the plane he began the flight again.

Even after all of that, [Daniel] still had some issues stemming from the aerodynamic nature of this plane specifically. There were some issues with wind, and with the flight controller not recognizing the correct “home” position, but all in all it seems like a fun day of flying a plane. If your idea of “fun” is sitting around and occasionally looking up for eight and a half hours. For more of [Daniel]’s long-term autonomous piloting, be sure to take a look at his solar tugboat as well.

Continue reading “24 Hours Of Le Airplanes”

Trombone Controls Virtual Trombone

Guitar Hero was a cultural phenomenon a little over a decade ago, and showed that there was a real fun time to be had playing a virtual instrument on a controller. There are several other similar games available now for different instruments, including one called Trombone Champ that [Hung Truong] is a fan of which replaces the traditional guitar with a trombone. The sliding action of a trombone is significantly different than the frets of a guitar, making it a unique challenge in a video game. But an extra challenge is building a controller for the game that works by playing a real trombone.

Unlike a guitar which can easily map finger positions to buttons, mapping a more analog instrument like a trombone with its continuous slide to a digital space is a little harder. The approach here was to use an ESP32 and program it to send mouse inputs to a computer. First, an air pressure sensor was added to the bell of the trombone, so that when air is passing through it a mouse click is registered, which tells the computer that a note is currently being played. Second, a mouse position is generated by the position of the slide by using a time-of-flight sensor, also mounted to the bell. The ESP32 sends these mouse signals to the computer which are then used as inputs for the game.

While [Hung Truong] found that his sensors were not of the highest quality, he did find the latency of the control interface, and the control interface itself, to be relatively successful. With some tuning of the sensors he figures that this could be a much more effective device than the current prototype. If you’re wondering if the guitar hero equivalent exists or not, take a look at this classic hack from ’09.

Continue reading “Trombone Controls Virtual Trombone”

A Solar-Powered Point-and-Shoot, Circa 1961

Try to put yourself in the place of an engineer tasked with building a camera in 1961. Your specs include making it easy to operate, giving it automatic exposure control, and, oh yeah — you can’t use batteries. How on Earth do you accomplish that? With a very clever mechanism powered by light, as it turns out.

This one comes to us from [Alec Watson] over at Technology Connections on YouTube, which is a channel you really need to check out if you enjoy diving into the minutiae of the mundane. The camera in question is an Olympus Pen EES-2, which was the Japanese company’s attempt at making a mass-market 35-mm camera. To say that the camera is “solar-powered” is a bit of a stretch, as [Alec] admits — the film advance and shutter mechanism are strictly mechanical, relying on springs and things to power them. It’s all pretty standard camera stuff.

But the exposure controls are where this camera gets interesting. The lens is surrounded by a ring-shaped selenium photocell, the voltage output of which depends on the amount of light in the scene you’re photographing. That voltage drives a moving-coil meter, which waggles a needle back and forth. A series of levers and cams reads the position of the needle, which determines how far the lens aperture is allowed to open. A clever two-step cam allows the camera to use two different shutter speeds, and there’s even a mechanism to prevent exposure if there’s just not enough light. And what about that cool split-frame exposure system?

For a camera with no electronics per se, it does an impressive job of automating nearly everything. And [Alec] does a great job of making it interesting, too, as he has in the past with a deep-dive into toasters, copy protection circa 1980, and his take on jukebox heroics.

Continue reading “A Solar-Powered Point-and-Shoot, Circa 1961”

Infinite Axis Printing On The Ender 3

It’s taken years to perfect them, but desktop 3D printers that uses a conveyor belt instead of a traditional build plate to provide a theoretically infinite build volume are now finally on the market. Unfortunately, they command a considerable premium. Even the offering from Creality, a company known best for their budget printers, costs $1,000 USD.

But if you’re willing to put in the effort, [Adam Fasnacht] thinks he might have the solution. His open source modification for the Ender 3 Pro turns the affordable printer into a angular workhorse. We wouldn’t necessarily call it cheap; in addition to the printer’s base price of $240 you’ll need to source $200 to $300 of components, plus the cost of the plastic to print out the 24 components necessary to complete the conversion. But it’s still pretty competitive with what’s on the market. Continue reading “Infinite Axis Printing On The Ender 3”