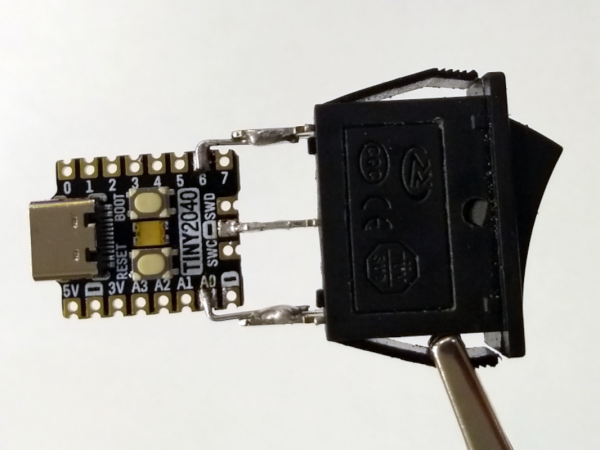
The TinyPICO board and the rocker switch soldered together showing a complete device, shown being held in the air by a crocodile clip

Simple Hardware Switch For OS Dualbooting, Thanks To RP2040

Dualbooting your computer can be a chore, the more switching between OSes you have to do – which is why virtualization or having separate computers are the go-to for many. Failing that, we have no choice but to smooth over our dualbooting experience with various workarounds and helpers. [William Somsky] shares one such helper tool with us – an elegant device made with a RP2040-sporting TinyPICO board and a three-way rocker switch, directing GRUB to boot into either Windows or Linux automatically, or leave us with the usual boot menu. This way, you can just flip the switch, hit “reboot” and walk away, coming back to your PC booted into OS of your choice, instead of timing your presence just so that you can catch the boot menu on time.

All you need to do is to solder a rocker switch to your RP2040 board of choice, then flash the RP2040 with code that detects the state of the switch, and creates a mass storage device hosting a file setting a Grub variable to either one of the 0, 1 or 2. [William] describes his journey, fighting mysterious caching problems, but tells us he got it working in the end. Sadly, [William] hasn’t shared the RP2040-side code with us, but he has at least put the Grub’s custom.cfg file in the ‘Files’ section of the Hackaday.io project.

Readily accessible microcontrollers with mass storage functions sure help make such hacks simple – earlier, we’ve seen dualboot switching like this done by modifying assembly code of the MBR. Dualbooting is a hacker’s rite of passage, and certain OSes of late can make it harder than other ones. Even if you don’t want to dualboot your PC, however, you sure can dualboot an Arduino!
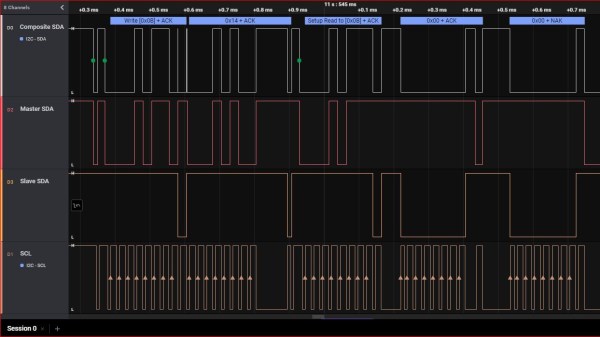
Screenshot of a logic analyzer software, showing the SDA channel being split into three separate traces

I2C Tap Helps Assign Blame For SDA Conflicts

If you’ve ever debugged a misbehaving I2C circuit, you probably know how frustrating it can be. Thankfully [Jim] over at Hackaday.io, has a proto-boardable circuit that can help!

Inter-integrated circuit bus (aka I2C) uses open collector outputs on a two wire interface. Open collector means a device connected to the I2C bus can only pull the bus down to ground. Chips never drive a logic “HIGH” on the wires. When nothing is driving the lines low, a weak resistor pulls the lines up to VCC. This is a good thing, because I2C is also a multidrop bus — meaning many devices can be connected to the bus at the time. Without open collector outputs, one chip could drive a high, while another drives a low – which would create a short circuit, possibly damaging both devices.

Even with all this protection, there can be problems. The SCL and SDA lines in the I2C communication protocol are bidirectional, which means either a controller or a peripheral can pull it low. Sometimes, when tracing I2C communications you’ll need to figure out which part is holding the line low. With many devices sharing the same bus, that can become nigh-impossible. Some folks have tricks with resistors and analog sampling, but the tried and true method of de-soldering and physically lifting chip pins off the bus often comes into play.

[Jim’s] circuit splits SDA signal into controller-side and peripheral-side, helping you make it clear who is to blame for hiccups and stray noise. To do that, he’s using 6N137 optoisolators and LMV393 comparators. [Jim] shared a NapkinCAD schematic with us, meant to be replicate-able in times of dire need. With this design, you can split your I2C bus into four separate channels – controller-side SDA, peripheral-side SDA, combined SDA and SCL. 4 Channels might be a lot for a scope, but this is no problem for today’s cheap logic analyzers.

Continue reading “I2C Tap Helps Assign Blame For SDA Conflicts” →

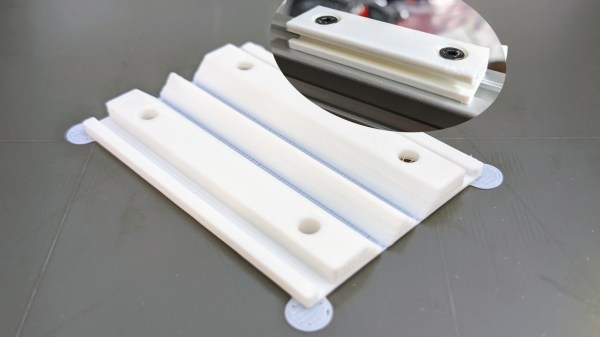
The eurorack rail piece, just printed in white plastic, not yet folded, with a folded example in the upper right corner

Bend Your Prints To Eliminate Supports

When designing even a reasonably simple 3D-printable part, you need to account for all the supports it will require to print well. Strategic offsetting, chamfering, and filleting are firmly in our toolkits. Over time we’ve learned to dial our settings in so that, hopefully, we don’t have to fumble around with a xacto knife after the bed has cooled down. On Twitter, Chris shows off his foldable 3D print experiments (nitter) that work around the support problem by printing the part as a single piece able to fold into a block as soon as you pop it off the bed.

The main components of this trick seem to be the shape of the place where the print will fold, and the alignment of bottom layer lines perpendicular to the direction of the fold lines. [Chris] shows a cross-section of his FreeCad design, sharing the dimensions he has found to work best.

Of course, this is Twitter, so other hackers are making suggestions to improve the design — like this sketch of a captive wedge likely to improve alignment. As for layer line direction alignment, [Chris] admits to winging it by rotating the part in the slicer until the layer lines are oriented just right. People have been experimenting with this for some time now, and tricks like these are always a welcome addition to our toolkits. You might be wondering – what kinds of projects are such hinges useful for?

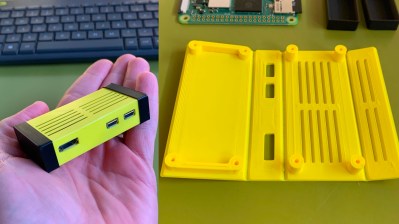
The example Chris provides is a Eurorack rail segment — due to the kind of overhangs required, you’d be inclined to print it vertically, taking a hit to the print time and introducing structural weaknesses. With this trick, you absolutely don’t have to! You can also go way further and 3D print a single-piece foldable Raspberry Pi Zero case, available on Printables, with only two extra endcaps somewhat required to hold it together.
Foldable 3D prints aren’t new, though we typically see them done with print-in-place hinges that are technically separate pieces. This trick is a radical solution to avoiding supports and any piece separation altogether. In laser cutting, we’ve known about similar techniques for a while, called a “living hinge”, but we generally haven’t extended this technique into 3D printing, save for a few manufacturing-grade techniques. Hinges like these aren’t generally meant to bend many times before they break. It’s possible to work around that, too — last time we talked about this, it was an extensive journey that combined plastic and fabric to produce incredibly small 3D printed robots!

We thank [Chaos] for sharing this with us!

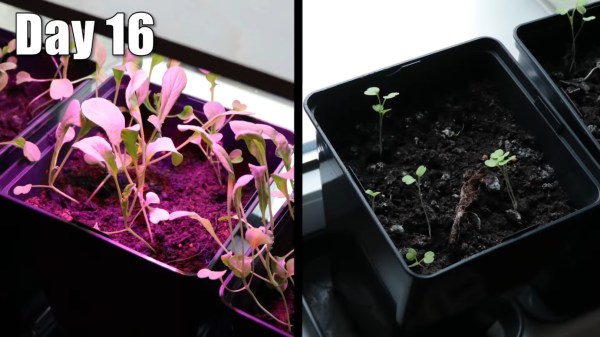
Plants compared side-by-side, with LED-illuminated plants growing way more than the sunlight-illuminated plants

Plant Growth Accelerated Tremendously With LEDs

[GreatScott!] was bummed to see his greenhouse be empty and lifeless in winter. So, he set out to take the greenhouse home with him. Well, at least, a small part of it. First, he decided to produce artificial sunlight, setting up a simple initial experiment for playing with different wavelength LEDs. How much can LEDs affect plant growth, really? This is the research direction that Würth Elektronik, supporting his project, has recently been expanding into. They’ve been working on extensive application notes, explaining the biological aspects of it for us — a treasure trove of resources available at no cost, that hackers can and should learn from.

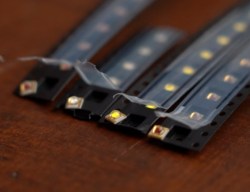
Initially, [GreatScott!] obtained LEDs in four different colors – red, ‘hyper red’, deep blue, and daylight spectrum. The first three are valued because their specific wavelengths are absorbed well by plants. The use of daylight LEDs though has been controversial.  Nevertheless, he points out that the plant might require different wavelengths for things other than photosynthesis, and the daylight LEDs sure do help assess the plants visually as the experiment goes on.Four cut tapes of the LEDs used in this experiment, laid out side by side on the desk

Next, [GreatScott!] borrowed parts of Würth’s LED driver designs, creating an Arduino PWM driver with simple potentiometers. He used this to develop his own board to host the LEDs.

An aluminum PCB increases heat dissipation, prolonging the LEDs lifespan. [GreatScott!] reflowed the LEDs onto it with solder paste, only to find that the ‘hyper red’ LEDs died during the process. Thankfully, by the time this problem reared its head, he managed to obtain the official horticulture devkit, with an LED panel ready to go.

[GreatScott!’s] test subjects were Arugula plants, whose leaves you often find on prosciutto pizza. Having built a setup with two different sets of flower pots, one LED-adorned and one LED-less, he put both of them on his windowsill. The plants were equally exposed to sunlight and equally watered. The LED duty cycle was set to ballpark values.

The results were staggering, as you can see in the picture above — no variable changing except the LEDs being used. This experiment, even including a taste test with a pizza as a test substrate, was a huge success, and [GreatScott!] recommends that we hit Würth up for free samples as we embark on our own plant growth improvement journeys.

Horticulture (aka plant growing) is one of the areas where hackers, armed with troves of freely available knowledge, can make big strides — and we’re not even talking about the kind of plants our commenters are sure to mention. The field of plant growth is literally fruitful and ripe for the picking. You can accomplish a whole lot of change with surprisingly little effort. The value of the plants on your windowsill doesn’t have to be purely decorative, and a small desk-top setup you hack together, can easily scale up! Some hackers understand that, and we’ve started seeing automated growing solutions way before Raspberry Pi was even a thing. The best part is, that you only need a few LEDs to start.

Continue reading “Plant Growth Accelerated Tremendously With LEDs” →

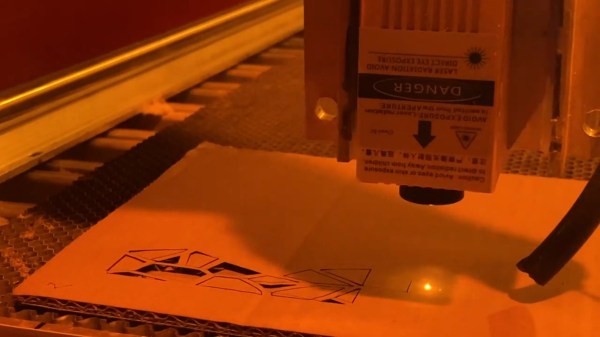
The laser module shown cutting shapes out of a piece of cardboard that's lying on the CNC's work surface

Giant CNC Partners With Powerful Laser Diode

[Jeshua Lacock] from 3DTOPO owns a large-format CNC (4’x8′, or 1.2×2.4 m), that he strongly feels is lacking laser-cutting capabilities. The frame is there, and a 150 W CO2 laser tube has been sitting in a box for ages – what else could you need? Sadly, at such a scale, aligning the mirrors is a tough and finicky job – and misalignment can be literally blinding. After reading tales about cutters of such size going out of alignment when someone as much as walked nearby, he dropped the idea – and equipped the CNC head with a high-power laser diode module instead. Having done mirror adjustment on a few CO2 tube-equipped lasers, we can see where he’s coming from.

Typically, the laser modules you see bolted onto CNC heads are firmly under three watts, which is usually only enough for engraving. With a module that provides 5 watts of optical power, [Jeshua] can cut cardboard and thin plywood as well he tells us even 10 W optical power modules are available, just that he didn’t go for one. We reckon that 20 W effective power diodes are not that far into our future, which is getting very close to the potential of the blue box “40 W but actually 35 W but actually way less” K40 laser cutters we cherish. [Jeshua]’s cutter is not breaking speed limits, but it’s built on what’s already there, and the diode is comparatively inexpensive. Equipped with a small honeycomb surface and what seems to be air assist, it’s shown in the video cutting an ornamental piece out of cardboard!

We hackers have been equipping CNCs with laser diodes for a while, but on a way smaller scale and with less powerful diodes – this is definitely a step up! As a hacker, you should have at least some laser cutting options at your disposal, and this overview of CO2 cutters and their availability can get you started. We’ve also given you detailed breakdowns about different sides of laser cutting, be it the must-have of safety, or the nice-to-have of air assist.

Continue reading “Giant CNC Partners With Powerful Laser Diode” →

ITman496 in his ATV, using the trashcan lifter to lift a trashcan up in the air. The lifter is a contraption mounted to the front of his ATV, welded together with square tubing

Equipping An ATV With A Trashcan Lifter

[ITman496] is one of us hackers working his way around health problems, in his case, a back injury. He is eager to solve various difficulties he has to deal with, and in case of the video he made, it was about moving a large trashcan through ice-covered roads on his property. Not willing to risk his health any further and dissatisfied with the flimsy solutions for sale requiring him to do the heavy lifting, still, he designed and built a winch-powered trashcan lifter mechanism – not entirely unlike a forklift. He mounted it to his ATV, tested it, improved upon it, filming his progress along the way – and then made a video detailing the entire build for us!

Having sketched the concept on his phone, he modeled and tested it in SketchUp, then cut and welded the parts, describing a welding alignment trick along the way – using 3D-printed joints to hold the two parts-to-be-welded together for tack welds, ensuring nigh-perfect alignment. Initial testing was a success! From there, he describes a good few surprising but in retrospect expected ease-of-use improvements that didn’t crop up during simulations, like adding chamfers to the scoop, so that he doesn’t have to angle his ATV super precisely to pick the trashcan up. In the end, having used it for about a month now, he tells us it’s been working extremely well for his purposes!

Not all such garbage cans need to be taken out, thankfully – some of them go voluntarily, and you can even get smaller ones that catch stuff you throw from across the room. We’ve covered the adventures of [ITman496] before, learning lessons from a failed robot build in 2016., and adopting an ultralight plane in 2018!

Continue reading “Equipping An ATV With A Trashcan Lifter” →

Stanislaw playing notes on his MIDI keyboard, with the LEDs on the LED strip lighting up right above the note he's playing, driven by the Raspberry Pi that runs a script based on the Pianolizer toolkit

Pianolizer Helps Your Musical Projects Distinguish Notes

[Stanislaw Pusep] has gifted us with the Pianolizer project – an easy-to-use toolkit for music exploration and visualization, an audio spectrum analyzer helping you turn sounds into piano notes. You can run his toolkit on a variety of different devices, from Raspberry Pi and PCs, to any browser-equipped device including smartphones, and use its note output however your heart desires. To show off his toolkit in action, he set it up on a Raspberry Pi, with Python code taking the note data and sending color information to the LED strip, displaying the notes in real time as he plays them on a MIDI keyboard! He also created a browser version that you can use with a microphone input or an audio file of your choosing, so you only need to open a webpage to play with this toolkit’s capabilities.

He took time to make sure you can build your projects with this toolkit’s help, providing usage instructions with command-line and Python examples, and even shared all the code used in the making of the demonstration video. Thanks to everything that he’s shared, now you can add piano note recognition to any project of yours! Pianolizer is a self-contained library implemented in JavaScript and C++ (which in turn compiles into WebAssembly), and the examples show how it can be used from Python or some other language.

[Stanislaw] also documented the principles behind the code, explaining how the note recognition does its magic in simple terms, yet giving many insights. We are used to Fast Fourier Transform (FFT) being our go-to approach for spectral analysis, aka, recognizing different frequencies in a stream of data. However, a general-purpose FFT algorithm is not as good for musical notes, since intervals between note frequencies become wider as frequency increases, and you need to do more work to distinguish the notes. In this toolkit, he used a Sliding Discrete Fourier Transform (SDFT) algorithm, and explains to us how he derived the parameters for it from musical note frequencies. In the end of the documentation, he also gives you a lot of useful references if you would like to explore this topic further!

What are you going to build with this? Maybe, a box that records you playing the flute and instantly turns it into sheet music? Or, perhaps, an AI that continues the song for you when you stop?

Continue reading “Pianolizer Helps Your Musical Projects Distinguish Notes” →