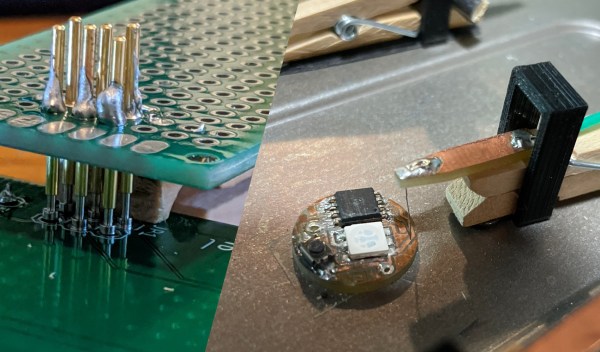
Two clothespin hacks mentioned in the article, side-by-side.

Need To Probe Circuits? Remember About Clothespins!

After browsing Thingiverse for some printable PCB probe designs, [Henry York] looked around and found a wooden clothespin on his desk. After some collaboration between his 3D printer and his CNC, Henry graced us with a nifty helper tool design that many of us might want to make in a pinch – a small, cheap and easy to make PCB probe, for circuits where soldering and headers are out of the question. Small magnets are glued to the clothespin, holding it flush to a magnetizable work surface (aka a toaster tray), and the probing itself is done by an extruder cleaning needle end. 3D printer and Edge.Cuts files are shared with us – thanks to Henry’s helpfulness, it should be easy to repeat if ever needed!

[Tyler Rosonke] (@zonksec) was programming a batch of badges and needed a reliable way to attach to a 6-pin ISP header – without actually soldering to the badges before they’re handed out to participants! A clothespin materialized nearby yet again – most likely, channeled from a different dimension by the spirit of numerous acrylic-cast pogopin-toothed clip-on tools we scroll by on Aliexpress. With a small perfboard piece and a bunch of pogopins jumping out of their respective drawers, it became no longer necessary to hold a bundle of male-ended pin header wires at a weird angle while nervously looking at the avrdude progress bar. This ended up saving a whole lot of time, something that’s always best spent on adding insidious bugs to the badge firmware (as well as, perhaps, easter eggs).

We’d love to hear about all the small hacks and improvements that you, hackers in our audience, invent. Whether it’s reusing a SOIC flashing clip for ISP programming or printing yourself an octopus-like contraption with needle probes, you should share it with us!

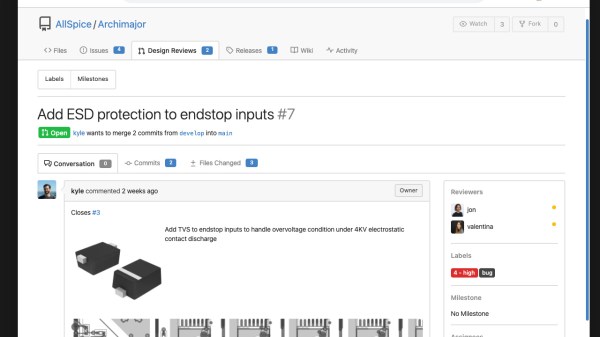
Image showing differences between WS2815 and WS2813 LED strips - the WS2815 strip lighting is more uniform throughout the strip's length.

Teaching You Everything You Might Have Missed About Addressable LEDs

Often, financial motivation results in people writing great educational material for hackers. Such is absolutely the case with this extensive documentation blog post on addressable LEDs by [DeRun]. This article could very be named “Addressable LEDs 101”, and it’s a must-scroll-through for anyone, whether you’re a seasoned hacker, or an artist with hardly any technical background and a desire to put LEDs in your creations.

This blog post is easy to read, painting a complete picture of what you can expect from different addressable LED types, and with apt illustrations to boot. Ever wonder which one of the addressable strips you should get from your retailer of choice, and what are the limitations of any specific type? Or, perhaps, you’d like to know – why is it that a strip with a certain LED controller is suspiciously cheap or expensive? You’re more than welcome to, at least, scroll through and fill into any of your addressable LED knowledge gaps, whether it’s voltage drops, color accuracy differences, data transfer protocol basics or dead LED failsafes.

Addressable LEDs have a special place in our hearts, it’s as if the sun started shining brighter after we’ve discovered them… or, perhaps, it’s all the LEDs we are now able to use. WS2812 is a staple of the addressable LED world, which is why we see them even be targets of both clone manufacturers and patent trolls. However, just like the blog post we highlight today mentions, there’s plenty of other options. Either way do keep coming cover a new addressable LED-related hack, like rewriting their drivers to optimize them, or adding 3.3V compatibility with just a diode.

We thank [Helge] for sharing this with us!

screenshow showing the supposed AllSpice interface. It resembles the GitHub interface, and shows a pull request open to add some ESD protection to a device.

AllSpice Building A Hardware Development Ecosystem For Companies

In our “hardware development gets serious” news, we’ve recently learned about AllSpice, a startup building hardware development collaboration infrastructure for companies. Hardware developers are great at building hardware tools for themselves, but perhaps not always so when it comes to software, and AllSpice aims to fill that gap at the “hardware company” level. Nowadays, what commonly happens is that software development tools and integrations are repurposed for hardware needs, and the results aren’t always as stellar as they get in the software world. In other words, AllSpice is learning from the positive outcomes of software industry and building a platform that takes the best parts from these tools, aiming to get to similarly positive outcomes in areas where currently hardware team experiences are lacking.

What AllSpice is building seems to be an umbrella platform designed to augment, integrate and hook into a slew of different already-developed platforms like GitHub, GitLab, Jira (and some other ones), and add much-needed features that large-scale hardware developers can’t afford to maintain and develop themselves. “Design review by screenshot” isn’t unheard of in hardware circles, and likely a thing that everyone of us with hardware collaboration experience has partaken in. On a company scale, there’s a myriad of hardware-related problems like that to solve and polish over.

Continue reading “AllSpice Building A Hardware Development Ecosystem For Companies” →

Two revisions of Wenting's custom SSD board - earlier revision on the left, later, sleeker and more complete, on the right.

Custom SSD Gives New Life To Handheld Atom PC

People don’t usually go as far as [Wenting Zhang] has – designing a new IDE SSD board for a portable x86 computer made in 2006. That said, it’s been jaw-dropping to witness the astounding amount of reverse-engineering and design effort being handwaved away.

The Benq S6 is a small MID (Miniaturized Internet Device) with an Atom CPU, an x86 machine in all but looks. Its non-standard SSD’s two gigabytes of storage, however, heavily limit the OS choice – Windows XP would hardly fit on there, and while a small Linux distro could manage better, it’s, and we quote, “not as exciting”. A lot of people would stop there and use an external drive, or a stack of adapters necessitating unsightly modifications to the case – [Wenting] went further and broke the “stack of adapters” stereotype into shards with his design journey.

Tracing quite a few complex multi-layer boards into a unified and working schematic is no mean feat, especially with the SSD PCB being a host to two BGA chips, and given the sheer amount of pins in the IDE interface of the laptop’s original drive. Even the requirement for the SSD to be initialized didn’t stop him – a short fight with the manufacturer’s software ensued, but was no match for [Wenting]’s skills. The end result is a drop-in replacement SSD even thinner than the stock one.

This project is well-documented for all of us to learn from! Source code and PCB files are on GitHub, and [Wenting] has covered the journey in three different places at once – on Hackaday.io, in a YouTube video embedded down below, and also on his Twitter in form of regular posts. Now, having seen this happen, we all have one less excuse to take up a project seemingly so complex.

Hackers play with SSD upgrades and repurposing every now and then, sometimes designing proprietary-to-SATA adapters, and sometimes reusing custom SSD modules we’ve managed to get a stack of. If case mods are acceptable to you aesthetics-wise, we’ve seen an SSD upgrade for a Surface Pro 3 made possible that way.

Continue reading “Custom SSD Gives New Life To Handheld Atom PC” →

the Caps Wiki logo, showing a few bulging capacitors, with "Caps Wiki" text under it

Caps Wiki: Place For You To Share Your Repair Notes

A right-to-repair battle is being waged in courts. The results of it, we might not see for a decade. The Caps Wiki is a project tackling our repairability problem from the opposite end – making it easy to share information with anyone who wants to repair something. Started by [Shelby], it’s heavily inspired by his vintage tech repairs experience that he’s been sharing for years on the [Tech Tangents] YouTube channel.

When repairing a device, there are many unknowns. How to disassemble it? What are the safety precautions? Which replacement parts should you get? A sporadic assortment of YouTube videos, iFixit pages and forum posts might help you here, but you have to dig them up and, often, meticulously look for the specific information that you’re missing.

The Caps Wiki talks a lot about capacitor replacement repairs – but not just that. Any device, even modern ones, deserves a place on the Caps Wiki, only named like this because capacitor repairs are such a staple of vintage device repair. You could make a few notes about something you’re fixing, and have them serve as help and guideline for newcomers. With time, this won’t just become a valuable resource for quick repairs and old tech revival, but also a treasure trove of datapoints, letting us do research like “which capacitors brands or models tend to pass away prematurely”. Plus, it also talks about topics like mains-powered device repair safety or capacitor nuances!

Continue reading “Caps Wiki: Place For You To Share Your Repair Notes” →

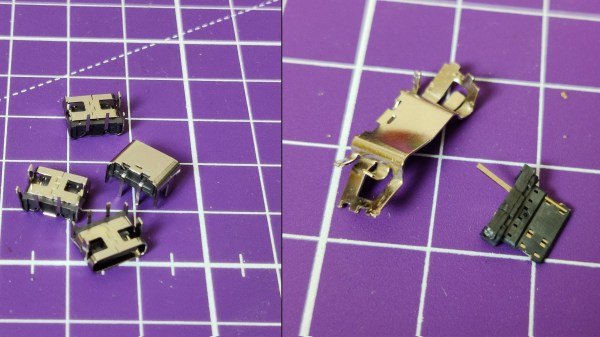
On the left, four through-hole USB-C connectors laid out on a purple cutting mat. On the right, a teardown picture shows that there's neither resistors nor CC connections inside such a connector, resulting in consequences described in the article.

The USB-C Connectors You Never Knew You Wanted To Avoid

On Tech Twitter, some people are known for Their Thing – for example, [A13 (@sad_electronics)], (when they’re not busy designing electronics), searches the net to find outstanding parts to marvel at. A good portion of the parts that they find are outstanding for all the wrong reasons. Today, that’s a through-hole two-pin USB Type-C socket. Observing the cheap tech we get from China (or the UK!), you might conclude that two 5.1K pulldown resistors are very hard to add to a product – this socket makes it literally impossible.

We’ve seen two-pin THT MicroUSB sockets before, sometimes used for hobbyist kits. This one, however, goes against the main requirement of Type-C connectors – sink (Type-C-powered) devices having pulldowns on CC pins, and source devices (PSUs and host ports) having pull up resistors to VBUS. As disassembly shows, this connector has neither of these nor the capability for you to add anything, as the CC pins are physically not present. If you use this port to make a USB-C-powered device, a Type-C-compliant PSU will not give it power. If you try to make a Type-C PSU with it, a compliant device shall (rightfully!) refuse to charge from it. The only thing this port is good for is when a device using it is bundled with a USB-A to USB-C cable – actively setting back whatever progress Type-C connectors managed to make.

As much as USB Type-C basics are straightforward, manufacturers get it wrong on the regular – back in 2016, a wrong cable could kill your $1.5k MacBook. Nowadays, we might only need to mod a device with a pair of 5.1K resistors every now and then. We can only hope that the new EU laws will force devices to get it right and stop ruining the convenience for everyone, so we can finally enjoy what was promised to us. Hackers have been making more and more devices with USB-C ports, and even retrofitting iPhones here and there. If you wanted to get into mischief territory and abuse the extended capabilities of new tech, you could even make a device that enumerates in different ways if you flip the cable, or make a “BGA on an FPC” dongle that is fully hidden inside a Type-C cable end!

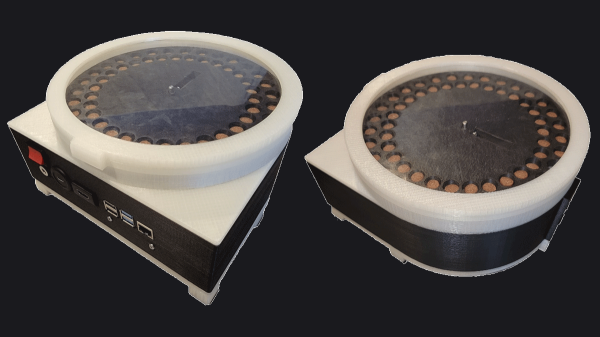
Two shots of the dispenser in question next to each other, showing it from different sides. One is showing the front panel, and the other shot gives us a better look at the top part, with a rotating disk that has openings for treats to be placed in.

Open-Hardware Dog Treat Dispenser Is A Stepping Stone For Behavioral Research

The principles of open-source hardware are starting to make great strides in scientific research fields. [Walker Arce] tells us about his paper co-authored with [Jeffrey R. Stevens], about a dog treat dispenser designed with scientific researchers in mind – indispensable for behavior research purposes, and easily reproducible so that our science can be, too. Use of Raspberry Pi, NEMA steppers and a whole lot of 3D printed parts make this build cheap (< $200 USD) and easy to repeat for any experiments involving dogs or other treat-loving animals.

Even if you’re not a scientist, you could always build one for your own pet training purposes – this design is that simple and easy to reproduce! The majority of the parts are hobbyist-grade, and chances are, you can find most of the parts for this around your workshop. Wondering how this dispenser works, and most importantly, if the dogs are satisfied with it? Check out a short demonstration video after the break.

Despite such dispensers being commercially available, having a new kind of dispenser designed and verified is more valuable than you’d expect – authors report that, in their experience, off-the-shelf dispensers have 20-30% error rate while theirs can boast just 4%, and they have test results to back that up. We can’t help but be happy that the better-performing one is available for any of us to build. The GitHub repository has everything you could want – from STLs and PCB files, to a Raspberry Pi SD card image and a 14-page assembly and setup guide PDF.

Open hardware and science are a match made in heaven, even if the relationship is still developing. The Hackaday community has come together to discuss open hardware in science before, and every now and then, open-source scientific equipment graces our pages, just like this recent assortment of biosensing hacks using repurposed consumer-grade equipment.

Continue reading “Open-Hardware Dog Treat Dispenser Is A Stepping Stone For Behavioral Research” →