24 Hours Of Le Airplanes

There’s no more famous road endurance race than the 24 Hours of Le Mans, where teams compete to see how far they can drive in a single 24-hour window. The race presents unique challenges not found in other types of racing. While RC airplanes may not have a similar race, [Daniel] a.k.a. [rctestflight] created a similar challenge for himself by attempting to fly an RC airplane non-stop for as long as he could, and a whole host of interesting situations cropped up before and during flight.

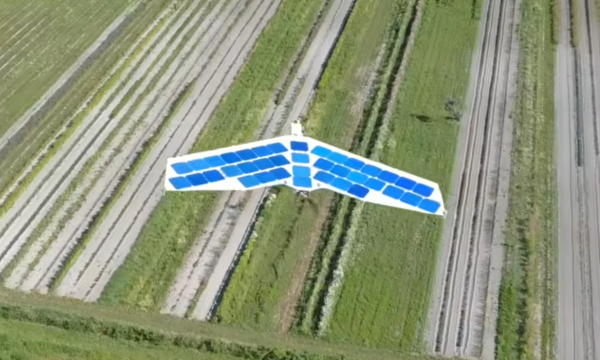
In order for an RC plane to fly for an entire day, it essentially needs to be solar powered. A large amount of strategy goes into a design of this sort. For one, the wing shape needs to be efficient in flight but not reduce the amount of area available for solar panels. For another, the start time of the flight needs to be balanced against the position of the sun in the sky. With these variables more or less fixed, [Daniel] began his flight.

It started off well enough, with the plane in an autonomous “return to home” mode which allowed it to continually circle overhead without direct human control. But after taking a break to fly it in FPV mode, [Daniel] noticed that the voltage on his battery was extremely high. It turned out that the solar charge controller wasn’t operating as expected and was shunting a large amount of solar energy directly into the battery. He landed and immediately removed the “spicy pillow” to avoid any sort of nonlinear event. With a new battery in the plane he began the flight again.

Even after all of that, [Daniel] still had some issues stemming from the aerodynamic nature of this plane specifically. There were some issues with wind, and with the flight controller not recognizing the correct “home” position, but all in all it seems like a fun day of flying a plane. If your idea of “fun” is sitting around and occasionally looking up for eight and a half hours. For more of [Daniel]’s long-term autonomous piloting, be sure to take a look at his solar tugboat as well.

Continue reading “24 Hours Of Le Airplanes”

Trombone Controls Virtual Trombone

Guitar Hero was a cultural phenomenon a little over a decade ago, and showed that there was a real fun time to be had playing a virtual instrument on a controller. There are several other similar games available now for different instruments, including one called Trombone Champ that [Hung Truong] is a fan of which replaces the traditional guitar with a trombone. The sliding action of a trombone is significantly different than the frets of a guitar, making it a unique challenge in a video game. But an extra challenge is building a controller for the game that works by playing a real trombone.

Unlike a guitar which can easily map finger positions to buttons, mapping a more analog instrument like a trombone with its continuous slide to a digital space is a little harder. The approach here was to use an ESP32 and program it to send mouse inputs to a computer. First, an air pressure sensor was added to the bell of the trombone, so that when air is passing through it a mouse click is registered, which tells the computer that a note is currently being played. Second, a mouse position is generated by the position of the slide by using a time-of-flight sensor, also mounted to the bell. The ESP32 sends these mouse signals to the computer which are then used as inputs for the game.

While [Hung Truong] found that his sensors were not of the highest quality, he did find the latency of the control interface, and the control interface itself, to be relatively successful. With some tuning of the sensors he figures that this could be a much more effective device than the current prototype. If you’re wondering if the guitar hero equivalent exists or not, take a look at this classic hack from ’09.

Continue reading “Trombone Controls Virtual Trombone”

3D Printing The Key To A Bass Clarinet

Playing music as part of a group typically requires that not only are all of the instruments tuned to each other, but also that the musicians play in a specific key. For some musicians, like pianists and percussionists, this is not terribly difficult as their instruments are easy to play in any key. At the other end of the spectrum would be the diatonic harmonica, which is physically capable of playing in a single key only. Other orchestral instruments, on the other hand, are typically made for a specific key but can transpose into other keys with some effort. But, if you have 3D printed your instrument like this bass clarinet from [Jared], then you can build it to be in whichever key you’d like.

The bass clarinet is typically an instrument that comes in the key of B flat, but [Jered] wanted one that was a minor third lower. Building a traditional clarinet is not exactly the easiest process, so he turned to his 3D printer. In order to get the instrument working with the plastic parts, he had to make a lot of the levers and keys much larger than the metal versions on a standard instrument, and he made a number of design changes to some of the ways the keys are pressed. Most of his changes simply revert back to clarinet designs from the past, and it’s interesting to see how simpler designs from earlier time periods lend themselves to additive manufacturing.

While [Jared] claims that the two instruments have slightly different tones, our amateur ears have a hard time discerning the difference. He does use a standard clarinet bell but other than that it’s impressive how similar the 3D printed version sounds to the genuine article. As to why it’s keyed differently than the standard, [Jared] points out that it’s just interesting to try new things, and his 3D printer lets him do that. We’d be happy to have another instrument in our 3D printed orchestra, too.

Continue reading “3D Printing The Key To A Bass Clarinet”

Building An Old Guitar From A New One

Anyone who’s ever played guitar to at least the skill level required to form a terrible garage band knows the names of the most legendary guitars. The driving sound of the Gibson Les Paul played by Jimmy Page, the upside-down and smooth Fender Stratocaster from Jimi Hendrix, or the twangy Rickenbacker made famous by George Harrison are all lusted-after models. The guitar that [Frank] really wanted was a Danelectro DC59 and since they’ve been steadily creeping up in price, he decided to build his own.

The body of the clone guitar is hollow and made from effectively scrap wood, in this case plywood. As the original guitars were in fact famous for using the least expensive materials possible, this makes it a great choice for a clone. [Frank] made the guitar using almost exclusively hand tools and glued everything together, but did use a few donor parts from a modern Stratocaster-type guitar. With most of the rough shape of the guitar finished, it was time to add the parts that make the guitar sound the way that a real Danelectro should: the lipstick-style pickups. He purchased these completely separately as they are the most important part to get right to emulate the tone and feel of the original.

With everything finally soldered and assembled, [Frank] got right to work recording a sample audio track which is included at the end of the video. It certainly sounds like the original to our untrained ears, and for around $100 it’s not a bad value either. If you’d like to see a guitar built from the ground up without using another as a clone, take a look at this build which brings a completely original guitar into existence, entirely from scratch.

Continue reading “Building An Old Guitar From A New One”

Robotic Platform Is Open Sourced And User Friendly

Having a 3D printer or a CNC machine available for projects is almost like magic. Designing parts in software and having them appear on the workbench is definitely a luxury. But for a lot of us, these tools aren’t easily available and projects that use them can be out-of-reach. That’s why one of the major design goals of this robotics platform was to use as many off-the-shelf components as possible.

The robot is called the OpenScout and, as its name implies, intends to be a fully open-source robotics platform for a wide range of use cases. It uses readily-available aluminum extrusion as a frame, which bolts together without any other specialized tools like welders. The body of the robot is articulating, helping it navigate uneven terrain outdoors. The specifications also call for using an Arduino to drive the robot, although there is plenty of space in the robot body to house any robotics platform you happen to have on hand.

For anyone looking to get right into the useful work of what robots can do, rather than spending time building up a platform from scratch, this is an excellent project. It’s straightforward and easy to build without many specialized tools. The unique articulating body design should make it effective in plenty of environments. If you do have a 3D printer, though, that opens up a lot of options for robotics platforms.

The Inner Machinations Of The Arduino Are An Enigma

Arduinos have been the microcontroller platform of choice for nearly two decades now, essentially abstracting away a lot of the setup and lower-level functions of small microcontrollers in favor of sensible IDEs and ease-of-use. This has opened up affordable microcontrollers to people who might not be willing to spend hours or days buried in datasheets, but it has also obscured some of those useful lower-level functions. But if you want to dig into them, they’re still working underneath everything as [Jim] shows us in this last of a series of posts about interrupts.

For this how-to, [Jim] is decoding linear timecodes (LTCs) at various speeds. This data is usually transmitted as audio, so the response from the microcontroller needs to be quick. To make sure the data is decoded properly, the first thing to set up is edge detection on the incoming signal. Since this is about using interrupts specifically, a single pin on the Arduino is dedicated to triggering an interrupt on these edges. The rest of the project involves setting up an interrupt service routine, detecting the clock signal, and then doing all of the processing necessary to display the received LTC on a small screen.

The project page goes into great detail about all of this, including all of the math that needs to be done to get it set up correctly. As far as general use of interrupts goes, it’s an excellent primer for using the lower-level functionality of these microcontrollers. And, if you’d like to see the other two projects preceding this one they can be found on the first feature about precision and accuracy, and the second feature about bitbanging the protocol itself.

Testing An Inexpensive CNC Spindle

The old saying “you get what you pay for” is a cautionary cliché, but is directly contrary to several other common sayings. In the case of [Spikee]’s planned CNC machine build, he took the more adventurous idiom of “no risk, no reward” to heart when he purchased these spindles for the machine from AliExpress. While the delivered product seemed fine, there were some problems that needed investigations.

Upon delivery of the spindle, everything seemed to work correctly out-of-the-box. Even the variable frequency drive, which was programmed at the factory, was working properly. But at around 8000 rpm the machine would begin shaking. The suspected part causing the vibration was the tool holder, so after checking the machine’s runout and also using a specialized vibration sensor this was confirmed to be the case.

Luckily [Spikee] was able to get a refund on the tool holders since they were out of spec, but still has a quite capable spindle on his hands for an excellent price. Without some skills in troubleshooting he might have returned the entire machine unnecessarily. If you are looking for some other ideas in setting up an inexpensive CNC machine, you might also like to look at BLDC motors from a remote control vehicle.