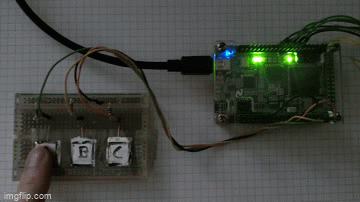
Voice-Controlled Smart Home From The Foundation Up

Smart homes are becoming an increasingly popular way to automate one’s home, whether it’s turning on lights, closing blinds, or even feeding pets. But the commercial offerings often rely on an internet connection to reach servers in order to work, which invites a lot of privacy concerns for a large percentage of us as well as being inconvenient when the internet is down. Essentially the only way to have a privacy-respecting, self-sufficient smart home is to build one on your own from the ground up, which is exactly what [Xasin] has done with this project.

This build is based on ESP32 modules with a Raspberry Pi as a hub, but it’s not as simple as a MQTT implementation. Not only does the self-contained home automation setup not rely on any outside services, but a failure of the central Pi server will not impact the nodes either as they are configured to continue operating independently even without central control. This allows for a robust home automation implementation without a single point of failure, and also includes some other features that are helpful as well including voice control, all while retaining a core design philosophy that makes it relatively easy to build.

Not only is the build technologically impressive for its standalone capabilities and its elimination of privacy concerns, but [Xasin] also did an excellent job with the physical design as well, adding plenty of RGB and a hexagonal enclosure that gives it a unique look wherever its is placed. If you’re renting right now or otherwise unable to interface any automation with your current home, be sure to take a look at some projects that do home automation without making any permanent changes.

Continue reading “Voice-Controlled Smart Home From The Foundation Up”

The Faux-Vintage Becomes Vintage

For those who might have missed it, there was a brief period in the mid-00s where gamers everywhere eschewed consoles and PCs in favor of simple Flash-based games to be played in a browser. Among these was the game Peasant’s Quest, created by the folks at Homestar Runner and modeled after video games from the 80s. [deater] was a fan of this game and wondered if it would actually be possible to play this retro-styled game on actual retro hardware.

For the experiment he decided on using an Apple II since this computer is featured as a prop rather often by the developers at Videlectrix. It turns out that with some determination it’s actually possible to run this game on the late 80s hardware with very little modifications. Squeezing the sprites into the required space was a challenge, as well as getting the sound tracks to play properly, but in the end the game runs within the hardware’s 280×192 resolution with 6 colors. There are also detailed notes on how the complicated graphics system on the Apple works for those willing to take a deep dive. There’s a lot going on here, but surprisingly few compromises needed to be made to get this to work.

The game itself is available on the project’s webpage for anyone who still has an Apple II kicking around, or for anyone who is willing to try it out in an emulator. Of course you could always play the original Flash version but that’s missing a certain charm that decades old retrocomputers have with games. We certainly aren’t seeing video game controllers like those built for the Apple II anymore, for example.

Continue reading “The Faux-Vintage Becomes Vintage”

Yo Dawg, We Heard You Like Retrocomputers

The idea of having software translation programs around to do things like emulate a Super Nintendo on your $3000 gaming computer or, more practically, run x86 software on a new M1 Mac, seems pretty modern since it is so prevalent in the computer world today. The idea of using software like this is in fact much older and easily traces back into the 80s during the era of Commodore and Atari personal computers. Their hardware was actually not too dissimilar, and with a little bit of patience and know-how it’s possible to compile the Commodore 64 kernel on an Atari, with some limitations.

This project comes to us from [unbibium] and was inspired by a recent video he saw where the original Apple computer was emulated on Commodore 64. He took it in a different direction for this build though. The first step was to reformat the C64 code so it would compile on the Atari, which was largely accomplished with a Python script and some manual tweaking. From there he started working on making sure the ROMs would actually run. The memory setups of these two machines are remarkably similar which made this slightly easier, but he needed a few workarounds for a few speed bumps. Finally the cursor and HMIs were configured, and once a few other things were straightened out he has a working system running C64 software on an 8-bit Atari.

Unsurprisingly, there are a few things that aren’t working. There’s no IO besides the keyboard and mouse, and saving and loading programs is not yet possible. However, [unbibium] has made all of his code available on his GitHub page if anyone wants to expand on his work and may also improve upon this project in future builds. If you’re looking for a much easier point-of-entry for emulating Commodore software in the modern era, though, there is a project available to run a C64 from a Raspberry Pi.

Thanks to [Cprossu] for the tip!

Arduino Finds Treasure

A beach is always a relaxing summer vacation destination, a great place to hang out with a drink and a book or take a swim in the ocean. For those who need a more active beach-going activity with an electronics twist, though, metal detecting is always a popular choice too. And, of course, with an Arduino and some know-how it’s possible to build a metal detector that has every feature you could want from even a commercial offering.

This build comes to us from [mircemk] who built this metal detector around an Arduino Nano and uses a method called induction balance detection to find metal. Similar to how radar works, one coil sends out a signal and the other listens for reflections back from metal objects underground. Building the coils and determining their resonant frequency is the most important part of this build, and once that is figured out the rest of the system can be refined and hidden treasure can easily be unearthed.

One of the more interesting features of this build is its ability to discriminate between ferrous and non-ferrous metals, and it can detect large metal objects at distances of more than 50 cm. There are improvements to come as well, since [mircemk] plans to increase power to the transmission coil which would improve the range of the device. For some of [mircemk]’s other metal detectors, be sure to check out this one which uses a smartphone to help in the metal detection process.

Continue reading “Arduino Finds Treasure”

Wireless Earbuds Charge Themselves

As more and more ports are removed from our smart devices, it seems that we have one of two options available for using peripherals: either buy a dongle to continue to use wired devices, or switch to Bluetooth and deal with perpetually maintaining batteries. If neither of these options suits you, though, there’s a third option available as [befinitiv] shows us in this build where he integrates a tiny solar panel to his earbud case to allow them to automatically charge themselves.

To start, he begins by taking apart the earbud case. For those who still haven’t tried out a set of these, they typically charge only when placed inside of their carrying case, which in his case also contains a small battery itself. Soldering wires directly to the battery allow for the battery to charge without as much electrical loss as he would have had if he had connected to the USB pins on the circuit board. Even then, the cell only generates a single volt so he needs a 5V boost converter to properly charge the battery. That came with its own problem, though, as it wouldn’t fit into the case properly. To solve that issue, he desoldered all of the components and deadbugged them together in order to fit the converter into a much smaller space without having to modify the case in any other way.

With all of that done and the small solar cell attached to the case, [befinitiv] has a smart solution to keep his wireless earbuds topped up without having to carry cables or dongles around every day. We’ve seen plenty of interesting solutions to the problem of various electronics manufacturers removing the ubiquitous 3.5 mm headphone jack too, and not all of them have dealt with this problem without certain other quirks arising as a result.

Continue reading “Wireless Earbuds Charge Themselves”

Custom RISC-V Processor Built In VHDL

While ARM continues to make inroads into the personal computing market against traditional chip makers like Intel and AMD, it’s not a perfect architecture and does have some disadvantages. While it’s a great step on the road to software and hardware freedom, it’s not completely free as it requires a license to build. There is one completely open-source and free architecture though, known as RISC-V, and its design and philosophy allow anyone to build and experiment with it, like this build which implements a RISC-V processor in VHDL.

Since the processor is built in VHDL, a language which allows the design and simulation of integrated circuits, it is possible to download the code for the processor and then program it into virtually any FPGA. The processor itself, called NEORV32, is designed as a system-on-chip complete with GPIO capabilities and of course the full RISC-V processor implementation. The project’s creator, [Stephan], also struggled when first learning about RISC-V so he went to great lengths to make sure that this project is fully documented, easy to set up, and that it would work out-of-the-box.

Of course, since it’s completely open-source and requires no pesky licensing agreements like an ARM platform might, it is capable of being easily modified or augmented in any way that one might need. All of the code and documentation is available on the project’s GitHub page. This is the real benefit of fully open-source hardware (or software) which we can all get behind, even if there are still limited options available for RISC-V personal computers for the time being.

How does this compare to VexRISC or PicoSOC? We don’t know yet, but we’re always psyched to have choices.

Custom Instrument Cluster For Aging Car

All of the technological improvements to vehicles over the past few decades have led to cars and trucks that would seem borderline magical to anyone driving something like a Ford Pinto in the 1970s. Not only are cars much safer due to things like crumple zones, anti-lock brakes, air bags, and compulsory seat belt use, but there’s a wide array of sensors, user interfaces, and computers that also improve the driving experience. At least, until it starts wearing out. The electronic technology in our modern cars can be tricky to replace, but [Aravind] at least was able to replace part of the instrument cluster on his aging (yet still modern) Skoda and improve upon it in the process.

These cars have a recurring problem with the central part of the cluster that includes an LCD display. If replacement parts can even be found, they tend to cost a significant fraction of the value of the car, making them uneconomical for most. [Aravind] found that a 3.5″ color LCD that was already available fit perfectly in the space once the old screen was removed, so from there the next steps were to interface it to the car. These have a CAN bus separated from the main control CAN bus, and the port was easily accessible, so an Arduino with a RTC was obtained to handle the heavy lifting of interfacing with it.

Now, [Aravind] has a new LCD screen in the console that’s fully programmable and potentially longer-lasting than the factory LCD was. There’s also full documentation of the process on the project page as well, for anyone else with a Volkswagen-adjacent car from this era. Either way, it’s a much more economical approach to replacing the module than shelling out the enormous cost of OEM replacement parts. Of course, CAN bus hacks like these are often gateway projects to doing more involved CAN bus projects like turning an entire vehicle into a video game controller.

Continue reading “Custom Instrument Cluster For Aging Car”