Fox Hunting With Software-Defined Radio

Fox hunting, or direction finding, is a favorite pastime in the ham radio community where radio operators attempt to triangulate the position of a radio transmission. While it may have required a large amount of expensive equipment in the past, like most ham radio operations the advent of software-defined radio (SDR) has helped revolutionize this aspect of the hobby as well. [Aaron] shows us how to make use of SDR for direction finding using his custom SDR-based Linux distribution called DragonOS.

We have mentioned DragonOS before, but every iteration seems to add new features. This time it includes implementation of a software package called DF-Aggregator. The software (from [ckoval7]), along with the rest of DragonOS, is loaded onto a set of (typically at least three) networked Raspberry Pis. The networked computers can communicate information about the radio waves they receive, and make direction finding another capable feature found in this distribution.

[Aaron] has a few videos showing the process of setting this up and using it, and all of the software is available for attempting something like this on your own. While the future of ham radio as a hobby does remain in doubt, projects like this which bring classic ham activities to the SDR realm really go a long way to reviving it.

Continue reading “Fox Hunting With Software-Defined Radio”

Logitech Joystick Gets A Mechanical Sidekick

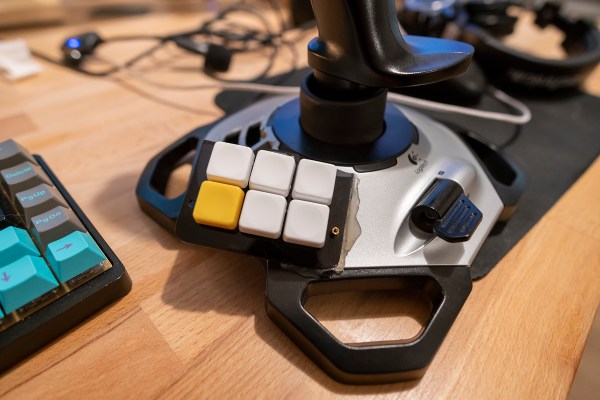
The mechanical keyboard rabbit hole is a deep one, and can swallow up as much money and time as you want to spend. If you’ve become spoiled on the touch and responsiveness of a Cherry MX or other mechanical switch, you might even start putting them on other user interfaces as well, such as this Logitech joystick that now sports a few very usable mechanical keys for the touch-conscious among us.

The Logitech Extreme 3D Pro that [ErkHal] and friend [HeKeKe] modified to accept the mechanical keys originally had a set of input buttons on the side, but these were unreliable and error-prone with a very long, inconsistent push. Soldering some mechanical switches directly on the existing board was a nice improvement, but the pair decided that they could do even better and rolled out an entire custom PCB to mount the keys more ergonomically. The switches are Kailh Choc V2 Browns and seem to have done a great job of improving the responsiveness of the joystick’s side buttons. If you want to spin up your own version, they’ve made the PCBs available on their GitHub page.

While [ErkHal] notes the switches aren’t the best and were only used since they were available, they certainly appear to work much better than what the joystick shipped with originally. In fact, we recently saw similar switches used to make a custom mechanical keyboard made for the PinePhone.

Machining Without Machines

It’s a luxury to be able to access a modern machine shop, complete with its array of lathes, mills, and presses. These tools are expensive though, and take up a lot of space, so if you want to be able to machine hard or thick metals without an incredible amount of overhead you’ll need a different solution. Luckily you can bypass the machines in some situations and use electricity to do the machining directly.

This project makes use of a process known as electrochemical machining and works on the principle that electricity passed through an electrolyte solution will erode the metal that it comes in contact with. With a well-designed setup, this can be used to precisely machine metal in various ways. For [bob]’s use this was pretty straightforward, since he needed to enlarge an existing hole in a piece of plate steel, so he forced electrolyte through this hole while applying around half an amp of current in order to make this precise “cut” in the metal, avoiding the use of an expensive drill press.

There are some downsides to the use of this process as [bob] notes in his build, namely that any piece of the working material that comes in contact with the electrolyte will be eroded to some extent. This can be mitigated with good design but can easily become impractical. It’s still a good way to avoid the expense of some expensive machining equipment, though, and similar processes can be used for other types of machine work as well.

3D Printing With VHS Tape Filament

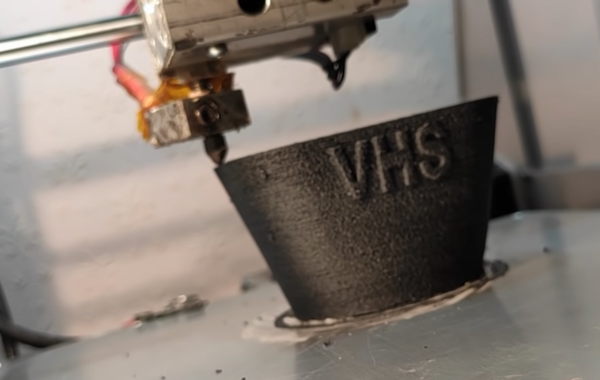
If you have a pile of old VHS tapes collecting dust in your attic or basement that you know you’ll never watch again, either because all of those movies are available on DVD or a streaming service, or because you haven’t had a working VCR since 2003, there might be a way of putting them to good use in another way. With the miles of tape available in just a few cassettes, [brtv-z] shows us how to use that tape as filament for a 3D printer.

The first step of the build is to actually create the filament. He uses a purpose-built homemade press to spin several tapes into one filament similar to how cotton or flax is spun into yarn. From there the filament is simply fed into the 3D printer and put to work. The tape filament needs to be heated higher than a standard 3D printer filament so he prints at a much slower rate, but the resulting product is indistinguishable from a normal print except for the color. It has some other interesting properties as well, such as retaining its magnetism from the magnetic tape, and being a little more brittle than PET plastic although it seems to be a little stronger.

While the VHS filament might not be a replacement for all plastic 3D prints, it’s still a great use for something that would likely otherwise head straight to the landfill. There are some other uses for this magnetic tape as well, like if you wanted to build a DIY particle accelerator.

Continue reading “3D Printing With VHS Tape Filament”

Pi Compute Module Is Love-child Of Raspberry And Arduino

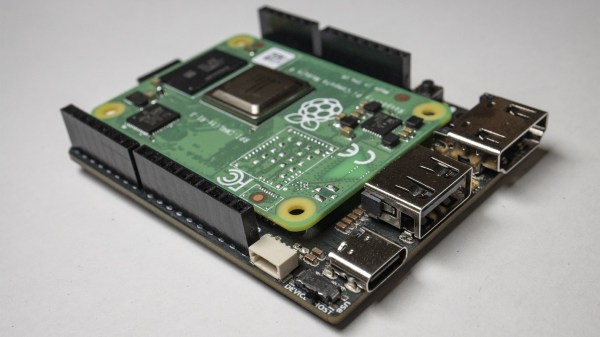
The Raspberry Pi compute module is a powerful piece of hardware, especially for the price. With it, you get more IO than a normal Pi, plus the ability to design hardware around it that’s specifically tailored to your needs rather than simply to general-purpose consumers. However, this comes at the cost of needing a way to interface with it since the compute module doesn’t have the normal IO pins or ports, but [Timon] has come up with a handy development board for this module called the Piunora which solves a lot of these prototyping issues.

The development board expands the compute module to the familiar Arduino-like form factor, complete with IO headers, USB ports, and HDMI output. It doesn’t stop there, though. It has an M.2 connector, some built-in LEDs, a camera connector, and a few other features. It also opens up some other possibilities that would be difficult or impossible with a standard Pi 4, such as the ability to run the Pi as a USB gadget rather than as a host device which simplifies certain types of development, which is [Timon]’s intended function.

As a development board, this project has a lot of potential for the niche uses of the compute module when compared to the standard Raspberry Pi. For embedded applications it’s much easier to deploy, with the increased development costs as a tradeoff. If you’re still unsure what to do with the compute module 4, we have some reading for you. And Timon’s previous project is a great springboard.

PET 2001 Emulator On $2 Of Hardware

Since the late 60s, Moore’s law has predicted with precision that the number of semiconductors that will fit on a chip about doubles every two years. While this means more and more powerful computers, every year, it also means that old computers can be built on smaller and cheaper hardware. This project from [Bjoern] shows just how small, too, as he squeezes a PET 2001 onto the STM32 Blue Pill.

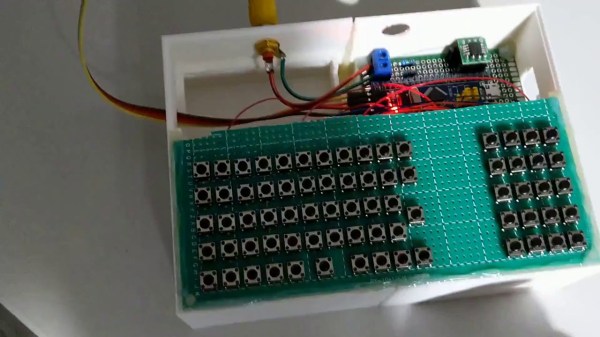
While the PET 2001 was an interesting computer built by Commodore this project wasn’t meant to be a faithful recreation, but rather to test the video output of the Blue Pill, with the PET emulation a secondary goal. It outputs a composite video signal which takes up a good bit of processing power, but the PET emulation still works, although it is slightly slow and isn’t optimized perfectly. [Bjoern] also wired up a working keyboard matrix as well although missed a few wire placements and made up for it in the software.

With his own home-brew software running on the $2 board, he has something interesting to display over his composite video output. While we can’t say we’d emulate an entire PC just to get experience with composite video, we’re happy to see someone did. If you’d like to see a more faithful recreation of this quirky piece of computing history, we’ve got that covered as well.

Continue reading “PET 2001 Emulator On $2 Of Hardware”

Speaker Snitch Tattles On Privacy Leaks

A wise senator once noted that democracy dies with thunderous applause. Similarly, it’s also how privacy dies, as we invite more and more smart devices willingly into our homes that are built by companies that don’t tend to have our best interests in mind. If you’re not willing to toss all of these admittedly useful devices out of the house but still want to keep an eye on what they’re doing, though, [Nick Bild] has a handy project that lets you keep an eye on them when they try to access the network.

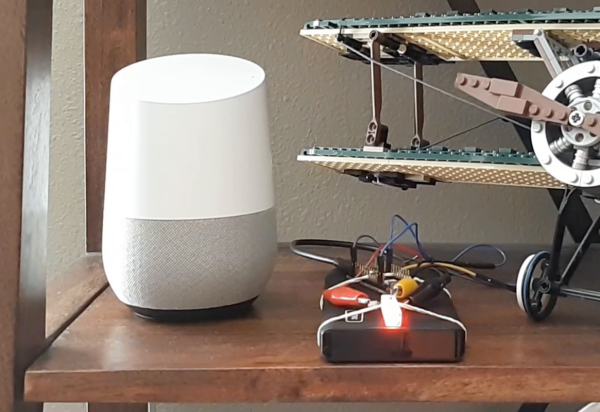
The device is built on a Raspberry Pi that acts as a middle man for these devices on his home network. Any traffic they attempt to send gets sent through the Pi which sniffs the traffic via a Python script and is able to detect when they are accessing their cloud services. From there, the Pi sends an alert to an IoT Arduino connected to an LED which illuminates during the time in which the smart devices are active.

The build is an interesting one because many smart devices are known to listen in to day-to-day conversation even without speaking the code phrase (i.e. “Hey Google” etc.) and this is a great way to have some peace-of-mind that a device is inactive at any particular moment. However, it’s not a foolproof way of guaranteeing privacy, as plenty of devices might be accessing other services, and still other devices have  even been known to ship with hidden hardware.

Continue reading “Speaker Snitch Tattles On Privacy Leaks”