Gathering Eclipse Data Via Ham Radio

A solar eclipse is coming up in just a few weeks, and although with its path of totality near the southern tip of South America means that not many people will be able to see it first-hand, there is an opportunity to get involved with it even at an extreme distance. PhD candidate [Kristina] and the organization HamSCI are trying to learn a little bit more about the effects of an eclipse on radio communications, and all that is required to help is a receiver capable of listening in the 10 MHz range during the time of the eclipse.

It’s well-known that certain radio waves can propagate further depending on the time of day due to changes in many factors such as the state of the ionosphere and the amount of solar activity. What is not known is specifically how the paths can vary over the course of the day. During the eclipse the sun’s interference is minimized, and its impact can be more directly measured in a more controlled experiment. By tuning into particular time stations and recording data during the eclipse, it’s possible to see how exactly the eclipse impacts propagation of these signals. [Kristina] hopes to take all of the data gathered during the event to observe the doppler effect that is expected to occur.

The project requires a large amount of volunteers to listen in to the time stations during the eclipse (even if it is not visible to them) and there are only a few more days before this eclipse happens. If you have the required hardware, which is essentially just a receiver capable of receiving upper-sideband signals in 10 MHz range, it may be worthwhile to give this a shot. If not, there may be some time to cobble together an SDR that can listen in (even an RTL-SDR set up for 10 MHz will work) provided you can use it to record the required samples. It’s definitely a time that ham radio could embrace the hacker community.

He’s The Operator Of His Pocket Arduino

The band Kraftwerk hit the music scene with its unique electronic sound in the 70s in Germany, opening the door for the electronic music revolution of the following decade. If you’re not familiar with the band, they often had songs with a technology theme as well, and thanks to modern microcontroller technology it’s possible to replicate the Kraftwerk sound with microcontrollers as [Steven] aka [Marquis de Geek] demonstrates in his melodic build.

While the music is played on a Stylophone and a Korg synthesizer, it is fed through five separate Arduinos, four of which have various synths and looping samplers installed on them (and presumably represent each of the four members of Kraftwerk). Samplers like this allow pieces of music to be repeated continuously once recorded, which means that [Steven] can play entire songs on his own. The fifth Arduino functions as a controller, handling MIDI and pattern sequencing over I2C, and everything is finally channeled through a homemade mixer.

[Marquis] also dressed in Kraftwerk-appropriate attire for the video demonstration below, which really sells the tribute to the famous and groundbreaking band. While it’s a great build in its own right and is a great recreation of the Kraftwerk sound, we can think of one more way to really put this project over the top — a Kraftwerk-inspired LED tie.

Continue reading “He’s The Operator Of His Pocket Arduino”

Electric BMX With Friction Drive

Electric bikes have increased in popularity dramatically over the past few years, and while you can easily buy one from a reputable bicycle manufacturer, most of us around here might be inclined to at least buy a kit and strap it to a bike we already have. There aren’t kits available for every bike geometry, though, so if you want an electric BMX bike you might want to try out something custom like [Shea Nyquist] did with his latest build. (Video, embedded below.)

BMX frames have a smaller front triangle than most bikes, so his build needed to be extremely compact. To that end, it uses two small-sized motors connected together with a belt, which together power a friction drive which clamps against the rear tire to spin it directly. This keeps the weight distribution of the bike more balanced as well when compared to a hub drive, where the motor is installed in the rear wheel. It also uses a more compact lithium polymer battery pack instead of the typical 18650 lithium ion packs most e-bikes use, and although it only has a range of around three miles it’s more than enough charge to propel it around a skate park.

The build boasts impressive numbers too, at 2.5 kW peak power per motor. This puts it in electric motorcycle territory, and it’s indeed fast despite its small stature. For a true high speed e-bike experience, though, you’ll need a slightly larger frame and motor even if it means tossing safety out of the window. Continue reading “Electric BMX With Friction Drive”

True Networked KVM Without Breaking The Bank

For administering many computers at once, an IP KVM is an invaluable piece of equipment that makes it possible to get the job done over the network without having to haul a keyboard, monitor, and mouse around to each computer. The only downside is that they can get pricey, unless of course you can roll one out based on the Raspberry Pi and the PiKVM image for little more than the cost of the Pi itself.

The video linked below shows how to set all of this up, which involves flashing the image and then setting up the necessary hardware. The build shows an option for using HDMI over USB, but another option using the CSI bus would allow for control over options like video resolution and color that a USB HDMI dongle doesn’t allow for. It also makes it possible to restart the computer and do things like configure BIOS or boot from removable media, which is something that would be impossible with a remote desktop solution like VNC.

The creator of PiKVM was mentioned in a previous post about the creation of the CSI bus capture card, and a Pi hat based on this build will be available soon which would include options for ATX controls as well. Right now, though, it’s possible to build all of this on your own without the hat, and is part of what makes the Pi-KVM impressive, as well as its very low cost.

Continue reading “True Networked KVM Without Breaking The Bank”

Full 8-Bit Computer On Breadboards

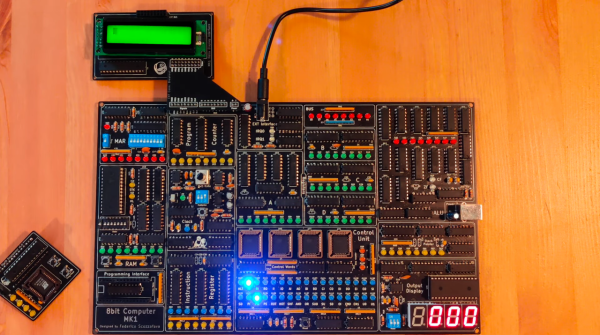
Getting into a big electronics project often involves the use of specialized tools, namely the use of some sort of soldering iron or other way to apply solder to often intricate, tiny, and heat-sensitive parts. While it’s best to learn to pick up this skill at some point, it’s not always necessary, even for big, complicated projects like [DerULF1]’s full 8-bit computer that he built entirely on breadboards.

For a fully featured 8-bit computer, this build goes deep into the details of how the computer works. The clock allows programs to be stepped through one cycle at a time, and even the memory can be individually accessed with a set of switches. There are plenty of other interesting features as well, such as using registers to access extra memory. It features an SPI port and PS/2 keyboard controller and also loads programs from an SD card.

The build was inspired by some of [Ben Eater]’s projects which famously focus on using logic gates and TTL chips to perform complex tasks, such as another breadboard computer which plays snake on a small display. It’s certainly a great way to learn about the inner function of computers, and better still that no soldering is required. But you may need a few extra breadboards.

Continue reading “Full 8-Bit Computer On Breadboards”

Beer Pong Difficulty Level: 10

Beer pong is a fun enough game for those of a certain age, but one thing that it lacks is a way of cranking up the difficulty setting independent of the amount of beer one has consumed. At least, that was the idea [Ty] had when he came up with this automated beer pong table which allows the players to increase the challenge of this game by sliding the cups around the top of the table.

The build uses a belt-driven platform under a clear cover with a set of magnets attached. Each of the cups on the table has a corresponding magnet, which allows them to slide fairly easily back and forth on the table. The contraption is controlled by an Arudino Nano with a small screen and dial that allows the players to select a difficulty level from 1 to 10. The difficulty levels increase the speed that the cups oscillate on the table, which certainly adds another layer of complexity to this already challenging game.

While we hope to eventually see a beer pong table that can automatically arrange the cups as the game is played, we do appreciate the effort to make an already difficult game even more difficult. Of course, if you have problems with the difficulty level you might want to pick up a PongMate CyberCannon Mark III to help with those clutch beer pong shots.

Continue reading “Beer Pong Difficulty Level: 10”

Micropython On Microcontrollers

There are plenty of small microcontrollers available for all kinds of tasks, each one with its unique set of features and capabilities. However, not all of us want to spend time mucking about in C or assembly to learn the intricacies of each different chip. If you prefer the higher planes of Python instead, it’s not impossible to import Python on even the smallest of microcontrollers thanks to MicroPython, which [Rob] shows us in this project based on the ESP32.

[Rob] has been working on a small robot called Marty which uses an ESP32 as its brain, so the small microcontroller is already tasked with WiFi/Bluetooth communications and driving the motors in the robot. Part of the problem of getting Python to run on a platform like this is that MicroPython is designed to be essentially the only thing running on the device at any one point, but since the ESP32 is more powerful than the minimum requirements for MicroPython he wanted to see if he could run more than just Python code. He eventually settled on a “bottum-up” approach to build a library for the platform, rather than implementing MicroPython directly as a firmware image for the ESP32.

The blog post is an interesting take on running Python code on a small platform, and goes into some details with the shortcomings of MicroPython itself which [Rob] ended up working around for this project. He’s also released the source code for his work on his GitHub page. Of course, for a different approach to running Python and C on the same small processor, there are some libraries that accomplish that as well.