A Non-Infinite But Arbitrariliy Large Number Of Video Feeds

It’s pretty common to grab a USB webcam when you need something monitored. They’re quick and easy now, most are plug-and-play on almost every modern OS, and they’re cheap. But what happens when you need to monitor more than a few things? Often this means lots of cameras and additional expensive hardware to support the powerful software needed, but [moritz simon geist] and his group’s Madcam software can now do the same thing inexpensively and simply.

Many approaches were considered before the group settled on using PCI to handle the video feeds. Obviously using just USB would cause a bottleneck, but they also found that Ethernet had a very high latency as well. They also tried mixing the video feeds from Raspberry Pis, without much success either. Their computer is a pretty standard AMD with 4 GB of RAM running Xubuntu as well, so as long as you have the PCI slots needed there’s pretty much no limit to what you could do with this software.

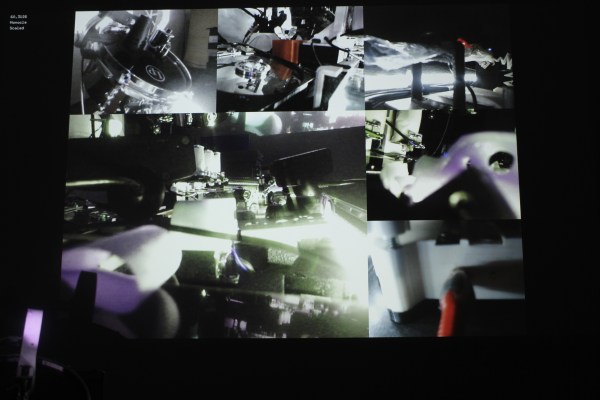
At first we scoffed at the price tag of around $500 (including the computer that runs the software) but apparently the sky’s the limit for how much you could spend on a commercial system, so this is actually quite the reduction in cost. Odds are you have a desktop computer anyway, and once you get the software from their Github repository you’re pretty much on your way. So far the creators have tested the software with 10 cameras, but it could be expanded to handle more. It would be even cooler if you could somehow incorporate video feeds from radio sources!

Continue reading “A Non-Infinite But Arbitrariliy Large Number Of Video Feeds”

Use The Internet To Get Your Kadabra To Evolve

If you grew up playing Pokemon Red or Blue, you might have moved far away from your childhood friends by now. If you’re still playing Pokemon Red or Blue, you can now literally reconnect with these friends using [Pepijn]’s new and improved Game Boy link that lets players trade Pokemon over the internet.

Based on [Pepijn]’s previous work building an Arduino-based Pokemon storage system (which was inspired by a separate project that was able to spoof trades), the device allows a Game Boy (including Pocket, Color, and Advance versions) to connect to the Internet via a Teensy shield. The online waiting room software is called TCPoke which facilitates the Internetting of the Game Boys. From there, all you have to do is connect via the project’s wiki!

The TCPoke software is available on the project’s site. Also, be sure to check out the video below which shows a demonstration of how the software works. There is noticeable delay compared to a direct link between Game Boys, but it functions very well. We didn’t see this link system work for a battle, but it would be interesting to see if it is possible. If so, you might never have to go to a Pokemon League meeting again!

Continue reading “Use The Internet To Get Your Kadabra To Evolve”

Inexpensively Replace A Worn Out N64 Joystick

The Nintendo 64 is certainly a classic video game system, with amazing titles like Mario Kart 64 and Super Smash Bros that are still being played across the world today. But, like finding new parts for a classic car, finding an original controller that doesn’t have a sad, wobbly, worn-out joystick is getting to be quite the task. A common solution to this problem is to replace the joystick with one from a Gamecube controller, but the kits to do this are about $20USD, and if that’s too expensive then [Frenetic Rapport] has instructions for doing this hack for about $2.

The first iteration of using a Gamecube stick on an N64 controller was a little haphazard. The sensitivity was off and the timing wasn’t exactly right (very important for Smash Bros.) but the first kit solved these problems. This was the $20 kit that basically had a newer PCB/microcontroller that handled the Gamecube hardware better. The improvement which drove the costs down to $2 involves modifying the original PCB directly rather than replacing it.

While this solution does decrease the cost, it sacrifices the new potentiometer and some of the easier-to-work-with jumpers, but what was also driving this project (in addition to cost) was the fact that the new PCBs were becoming harder to get. It essentially became more feasible to simply modify the existing hardware than to try to source one of the new parts.

Either way you want to go, it’s now very easy to pwn your friends in Smash with a superior controller, rather than using a borked N64 controller you’ve had for 15 years. It’s also great to see hacks like this that come together through necessity and really get into the meat of the hardware. Perhaps we’ll see this controller ported to work with other versions of Super Smash Bros, too!

APRS Tracking System Flies Your Balloons

Looking for a way to track your high-altitude balloons but don’t want to mess with sending data over a cellular network? [Zack Clobes] and the others at Project Traveler may have just the thing for you: a position-reporting board that uses the Automatic Packet Reporting System (APRS) network to report location data and easily fits on an Arduino in the form of a shield.

The project is based on an Atmel 328P and all it needs to report position data is a small antenna and a battery. For those unfamiliar with APRS, it uses amateur radio frequencies to send data packets instead of something like the GSM network. APRS is very robust, and devices that use it can send GPS information as well as text messages, emails, weather reports, radio telemetry data, and radio direction finding information in case GPS is not available.

If this location reporting ability isn’t enough for you, the project can function as a shield as well, which means that more data lines are available for other things like monitoring sensors and driving servos. All in a small, lightweight package that doesn’t rely on a cell network. All of the schematics and other information are available on the project site if you want to give this a shot, but if you DO need the cell network, this may be more your style. Be sure to check out the video after the break, too!

Continue reading “APRS Tracking System Flies Your Balloons”

Solar Charge Controller Improves Efficiency Of Solar Panels

The simplest and easiest way to charge a battery with a solar panel is to connect the panel directly to the battery. Assuming the panel has a diode to prevent energy from flowing through it from the battery when there’s no sunlight. This is fairly common but not very efficient. [Debasish Dutta] has built a charge controller that addresses the inefficiencies of such a system though, and was able to implement maximum power point tracking using an Arduino.

Maximum power point tracking (MPPT) is a method that uses PWM and a special DC-DC converter to match the impedance of the solar panel to the battery. This means that more energy can be harvested from the panel than would otherwise be available. The circuit is placed in between the panel and the battery and regulates the output voltage of the panel so it matches the voltage on the battery more closely. [Debasish] reports that an efficiency gain of 30-40% can be made with this particular design.

This device has a few bells and whistles as well, including the ability to log data over WiFi, an LCD display to report the status of the panel, battery, and controller, and can charge USB devices. This would be a great addition to any solar installation, especially if you’ve built one into your truck.

This is [Debasish]’s second entry to The Hackaday Prize. We covered his first one a few days ago. That means only one thing: start a project and start documenting it on hackaday.io

Open-Source Robotic Arm Now Within Reach

For anyone looking for a capable robotic arm for automation of an industrial process, education, or just a giant helping hand for a really big soldering project, most options available can easily break the bank. [Mads Hobye] and the rest of the folks at FabLab RUC have tackled this problem, and have come up with a very capable, inexpensive, and open-source industrial arm robot that can easily be made by anyone.

The robot itself is Arduino-based and has the option to attach any end effector that might be needed for a wide range of processes. The schematics for all of the parts are available on the project site along with all of the Arduino source code. [Mads Hobye] notes that they made this robot during a three-day sprint, so it shouldn’t take very long to get your own up and running. There’s even a virtual robot that can be downloaded and used with the regular robot code, which can be used for testing or for simply getting the feel for the robot without having to build it.

This is a great project, and since it’s open source it will be great for students, small businesses, and hobbyists alike. The option to attach any end effector is also a perk, and we might suggest trying out [Yale]’s tendon-driven robotic hand. Check after the break for a video of this awesome robot in action.

Continue reading “Open-Source Robotic Arm Now Within Reach”

Spectrum Analyzer On The Cheap

Provided you have an NTSC-compatible TV you can build yourself a really inexpensive spectrum analyzer. From there you just need one trivial piece of hardware to complete this build. [Bruce Land] has come up with a spectrum analyzer that shouldn’t cost any more than $5, if that’s what’s been keeping you from adding this tool to your workbench!

The spectrum analyzer is based on a PIC32 microcontroller which was previously proven in his Oscilloscope project. [Bruce] has managed to squeeze quite a bit out of this robust chip; the spectrum analyzer has 450 kHz bandwidth and runs a 256 Hz TV display and can output over 30 updates per second. The microcontroller runs the Fast Fourier Transform (FFT) to do calculations, with great results.

[Bruce] notes that the project was based on TV framework from another project, and that the FFT was added on top of that. Be sure to check out the source code on the project site if you’ve been on the hunt for an inexpensive spectrum analyzer, and if you need something with more processing power but only slightly more money, check out the FFT that runs on the Raspberry Pi’s GPU.