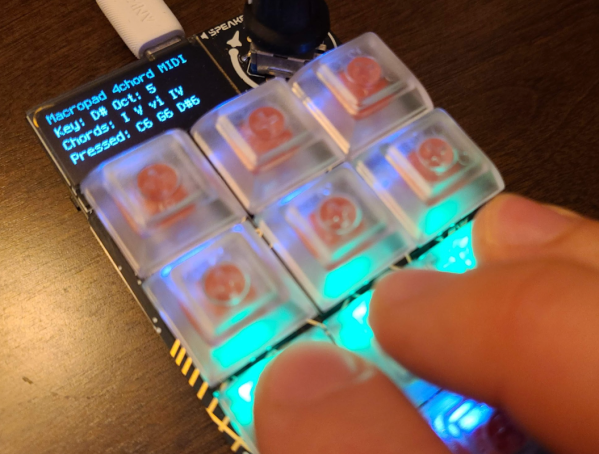
Copy And Paste Lithium Battery Protection

Lithium batteries have, nearly single-handedly, ushered in the era of the electric car, as well as battery energy storage of grid power and plenty of other technological advances not possible with older battery chemistries. There’s just one major downside: these lithium cells can be extremely finicky. If you’re adding one to your own project you’ll have to be extremely careful to treat them exactly how they are designed to be treated using something like this boilerplate battery protection circuit created by [DIY GUY Chris].

The circuit is based around the TP4056 integrated circuit, which handles the charging of a single lithium cell — in this design using supplied power from a USB port. The circuit is able to charge a cell based on the cell’s current charge state, temperature, and a model of the cell. It’s also paired with a DW01A chip which protects the cell from various undesirable conditions such as over-current, overcharge, and over-voltage.

The best thing about this design isn’t the design itself, but that [DIY GUY Chris] built the circuit schematic specifically to be easily copied into PCB designs for other projects, which means that lithium batteries can more easily be integrated directly into his other builds. Be sure to check out our primer on how to deal with lithium batteries before trying one of your own designs, though.

Continue reading “Copy And Paste Lithium Battery Protection”

Electronic Shoe Explores Alleged Chess Misbehavior

A few months ago, a scandal erupted in the chess world which led to some pretty wild speculation around a specific chess player. We won’t go into any of the details except to say that there is virtually no physical evidence of any method this player allegedly used to cheat in a specific in-person chess match. But [Teddy Warner] and partner [Jack Hollingsworth] were interested in at least providing a proof-of-concept for how this cheating could have been done, though, and came up with this device which signals a chess player through a shoe.

The compact device is small enough to fit in the sole of one of the player’s shoes, and is powered by an ATtiny412 microcontroller paired with a HC-06 Bluetooth module. The electronics are fitted into a 3D printed case along with a small battery which can then be placed into the sole of a shoe, allowing the wearer to feel the vibrations from a small offset-weight motor. With a second person behind a laptop and armed with a chess engine, the opponent’s moves can be fed into the computer and the appropriate response telegraphed through the shoe to the player.

While [Teddy] and [Jack] considers the prototype a success in demonstrating the ease at which a device like this could be used, and have made everything related to this build open source, this iteration did have a number of issues including that the motor buzzing was noticeable during play, and that his chess engine made some bizarre choices in the end game. It also requires the complicity of a second person, which is something this other chess cheating machine does away with. They also note that it’s unlikely that any chess players at the highest levels use devices like these, and that other chess experts have found no evidence of any wrongdoing in this specific scandal.

Continue reading “Electronic Shoe Explores Alleged Chess Misbehavior”

Classic Calculators Emulated In Browser

The Multiple Arcade Machine Emulator, now known simply as MAME, started off as a project to emulate various arcade games. The project is still adding new games to its library, but the framework around MAME makes it capable of emulating pretty much any older computer. The computer doesn’t even need to be a gaming-specific machine as the latest batch of retro hardware they’ve added support for is a number of calculators from the 90s and early 00s including a few classics from Texas Instruments.

Since no one is likely to build an arcade cabinet version of a TI-89, all of these retro calculators are instead emulated entirely within a browser. This includes working buttons and functions on an overlay of each of these calculators but also pixel-accurate screen outputs for each of these. The graphing calculators have more of what we would consider a standard computer screen, but even the unique LCDs of some of the more esoteric calculators are accurately replicated as well thanks to the MAME artwork system.

There are a number of calculators implemented under this project with a full list found at this page, and the MAME team has plans to implement more in the future. If you’re looking for something fun to do on a more modern calculator, though, take a look at this build which implements ray tracing on a TI-84 Plus CE.

Thanks to [J. Peterson] for the tip!

Converting A Sink To An Ultrasonic Cleaner

While ultrasonic cleaning might sound a bit like the “sonic shower” from Star Trek, this is actually one case where the futuristic-sounding technology predates its use in Sci-Fi. Ultrasonic cleaners have been around since the 50s and are used to clean all sorts of oddly-shaped or specialty objects by creating cavitation within a liquid that allows the surface of the object to be scoured. With the right equipment, these cleaning devices are fairly straightforward to build as well.

This ultrasonic cleaner by [Branchus Creations] started off as a standard stainless steel laundry sink, but with the addition of a few transducers it really turns up the volume. They are attached to the underside of the sink with a combination of a bolt and hard epoxy so that the sound is efficiently transmitted to the sink, but they’re not much use without driver boards to power them. These drivers take AC power and convert it to the DC required to generate the ultrasonic frequencies, and this build uses a driver for each of the transducers all wired up to a common control board for ease-of-use.

The results speak for themselves; a test is performed on a sheet of aluminum foil which quickly turns takes on a Swiss cheese appearance after just a couple minutes in the cleaner. It’s also shown cleaning rusty nails and a few other things as well. For other nontraditional cleaning methods, be sure to check out this wet media blast cabinet built from a 55-gallon drum.

Continue reading “Converting A Sink To An Ultrasonic Cleaner”

DIY Macro Keyboard Wood Be Nice

Editing video tends to involve a lot of keyboard shortcuts, and while this might be fine for the occasional edit, those who regularly deal with video often reach for a macro pad to streamline their workflow. There are plenty of macro keyboards available specifically meant to meet the needs of those who edit a lot of video, but if you want something tailored for your personal workflow you may want to design your own keyboard like this wooden macro pad from [SS4H].

The keyboard itself is built around an STM32 microcontroller, which gives it plenty of power to drive and read the keyboard matrix. It also handles an encoder that is typically included on macro keyboards for video editing, but rather than using a potentiometer-type encoder this one uses a magnetic rotary encoder for accuracy and reliability. There’s a display built into the keyboard as well with its own on-board microcontroller that needs to be programmed separately, but with everything assembled it looks like a professional offering.

[SS4H] built a prototype using 3D printed parts, but for the final version he created one with a wooden case and laser etched keys to add a bit of uniqueness to the build. He also open-sourced all of the PCB schematics and other files needed to recreate this build so anyone can make it if they’d like. It’s not the only macro keyboard we’ve seen before, either, so if you’re looking for something even more esoteric take a look at this keyboard designed to be operated by foot.

Continue reading “DIY Macro Keyboard Wood Be Nice”

Translating And Broadcasting Spoken Morse Code

When the first radios and telegraph lines were put into service, essentially the only way to communicate was to use Morse code. The first transmitters had extremely inefficient designs by today’s standards, so this was more a practical limitation than a choice. As the technology evolved there became less and less reason to use Morse to communicate, but plenty of amateur radio operators still use this mode including [Kevin] aka [KB9RLW] who has built a circuit which can translate spoken Morse code into a broadcasted Morse radio signal.

The circuit works by feeding the signal from a microphone into an Arduino. The Arduino listens for a certain threshold and keys the radio when it detects a word being spoken. Radio operators use the words “dit” and “dah” for dots and dashes respectively, and the Arduino isn’t really translating the words so much as it is sending a signal for the duration of however long each word takes to say. The software for the Arduino is provided on the project’s GitHub page as well, and uses a number of approaches to make sure the keyed signal is as clean as possible.

[Kevin] mentions that this device could be used by anyone who wishes to operate a radio in this mode who might have difficulty using a traditional Morse key and who doesn’t want to retrain their brain to use other available equipment like a puff straw or a foot key. The circuit is remarkably straightforward for what it does, and in the video below it seems [Kevin] is having a blast using it. If you’re still looking to learn to “speak” Morse code, though, take a look at this guide which goes into detail about it.

Thanks to [Dragan] for the tip!

Continue reading “Translating And Broadcasting Spoken Morse Code”

Wii Turned Expansion Card For Broadcast Monitor

For the proper retro gaming aesthetic, plenty of gamers look to old CRT displays. Older games can look better on these displays because the original programmers took their visual characteristics into account. Finding a CRT from the 90s or early 2000s is one option, but an even better option is a broadcast video monitor (BVM) which were extremely high quality CRTs with some other features, like the ability to install a Wii straight to an expansion port on the monitor itself (Nitter).

These monitors were, as their name implies, made for broadcast TV productions. As such, they don’t have the typical video connections that might be found on a consumer unit. Instead, they used modular cards to interface with the monitor. Thanks to an open design for cards made for Sony monitors, [ShankMods] was able to make one for the Wii by “trimming” away the unnecessary parts of the console’s PCB and mapping its video and audio outputs to the slot connector.

While the Wii might not be everyone’s idea of retro, it was still a console that came out when plenty of people still had CRTs as their primary home television. It isn’t as necessary to have a CRT for a Wii as some of the older consoles, but it was very easily adaptable to this single-board design. If you don’t have a CRT and still want the CRT feel, there are ways of retrofitting a more modern display to get this effect, though.

Thanks to [Jonas] for the tip!