Well-Protected USB Power Strip Makes It Easy To Plug In

When we get a new device these days, somewhere in the package is likely to be a wall-wart USB power supply. We look for a place to plug in the little switch-mode dongle, rearrange a few plugs in the mains power strip, and curse its designers for the overly cozy outlet spacing. And all the while that USB-A plug on the power supply cable taunts us with its neat, compact form factor. If only there were a USB power strip.

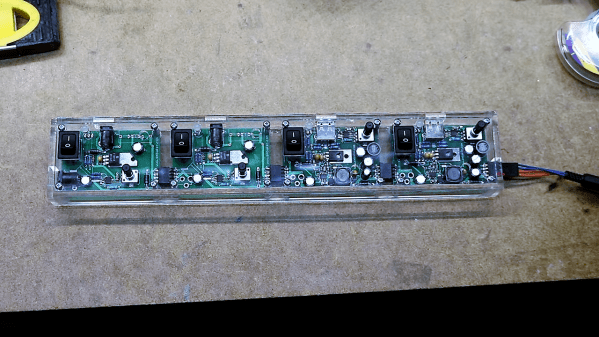
Unwilling to suffer such indignity any longer, [Scott M. Baker] took matters into his own hands and designed this USB power distribution system. We were surprised to hear that he was unable to find a commercial USB power strip, but even if he had, it likely wouldn’t have had the bells and whistles that he added to his. The circuit went through a couple of revs, but each was focused on protection of the connected USB devices. He included both overcurrent protection, in the form of an electronic fuse built around a TPS2421 hot-swap controller, and overvoltage protection using a crowbar circuit with the usual zener-SCR arrangement. There’s also a transient voltage suppression diode to keep any inductive spikes at bay. Interestingly, each USB outlet has all these protections – it’s not just one protected bus feeding a bunch of USB outlets in parallel, but individual modules with all the circuitry. The modules are gangable and live inside a laser-cut acrylic case. The video below shows the design and build process in some detail.

We have to say that we always learn a lot about circuit design from [Scott]’s projects. You may recall his custom Atari 2600 controller or his dual-port memory retro game console, both interesting and instructive builds in their own right.

Continue reading “Well-Protected USB Power Strip Makes It Easy To Plug In”

Polar Platform Spins Out Intricate String Art Portraits

We have semi-fond memories of string art from our grade school art class days. We recall liking the part where we all banged nails into a board, but that bit with wrapping the thread around the nails got a bit tedious. This CNC string art machine elevates the art form far above the grammar school level without all the tedium.

Inspired by a string art maker we recently feature, [Bart Dring] decided to tackle the problem without using an industrial robot to dispense the thread. Using design elements from his recent coaster-creating polar plotter, he built a large, rotating platform flanked by a thread handling mechanism. The platform rotates the circular “canvas” for the portrait, ringed with closely spaced nails, following G-code generated offline. A combination of in and out motion of the arm and slight rotation of the platform wraps the thread around each nail, while rotating the platform pays the thread out to the next nail. Angled nails cause the thread to find its own level naturally, so no Z-axis is needed. The video below shows a brief glimpse of an additional tool that seems to coax the threads down, too. Mercifully, [Bart] included a second fixture to drill the hundreds of angled holes needed; the nails appear to be inserted manually, but we can think of a few fixes for that.

We really like this machine, both in terms of [Bart]’s usual high build-quality standards and for the unique art it creates. He mentions several upgrades before he releases the build files, but we think it’s pretty amazing as is.

Continue reading “Polar Platform Spins Out Intricate String Art Portraits”

Art Deco Control Panel Looks Out Of Metropolis

Bakelite, hammertone gray finish, big chunky toggle switches, jeweled pilot lights – these are a few of [Wesley Treat]’s favorite retro electronics things. And he’ll get no argument from us, as old gear is one of our many weak spots. So when he was tasked by a friend to come up with some chaser lights for an Art Deco-themed bar, [Wesley] jumped at the chance to go overboard with this retro-style control panel.

Granted, the video below pays short shrift to the electronics side of this build in favor of concentrating on the woodworking and metalworking aspects of making the control panel. We’re OK with that, too, as we picked up a ton of design tips along the way. The control panel is all custom, with a chassis bent from sheet aluminum. The sides of the console are laminated walnut and brushed aluminum, which looks very chic. We really like the recessed labels for the switches and indicators on the front panel, although we’d have preferred them to be backlighted. And that bent aluminum badge really lends a Chrysler Building flair that ties the whole project together.

All in all, a really nice job, and another in a long string of retro cool projects from [Wesley]. We recently featured his cloning of vintage knobs for an old Philo tube tester, and we’ll be looking for more great projects from him in the future.

Continue reading “Art Deco Control Panel Looks Out Of Metropolis”

A Coin Cell Powers This Tiny ESP32 Dev Board

Just for the challenge, just for fun, just for bragging rights, and just to do a little showing off – all perfectly valid reasons to take on a project. It seems like one or more of those are behind this tiny ESP32 board that’s barely larger than the coin cell that powers it.

From the video below, [Mike Rankin] has been working down the scale in terms of powering and sizing his ESP32 builds. He recently completed a project with an ESP32 Pico D4 and an OLED display that fits exactly on an AA battery holder, which he populated with a rechargeable 14550. Not satisfied with that form factor, he designed another board, this time barely larger than the LIR2450 rechargeable coin cell in its battery holder. In addition to the Pico D4, the board sports a USB charging and programming socket, a low drop-out (LDO) voltage regulator, an accelerometer, a tiny RGB LED, and a 96×16 OLED display. Rather than claim real estate for switches, [Mike] chose to add a pair of pads to the back of the board and use them as capacitive touch sensors. We found that bit very clever.

Sadly, the board doesn’t do much – yet – but that doesn’t mean we’re not impressed. And [Mike]’s no stranger to miniaturization projects, of course; last year’s Open Hardware Summit badge was his brainchild.

Continue reading “A Coin Cell Powers This Tiny ESP32 Dev Board”

Radiation Detector Eschews Tubes, Uses Photodiode

When the topic is radiation detection, thoughts turn naturally to the venerable Geiger-Müller tube. It’s been around for ages, Russian surplus tubes are available for next to nothing, and it’s easy to use. But as a vacuum tube it can be somewhat delicate, and the high voltages needed to run it can be a little on the risky side.

Luckily, there are other ways to see what’s going on in the radioactive world, like this semiconductor radiation detector. [Robert Gawron] built it as a proof-of-concept after having built a few G-M tube detectors before. His solid-state design relies on a reverse-biased photodiode conducting when ionizing radiation hits the P-N junction. The tiny signal is amplified by a pair of low-noise op-amps and output to a BNC connector. The sensor’s analog output is sent to an oscilloscope whose trigger out is connected to a Nucleo board for data acquisition. The Nucleo is in turn connected to a Raspberry Pi for totalizing and logging. It’s a complicated chain, but the sensor appears to work, even detecting alpha emissions from thoriated TIG electrodes, a feat we haven’t been able to replicate with our G-M tube counter.

[Robert]’s solid-state detector might not be optimal, but it has promise. And we have seen PIN diodes used as radiation detectors before, too.

[via Dangerous Prototypes]

Retrotechtacular: How Not To Design With Transistors

Consider the plight of a mid-career or even freshly minted electrical engineer in 1960. He or she was perched precariously between two worlds – the proven, practical, and well-supported world of vacuum tube electronics, and the exciting, new but as yet unproven world of the transistor. The solid-state devices had only started making inroads into electronic products relatively recently, and mass production techniques were starting to drive the cost per unit down enough to start including them in your designs. But, your company has a long history with hot glass and no experience with flecks of silicon. What to do?

To answer that question, you might have turned to this helpful guide, “Tubes and Transistors: A Comparative Guide” (PDF link). The fancy booklet, with a great graphic design that our own [Joe Kim] would absolutely love, was the product of the Electron Tube Information Council, an apparently defunct group representing the interests of the vacuum tube manufacturers. Just reading the introduction of this propaganda piece reveals just how worried companies like RCA, General Electric, and Westinghouse must have been as the 1950s turned into the 1960s. The booklet was clearly aimed directly at engineers and sought to persuade them of the vacuum tube’s continued relevance and long-term viability. They helpfully explain that tubes are a reliable, proven technology that had powered decades of designs, and that innovations such as heaterless cathodes and miniaturization were just around the corner. Transistors, we’re told, suffer from “spread of characteristics” that correctly describes the state of materials engineering of silicon and germanium at the time, a thornier problem than dealing with glass and wires but that they had to know would be solved within a few years.

With cherry-picked facts and figures, the booklet makes what was probably in 1960 a persuasive case for sticking with tubes. But the Electron Tube Information Council was fighting a losing battle, and within a decade of swamping engineers with this book, the industry had largely shifted to the transistor. Careers were disrupted, jobs disappeared, and fortunes were lost, but the industry pressed forward as it always does. Still, it’s understandable why they tried so hard to stem the tide with a book like this. The whole PDF is worth a look, and we’d love to have a hard copy just for nostalgia’s sake.

Thanks to [David Gustafik] for the tip.

Casio Watch Gets A MEMS Oscillator Upgrade

We’ve got to admit to being a bit of a Casio G-Shock watch geek. The big, chunky watches were every day carry items that survived everything we dished out, right up until the smartphone made wearing one seem redundant. But others continue to use and abuse G-Shocks, and some brave souls even hack them.

Replacing the standard quartz crystal with a temperature-compensated MEMS oscillator is one hack that [Alex] tried, and it appears to have worked out well. His project write-up doesn’t specify which MEMS oscillator was used, but we suspect it’s the SiT1552 TCXO. With its extremely small size, stability over a wide range of temperatures, and ultra-low power requirements, the chip is a natural choice to upgrade the stock 32.768-kHz quartz crystal of the watch. Trouble is, the tiny 1.5 mm x 0.8 mm chip-scale package (CSP) device presented some handling problems. After overcooking a few chips in the reflow oven, [Alex] was able to get one mounted to a tiny breakout board, which went into the space formerly occupied by the watch’s quartz crystal. He stole power for the TCXO from a decoupling capacitor, sealed the watch back up, and it’s back in service with better stability and longer battery life to boot. The video below shows the TCXO undergoing tests alongside the original quartz crystal and a comparatively huge DS3231 RTC module, just for fun.

[Alex]’s MEMS transplant seems a long way to go and a lot of fussy work for marginal gains, but who are we to judge? And it does make the watch susceptible to punking with a little helium, which might make things interesting.

Continue reading “Casio Watch Gets A MEMS Oscillator Upgrade”