Arduino Shield For Arduino. No, Really.

We’ve been accused on more than one occasion…okay, pretty much every single day…of harboring some kind of creepy Arduino love affair. The topic does come up an awful lot here, we’re not oblivious to that, and had been patiently waiting for April Fool’s Day to post an article lampooning the whole situation, both ourselves and critics alike, so that everybody could have a good laugh (or possibly annihilate the entire planet in the resulting flame war, we’re not sure). And what could possibly make for a more self-referential joke than an Arduino shield…for Arduino?

Truth, as it turns out, is stranger than fiction. “Core2duino” is — seriously now, no joke — an Arduino shield containing a second ATmega microcontroller and full complement of I/O pins. The two chips in this Young Frankenstein-esque assemblage coordinate over the I2C bus, providing, at least in theory, more processing power, more I/O, and perhaps a degree of fault tolerance. In reality, we’re pretty skeptical, but do have to give them props for a great Instructable, detailing the whole process start to finish with Eagle CAD files, board etching and drilling, and advice on where to score free Cosmopolitan magazines (it helps “if you know any women,” we’re told).

There’s no indication whether this works with stacking headers to allow for an Arduino shield for Arduino shield for Arduino, or perhaps some Möbius strip-like endless stack of Arduinos. Feel free to discuss in the comments. We’ll be waiting in our concrete bunker 37 miles away!

Tiny Keyboard/touchpad Has “hack” Written All Over It

Yes, we know, this is not a hack, yet it just has the vibe of something we’ll likely be seeing in many small form-factor systems and wearable hacks in the future.

The USB Wireless Handheld Keyboard is a diminutive keyboard and mouse replacement with a passing resemblance to a BlackBerry PDA — where the screen has been replaced with a laptop-style trackpad sensor. This seems a shoo-in for home theater PC use; it’s unobtrusive and won’t look out of place on the coffee table alongside the universal remote. But any tiny system requiring only occasional input could likely benefit.

The keyboard layout is funky as heck, though likely adequate for its intended use of couch web-surfing and interactive messaging (or whatever wild applications our readers will surely come up with). A USB wireless receiver and a charging cable are included in the $62 package. Video after the break…

[USB Geek via Engadget]

Continue reading “Tiny Keyboard/touchpad Has “hack” Written All Over It”

Make Any Gloves Work With A Touch Screen

The chill of autumn is upon us, and with it comes the awkward sport of trying to work touch-sensitive phones and gadgets with gloved fingers. One can try toughing it out with fingerless gloves, or we’ve seen some costly solutions in the forms of specialized gloves and capacitive-compatible styluses, but sometimes simple is best: all it takes is a few stitches of conductive thread in the fingertips.

Conductive thread is available from various sources; SparkFun Electronics comes naturally to mind, but most vendors carrying the LilyPad Arduino will stock a suitable thread as well. Don’t fret if you’ve never sewn before — just a few simple loops are required, and it doesn’t need to be especially tidy. In principle this should work for trackpads and capacitive mice as well, if you use those in the field. For multitouch devices, add a separate conductive bit to each fingertip.

[via Lifehacker]

STM8S-Discovery: Microcontrollers Reach A New Low

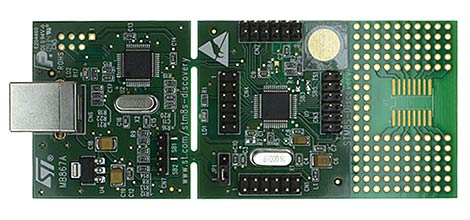
A complete microcontroller development kit for little more than the cost of a bare chip? That’s what STMicroelectronics is promising with their STM8S-Discoveryseven dollars gets you not only a board-mounted 8-bit microcontroller with an decent range of GPIO pins and functions, but the USB programmer/debugger as well.

The STM8S microcontroller is in a similar class as the ATmega328 chip on latest-generation Arduinos: an 8-bit 16 MHz core, 32K flash and 2K RAM, UART, SPI, I2C, 10-bit analog-to-digital inputs, timers and interrupts and all the usual goodness. The Discovery board features a small prototyping area and throws in a touch-sense button for fun as well. The ST-LINK USB programmer/debugger comes attached, but it’s easy to crack one off and use this for future STMicro-compatible projects; clearly a plan of giving away the razor and selling the blades.

The development tools are for Windows only, and novice programmers won’t get the same touchy-feely community of support that surrounds Arduino. But for cost-conscious hackers and for educators needing to equip a whole classroom (or if you’re just looking for a stocking stuffer for your geeky nephew), it’s hard to argue with seven bucks for a full plug-and-play setup.

[thanks Billy]

Review: Mbed NXP LPC1768 Microcontroller

mbed is a next-generation 32-bit microcontroller platform. It’s a prototyping and teaching tool somewhat along the lines of Arduino. On steroids. With claws and fangs. Other contenders in this class include the MAKE Controller, STM32 Primer and Primer 2, Freescale Tower, and Microchip’s PIC32 Starter Kit. The mbed hardware has a number of advantages (and a few disadvantages) compared to these other platforms, but what really sets it apart is the development environment: the entire system — editor, compiler, libraries and reference materials — are completely web-based. There is no software to install or maintain on the host system.
Continue reading “Review: Mbed NXP LPC1768 Microcontroller”

DIYLILCNC: Do-it-yourself CNC Mill

DIYLILCNC

The DIY LIL CNC project is the newest member of the homebrew fabrication scene. This is a three-axis CNC mill that can be built by anyone with basic shop skills and about $700 in their pocket. Many of the materials can be acquired from the likes of Home Depot: the basic framework is assembled from Masonite, while other cost-cutting measures include the use of skate bearings and a common Dremel tool for powering the cutting bit. About half of the cost is for the HobbyCNC driver and stepper motor package that runs the show.

The instructions for the DIY LIL CNC are distributed under a Creative Commons license, allowing for modification and distribution with few restrictions. They’re well-written and quite thorough, including all patterns and a complete bill of materials with suppliers, part numbers and costs. As documented, the ’bot can produce parts up to 12 x 14 x 2 inches, but the project’s creators offer some suggestions on adapting the design for larger work. It’s not self-replicating like the RepRap aims for; you’ll need access to a laser cutter for some of the parts. If you can clear that hurdle, this looks like a great introduction to CNC production.

DIY Circuit Etching Video Tutorial

toner-paper

Circuit-bending blog GetLoFi has posted the best tutorial yet on home-made printed circuit boards using the toner transfer method.

We’ve covered homebrew PCB fabrication techniques about a billion times before. What sets this tutorial apart is that it collects many bits of knowledge otherwise scattered all about the web, and then depicts the entire process on video, from initial printing to cut PCB…because reading about it versus seeing it done are two different things entirely. They give a number of immensely useful tips throughout: choice of materials and where to get them, tools and techniques, and dispelling several myths about these methods (for example, they’re adamant about not using acetone to clean toner from the PCB). Well worth the 30 minutes to watch. If that’s too much and you’ve been stuck on just one part of the process, the tutorial is in three segments.

Trimming finished boards on a paper cutter? Who would’ve guessed?

[via Make]