unicycle

Offset Unicycle Built Mostly From A Single Bicycle

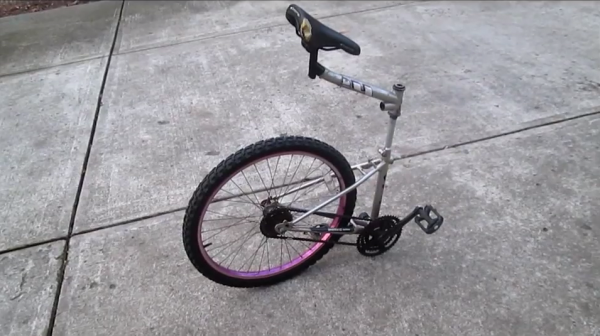
[Lou’s] friends all said that it would be impossible to build a unicycle that had offset pedals. Moving the pedals to the front of the unicycle would throw off the balance and prevent the user from being able to ride it. [Lou] proved them wrong using mostly components from a single donor bicycle.

The donor bike gets chopped up into a much smaller version of itself. The pedals stay attached in the original location and end up being out in front of the rider. The seat is moved backwards, which is the key to this build. Having the rider’s legs out in front requires that there be a counter balance in back. Moving the seat backwards gets the job done with relative ease.

To prevent the hub from free wheeling, [Lou] lashes the sprocket directly to the wheel spokes using some baling wire. He also had to remove the derailer and shorted the chain. All of this gives the pedals a direct connection to the wheel, allowing for more control. The video does a great job explaining the build quickly and efficiently. It makes it look easy enough for anyone to try. Of course, actually riding the unicycle is a different matter. Continue reading “Offset Unicycle Built Mostly From A Single Bicycle”

Coffee payment system

Coffee Payment System Doesn’t Void Your Warranty

[Oliver] is back with an update to his recent coffee maker hacks. His latest hack allowed him to add a coffee payment system to an off-the-shelf coffee maker without modifying the coffee maker itself. This project is an update to his previous adventures in coffee maker hacking which logged who was using up all of the coffee.

The payment system begins with an Arduino Uno clone inside of a small project enclosure. The Arduino communicates with the coffee maker via serial using the coffee maker’s service port. This port is easily available from outside the machine, so you won’t have to crack open the case and risk voiding your warranty.

The system also includes an RFID reader and a Bluetooth module. The RFID reader allows each user to have their own identification card. The user can swipe their card over the reader and the system knows how many credits are left in their account. If they have enough credit, the machine will pour a delicious cup of coffee.

The Arduino communicates to an Android phone using the Bluetooth module. [Oliver’s] Android app was built using MIT’s app inventor. It keeps track of the account credits and allows the user to add more. The system can currently keep track of up to forty accounts. [Oliver] also mentions that you can use any Bluetooth terminal program to control the system instead of a smart phone app. Continue reading “Coffee Payment System Doesn’t Void Your Warranty”

Pandaphone

Pandaphone Is A DIY Baby Toy

[Tyler] was looking for a gift for his friend’s one year old son. Searching through the shelves in the toy store, [Tyler] realized that most toys for children this age are just boxes of plastic that flash lights and make sound. Something that he should be able to make himself with relative ease. After spending a bit of time in the shop, [Tyler] came up with the Pandaphone.

The enclosure is made from a piece of 2×4 lumber. He cut that piece into three thinner pieces of wood. The top piece has two holes cut out to allow for an ultrasonic sensor to poke out. The middle piece has a cavity carved out using a band saw. This would leave room to store the electronics. The bottom piece acts as a cover to hide the insides.

The circuit uses an ATtiny85. The program watches the ultrasonic PING sensor for a change in distance. It then plays an audio tone out of a small speaker, which changes pitch based on the distance detected. The result is a pitch that is lower when your hand is close to the sensor, but higher when your hand is farther away. The case was painted with the image of a panda on the front, hence the name, “Pandaphone”. Based on the video below, it looks like the recipient is enjoying it! Continue reading “Pandaphone Is A DIY Baby Toy”

twitter

HamRadioTweets Gets The Word Out

In times of crisis, or extreme government control, it can be difficult to spread critical information to people who can help. A good example of this was during the Arab Spring in 2011. When your Internet connection is taken away, it can feel as though all is lost. Unless you have a ham radio, that is.

For many people the thought of ham radio conjures up images of old guys twisting knobs listening to static, but it’s actually come a long way in our modern digital age. For example, you can now send tweets via ham radio. This project was actually started in 2011 by [Bruce Sutherland]. The Egyptian government had shut down the country’s Internet access after citizens were posting information about the extreme violence they were facing. [Bruce] wanted a way to help  others get the word out, and he came up with HamRadioTweets. This system allows a user to send tweets via ham radio.

The system actually piggybacks off of a ham radio service called APRS. This service is most often associated with GPS tracking systems, such as those found in nearspace balloons, but it can also be used to send simple text messages over the air. APRS works thanks to the vast network of receiving stations setup all around the world. These stations can receive messages and then re-transmit them, greatly extending the reach of the original transmitter. Some of them are even hooked up to the Internet to get the messages to go distances that would be extremely difficult and unreliable by traditional means.

[Bruce’s] system hooked into the Internet component and watched for messages being sent specifically to “TWITR”. The Python based system would then read these messages and re-transmit them over Twitter. The project died out a while back after Twitter updated their API. Now, it’s been rebuilt on Ruby by [Harold Giddings]. The project website was handed over to [Harold] and he is currently maintaining it. Hopefully you’ll never need to use this software, but if the time comes you will be glad it’s available. You can watch [Harold] bounce an APRS message off of the International Space Station and on to Twitter in the video below. Continue reading “HamRadioTweets Gets The Word Out”

Boxing Trainer

Boxing Trainer Uses DIY Force Sensors

A team of Cornell students have designed and built their own electronic boxing trainer system. The product of their work is a game similar to Whack-A-Mole. There are five square pads organized roughly into the shape of a human torso and head. Each pad will light up based on a pre-programmed pattern. When the pad lights up, it’s the player’s job to punch it! The game keeps track of the player’s accuracy as well as their reaction time.

The team was trying to keep their budget under $100, which meant that off the shelf components would be too costly. To remedy this, they designed their own force sensors. The sensors are basically a sandwich of a few different materials. In the center is a 10″ by 10″ square of ESD foam. Pressed against it is a 1/2″ thick sheet of insulating foam rubber. This foam rubber sheet has 1/4″ slits cut into it, resulting in something that looks like jail bars. Sandwiching these two pieces of foam is fine aluminum window screen. Copper wire is fixed the screen using conductive glue. Finally, the whole thing is sandwiched between flattened pieces of corrugated cardboard to protect the screen.

The sensors are mounted flat against a wall. When a user punches a sensor, it compresses. This compression causes the resistance between the two pieces of aluminum screen to change. The resistance can be measured to detect a hit. The students found that if the sensor is hit harder, more surface area becomes compressed. This results in a greater change in resistance and can then be measured as a more powerful hit. Unfortunately it would need to be calibrated depending on what is hitting the sensor, since the size of the hitter can throw off calibration.

Each sensor pad is surrounded by a strip of LEDs. The LEDs light up to indicate which pad the user is supposed to hit. Everything is controlled by an ATMEGA 1284p microcontroller. This is the latest in a string of student projects to come out of Cornell. Make sure to watch the demonstration video below. Continue reading “Boxing Trainer Uses DIY Force Sensors”

ASL Glove

Electronic Glove Detects Sign Language

A team of Cornell students recently built a prototype electronic glove that can detect sign language and speak the characters out loud. The glove is designed to work with a variety of hand sizes, but currently only fits on the right hand.

The glove uses several different sensors to detect hand motion and position. Perhaps the most obvious are the flex sensors that cover each finger. These sensors can detect how each finger is bent by changing the resistance according to the degree of the bend. The glove also contains an MPU-6050 3-axis accelerometer and gyroscope. This sensor can detect the hand’s orientation as well as rotational movement.

While the more high-tech sensors are used to detect most characters, there are a few letters that are similar enough to trick the system. Specifically, they had trouble with the letters R, U, and V. To get around this, the students strategically placed copper tape in several locations on the fingers. When two pieces of tape come together, it closes a circuit and acts as a momentary switch.

The sensor data is collected by an ATmega1284p microcontroller and is then compiled into a packet. This packet gets sent to a PC which then does the heavy processing. The system uses a machine learning algorithm. The user can train the it by gesturing for each letter of the alphabet multiple times. The system will collect all of this data and store it into a data set that can then be used for detection.

This is a great project to take on. If you need more inspiration there’s a lot to be found, including another Cornell project that speaks the letters you sign, as well as this one which straps all needed parts to your forearm.
Continue reading “Electronic Glove Detects Sign Language”

thermostat

Arduino Thermostat Includes Vacation Mode

When [William’s] thermostat died, he wanted an upgrade. He found a few off-the-shelf Internet enabled thermostats, but they were all very expensive. He knew he could build his own for a fraction of the cost.

The primary unit synchronizes it’s time using NTP. This automatically keeps things up to date and in sync with daylight savings time. There is also a backup real-time clock chip in case the Internet connection is lost. The unit can be controlled via the physical control panel, or via a web interface. The system includes a nifty “vacation mode” that will set the temperature to a cool 60 degrees Fahrenheit while you are away. It will then automatically adjust the temperature to something more comfortable before you return home.

[William’s] home is split into three heat zones. Each zone has its own control panel including an LCD display and simple controls. The zones can be individually configured from either their own control panel or from the central panel. The panels include a DHT22 temperature and humidity sensor, an LCD display, a keypad, and support electronics. This project was clearly well thought out, and includes a host of other small features to make it easy to use.