Stay Focused With This Distraction Free Cyberdeck

While on the surface they might seem like little more than cosplay accessories, there are perfectly valid and practical reasons for building a custom cyberdeck. For one thing, a hand-built deck is going to be easier to upgrade and modify down the line. A bespoke rig can also be made to fit your exacting specifications, with each and every design choice made specifically to support your personal style and workflow.

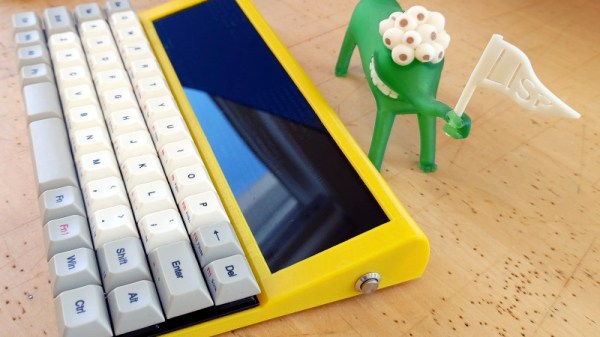
For [Conrad Barski], that meant a computer that would stay out of his way and allow him to take notes and write code while keeping distractions to the absolute minimum. All he wanted in his dream machine was a nice mechanical keyboard, a widescreen display, and enough battery power to go mobile should the need arise. Anything else would be gilding the lily. For those who want to distill personal computing down to its simplest form, this build is really the high water mark.

[Conrad] is currently in the early stages of turning his Lisperati1000 into a kit others can build for themselves, so details are a bit sparse at the moment. But we do know there’s a Raspberry Pi Zero W, a Vortex Core 40% keyboard, and 4,400 mAh worth of battery power wrapped up in that slick 3D printed enclosure. Readers may recognize the 1920×480 ultra-wide LCD from the modernized TRS-80 Model 100 we covered recently, or perhaps the gorgeously reimagined retro terminals of [Oriol Ferrer Mesià]. If you’ve got retro-futurism on the brain, this seems to be the display to beat.

Whether you want to explore vintage computing, stylishly take control of your custom race car, or cruise the airwaves with an integrated software defined radio, a completely custom portable computing device can make for an interesting alternative to another ho-hum laptop from the Big Box electronics store.

Teardown: Bug Zapper Bulb

Up here in the Northern Hemisphere, mosquitoes and other flying pests are the last thing on anyone’s mind right now. The only bug that’s hindering gatherings at the moment goes by the name of COVID-19, but even if we weren’t social distancing, insects simply aren’t a concern at this time of year. So it’s little surprise that these months are often the best time to find a great deal on gadgets designed to deter or outright obliterate airborne insects.

Whatever PIC stands for…it’s not that.

Case in point, I was able to pick up this “Bug Zapper LED Bulb” at the big-box hardware store for just a few bucks. This one is sold by PIC Corporation, though some press release surfing shows the company merely took over distribution of the device in 2017. Before then it was known as the Zapplight, and was the sort of thing you might see advertised on TV if you were still awake at 3 AM. It appears there are several exceptionally similar products on the market as well, which are likely to be the same internally.

In all fairness, it’s a pretty clever idea. Traditional zappers are fairly large, and need to be hoisted up somewhere next to an electrical outlet. But if you could shrink one down to the size of a light bulb, you could easily dot them around the porch using the existing sockets and wiring. Extra points if you can also figure out a way to make it work as a real bulb when the bugs aren’t out. Obviously the resulting chimera won’t excel at either task, but there’s certainly something to be said for the convenience of it.

Let’s take a look inside one of these electrifying illuminators and see how they’ve managed to squeeze two very different devices into one socket-friendly package.

Continue reading “Teardown: Bug Zapper Bulb”

VESA Arm Turned Low-Cost Overhead Camera Rig

Whether you’re live streaming builds or just want to take your project photography to the next level, you can’t beat an overhead camera setup. Unfortunately, they tend to be cumbersome and more often than not quite pricey. Looking for an affordable solution that could easily be moved out of the way when not in use, [Jay Doscher] had the clever idea of adapting a common VESA monitor arm to give his camera a bird’s eye view of the action.

If you think about it, one of these monitor arms is a nearly perfect base for a camera rig. They’re easily mounted to a desk or work bench, can be quickly repositioned by design, and perhaps best of all, you don’t have to spend a lot of money to get a decent one. A camera is also a far lighter and less awkward payload than the arm was designed to hold, so you don’t have to worry about it potentially dropping your expensive gear. Or cheap webcam, as the case may be.

All [Jay] had to do was come up with a way to securely mount his Sony A7R3 on the end of one. While there’s certainly a few ways you could solve this particular problem, he went the extruded plastic route and 3D printed a beefy adapter plate with the standard VESA bolt pattern. His Smallrig camera cage attaches to the plate, and thanks to a pair of press-fit bubble levels from McMaster Carr, he’s able to get everything lined up properly over the bench.

Of course, there’s an excellent chance you don’t have the same camera as [Jay]. But that doesn’t mean you can’t modify the design of his adapter to fit your own gear. To that end, he’s not only shared the final STLs, but he’s provided a link to the TinkerCAD project that you can actually edit right in the browser.

If you’ve got a light enough camera, you could put something similar together with PVC pipes or even an articulated arm intended for a desk lamp. But if you’ve got a DSLR or other full-sized camera, we think it’s more than worth the $30 USD one of these will cost you on Amazon to make sure your gear doesn’t end up smashing into the deck during a live stream.

GBA Gets Homebrew USB Charging Upgrade

Sure there are pre-made kits to add a rechargeable battery and USB-C compatibility to Nintendo’s venerable Game Boy Advance, but [HorstBaerbel] thought he could throw together something similar for a fraction of the price. Plus, he wouldn’t have to wait on shipping. The end result might not be quite as polished, but it’s certainly impressive for what’s essentially a junk bin build.

The star of the show is the popular TP4056 lithium-ion charger module. [HorstBaerbel] went with the more common micro USB version, but these boards are also available with USB-C should you want to embrace the future. The module fits nicely inside the original battery compartment while while still leaving room for a 1,000 mAh pouch cell. The 4.2 V output of the fully charged battery is a bit too high for the Game Boy’s liking, so he used the forward voltage drop of a diode to bring it down to a more acceptable 3.5 V.

Naturally this does waste a good deal of energy, especially compared to the DC-DC converters used in commercial offerings like the CleanJuice, but it still delivers a respectable seven hours of runtime. The only issue with this modification seems to be that you’ve got just five minutes to save your progress and shut down when the GBA’s low-battery light goes on; but what’s life without a little excitement?

While not nearly extreme as some of the other GBA modifications we’ve seen over the years, this project is yet another example of the seemingly unlimited hacking potential of Nintendo’s iconic Game Boy line.

LoRa Messenger Does Its Best BlackBerry Impression

While the de facto smartphone design ultimately went in a different direction, there’s no denying the classic BlackBerry layout offered some compelling advantages. It was a gadget primarily designed to send and receive emails and text messages, and it showed. So is it really any wonder [MSG] would build his pocket-sized LoRa messengers in its image?

Of course, he did have some help. The communicators use the Keyboard FeatherWing by [arturo182], which puts a surplus BlackBerry Q10 keyboard on a custom PCB designed to accept a board from Adafruit’s Feather collection. [MSG] ended up pairing his with a Feather M4 because he wanted to work with CircuitPython, with a 900 MHz LoRa FeatherWing along for the ride. He notes that switching his code over to Arduino-flavored C would allow him to use the Feather M0 that features integrated LoRa; a change that would allow him to make the gadget a bit thinner.

Inside the 3D printed enclosure, He’s made room for a 3.7 V 1800 mAh pouch battery that should provide plenty of runtime. There’s also an external antenna with a uFL pigtail for connecting to the radio. The case is held together with heat-set inserts, which should make it more than robust enough to handle a few adventures.

[MSG] says slight variations in hardware versions means his STLs might need a little tweaking to fit your components, and warns that his code is basically just a mashup of examples he found online, but he’s still sharing the goods for anyone who wants to reach out and touch someone without all that pesky infrastructure in the way.

Continue reading “LoRa Messenger Does Its Best BlackBerry Impression”

Raspberry Pi Takes Over Volvo’s Integrated LCD

As [Luuk Esselbrugge] explains in a recent blog post, his 2002 Volvo S60 had an optional GPS navigation system and backup camera that used a motorized display that would rise out of the dashboard when needed. His particular car didn’t come with the hardware installed, but after getting his hands on a display module and doing some research, he figured out how he could drive it with the Raspberry Pi and a couple of microcontrollers.

Given the age of the display, you probably won’t be surprised to hear that it uses composite video. Not exactly high resolution, but in the demonstration after the break, we have to admit it looks more than up to the task. [Luuk] is running Android Auto on the Raspberry Pi 3 through the openauto project, which gives him a nice big display and access to all the navigation and media applications you’d expect. The display doesn’t support touch, but thanks to an ESP32 plugged into the CAN bus, he’s able to control the software by reading the buttons built into the Volvo’s steering wheel.

Composite video sources are switched with a simple relay.

To actually raise and lower the display, [Luuk] found you just need to fire a few bytes down the 1,200 baud serial bus that’s built into the display’s wiring harness. The ESP32 handles this duty as well, at least partly because it’s already plugged into the CAN bus and can tell when the vehicle is in reverse. This lets it bring up the screen to show the video feed from the newly installed backup camera in the event that the Pi hadn’t already asked to raise the display. Incidentally plugging in the phone normally triggers the system to wake up and raise the screen, and disconnecting it will command the screen to lower back into the stowed position.

The attentive reader or Volvo aficionado may be wondering how [Luuk] got the audio working. Since his car’s sound system doesn’t feature an auxiliary input, he’s using an Arduino to spoof the existence of a CD changer, which allows him to inject an audio signal into one of the pins on the back of the radio. Eventually he wants to move this task over to the ESP32, but he says a big change like that will have to wait until warmer weather.

This isn’t the first time we’ve seen the Raspberry Pi used to add enhanced features to a somewhat older vehicle. While some bemoan the increased complexity of modern vehicles, it seems some hackers can’t get enough of it.

Continue reading “Raspberry Pi Takes Over Volvo’s Integrated LCD”

Arduboy Gets Even Smaller With New Nano Edition

One of the selling points of the Arduboy is how slim [Kevin Bates] was able to get the Arduino-compatible game system, which is perhaps less surprising when you realize that it originally started out as a design for an electronic business card. But compared to the recently unveiled Nano version, it might as well be the old school “brick” Game Boy.

Now to be clear, [Kevin] isn’t looking to put these into official production. Though it does sound like the bare PCBs might be going up for sale in the near future. This was simply an experiment to see how far he could shrink the core Arduboy hardware while still keeping it not only playable but also code-compatible with the full-size version. While “playable” might be a tad subjective in this case, the video after the break clearly demonstrates that it’s fully functional.

Inside the 3D printed case is the same ATmega32U4 that powers the Arduboy, a 64×32 0.49″ OLED display, and a tiny 25 mAh pouch battery. There’s even a miniature piezo speaker for the bleeps and bloops. All of the pinouts have remained the same so existing code can be moved right over, though the screen is now connected over I2C. [Kevin] has released the schematics for the board in keeping with the general open nature of the Arduboy project, though for now he’s decided to hold onto the board files until it’s clear whether or not there’s a commercial future for the Nano.

We’ve seen attempts to shrink the Arduboy down before, most notably down to the point it could fit inside of a Dreamcast Visual Memory Unit, but the Nano certainly raises (or is that lowers?) the bar considerably.

Continue reading “Arduboy Gets Even Smaller With New Nano Edition”