A Look At The “Risky” Tech In NASA’s Martian Helicopter

On February 18th, the Perseverance rover safely touched down on the Martian surface. In the coming days and weeks, the wide array of instruments and scientific payloads tucked aboard the robotic explorer will spring to life; allowing us to learn more about the Red Planet. With a little luck, it may even bring us closer to determining if Mars once harbored life as we know it.

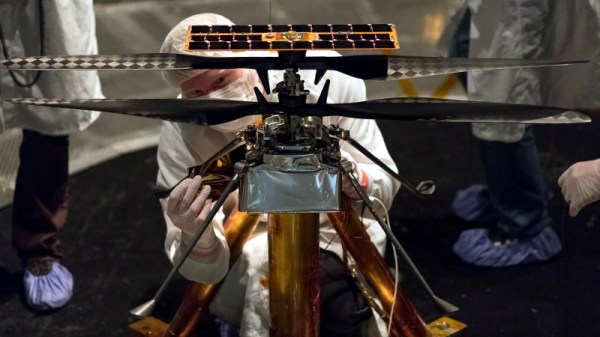
Among all of the pieces of equipment aboard the rover, one of the most intriguing must certainly be Ingenuity. This small helicopter will become the first true aircraft to take off and fly on another planet, and in a recent interview with IEEE Spectrum, operations lead [Tim Canham] shared some fascinating details about the vehicle and some of the unorthodox decisions that went into its design.

Ingenuity’s downward facing sensors.

[Tim] explains that, as a technology demonstrator, the team was allowed to take far more risks in developing Ingenuity than they would have been able to otherwise. Rather than sticking with legacy hardware and software, they were free to explore newer and less proven technology.

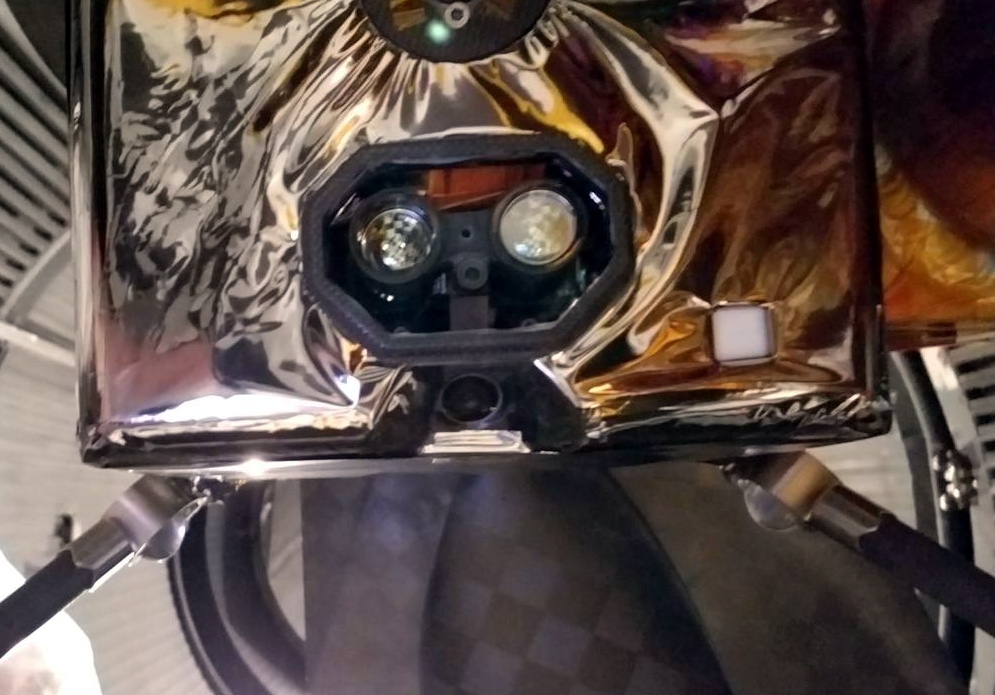
That included off-the-shelf consumer components, such as a laser altimeter purchased from SparkFun. It also means that the computational power packed into Ingenuity far exceeds that of Perseverance itself, though how well the helicopter’s smartphone-class Snapdragon 801 processor will handle the harsh Martian environment is yet to be seen.

On the software side, we also learn that Ingenuity is making extensive use of open source code. Not only is the onboard computer running Linux, but the vehicle is being controlled by an Apache 2.0 licensed framework developed by NASA’s Jet Propulsion Laboratory for CubeSats and other small spacecraft. The project is available on GitHub for anyone who wants it, and according to the changelog, the fixes and improvements required for the “Mars Helicopter Project” were merged in a few releases ago.

The fact that code currently ticking away on the surface of Mars can be downloaded and implemented into your own DIY project is a revelation that’s not lost on [Tim]. “It’s kind of an open-source victory because we’re flying an open-source operating system and an open-source flight software framework and flying commercial parts that you can buy off the shelf if you wanted to do this yourself someday.”

Of course, it took a whole lot more than some Python libraries and a handful of sensors from SparkFun to design and build the first space-going helicopter. But the fact that even a small slice of the technology inside of a project like Ingenuity is now available to the average hacker and maker is a huge step towards democratizing scientific research here on Earth.

Continue reading “A Look At The “Risky” Tech In NASA’s Martian Helicopter”

Google-Inspired USB-PD Sniffer For The DIY Crowd

If you want to hack around with the communication protocol that USB Power Delivery devices use to negotiate their power requirements with the upstream source, a tool like Google’s Twinkie really helps. With it you can sniff data off the line, analyze it, and even inject your own packets. Luckily for us, the search giant made the device open source so we can all have one of our own.

Unfortunately, as [dojoe] found out, the Twinkie isn’t particularly well suited for small-scale hobbyist manufacturing. So he came up with a revised design he calls Twonkie that replaces the six layer PCB with a much more reasonable four layer version that can be manufactured cheaply by OSHPark, and swaps out the BGA components with QFP alternatives you can hand solder.

That said, it’s still likely to be a challenging build for the home gamer. There’s quite a few 0402 passives on there, and while those are doable with an iron, it can certainly be tricky. To take some pressure off, [dojoe] says he tried to optimize the board layout as much as possible for hand assembly. He was even able to avoid needing hot air by straddling the PCB with USB-C mounts intended for vertical applications.

Given the current chip shortage, [dojoe] says the biggest problem might actually getting your hands on the STM32F072CB microcontroller at the Twonkie’s core. To that end, the board supports TQFP44 and QFN44 footprints, and you can even use a STM32F072C8 at the cost of some functionality. With a bit of luck, hopefully you can find a chip that will work in the parts bin.

Slim Sypherdeck Skips The Keyboard, Packs X86 CPU

There are few hard and fast rules in the world of custom cyberdecks, but many of these bespoke machines do share a certain level of commonality. They generally use a low-power ARM board such as the Raspberry Pi that doesn’t consume much power or require any exotic thermal management, and a large mechanical keyboard is almost a given. But at a glance, it’s clear that [Daan Gerits] wasn’t concerned with the status quo when designing the Sypherdeck.

Now to be fair, dropping the ARM single-board computer for x86 isn’t completely unheard of. But those builds tend to be considerably bulkier than the Sypherdeck. The secret here seems to be that the 3D printed enclosure doesn’t hold much else than the LattePanda and a seven inch LCD touch screen. The hatch on the side covers the rear of the power, USB, and HDMI bulkhead connectors, but it looks like there’s enough room in there to squeeze in a bit of custom electronics should you wish. There’s no obvious place to install any batteries, so if you wanted to take the show on the road, you’ll need to use an external pack.

Continue reading “Slim Sypherdeck Skips The Keyboard, Packs X86 CPU”

NASA Selects SpaceX To Launch Lunar Gateway

While not a Cabinet position, the NASA Administrator is nominated by the president of the United States and tasked with enacting their overall space policy. As such, a new occupant in the White House has historically resulted in a different long-term directive for the agency. Some presidents have wanted bold programs of exploration, while others have directed NASA to follow a more reserved and economical path, with the largest shifts traditionally happening when the administration changes hands between the parties.

So it’s no surprise that the fate of Artemis, a bold program initiated by the previous administration that aims to establish a sustainable human presence on the Moon, has been considered uncertain since the November election. But the recent announcement that SpaceX has been awarded a $331.8 million contract to launch the first two modules of the lunar Gateway station, an orbital outpost that will serve as a rallying point for astronauts coming and going to the Moon’s surface, should help quell some concerns. While the components still aren’t slated to fly until 2024 at the earliest, it’s a step in the right direction and strong indicator that the new administration plans on seeing Artemis through.

Continue reading “NASA Selects SpaceX To Launch Lunar Gateway”

Custom 3D Printed Vitamins Are Just A Few Clicks Away

It’s recently come to our attention that a company by the name of Nourished has carved out a niche for themselves by offering made-to-order gummy vitamins produced with their own custom designed 3D printers. Customers can either select from an array of pre-configured “stacks”, or dial in their own seven layers of gelatinous goodness for a completely bespoke supplement.

Now we can’t vouch for whether or not taking a custom supplement like this is any better than just popping a traditional multi-vitamin, but we’ll admit the hardware Nourished has developed is pretty interesting. As briefly seen in the video after the break, large syringes are filled with the seven different vitamin suspensions, and then loaded into what appears to be a heated chamber for extrusion. This is not unlike other food-grade 3D printers we’ve seen, such as the Cocoa Press.

It looks like all of the syringes are being depressed simultaneously with a plate and a pair of beefy lead screws, so it seems the order in which the layers are placed down must be different for each nozzle. A blog post on the company’s site from early last year shows a wildly different machine being used to produce the vitamins, so either their core technology is changing rapidly, or perhaps the printer being used depends on whether they’re running off the customized stacks versus the standard formulations.

Interestingly, this is very similar to a concept floated by the U.S. Army’s Combat Feeding Directorate (CFD) back in 2014. They reasoned that a 3D printer could be used to produce meal bars that were customized for each soldier’s personal nutritional needs. Being largely impractical for the battlefield, the program didn’t get very far. But thanks to consumers who are willing to pay the premium that Nourished is charging for this service, it seems the idea has turned into a lucrative business model.

Continue reading “Custom 3D Printed Vitamins Are Just A Few Clicks Away”

PS2 Gets Integrated HDMI

It might be difficult to imagine in our modern HDMI Utopia, but there was a time when game consoles required proprietary cables to connect up to your TV. We’re not just talking about early machines like the NES either, turn of the millennium consoles like the PlayStation 2, Gamecube, and the original Xbox all had weirdo A/V ports on the back that were useless without the proper adapter.

But thanks to the efforts of [Taylor Burley], you can now upgrade your Slim PS2 with integrated HDMI capability. It’s not even a terribly difficult modification, as these things go. Sure there’s a lot of soldering involved to run from the console’s A/V connector to the commercially-made HDMI dongle he’s hidden inside the case, but at least it’s straightforward work.

Tapping into the console’s A/V connector.

As [Taylor] shows in the video after the break, all you have to do is remove the proprietary connector from the HDMI adapter dongle, and wire it directly into the console’s A/V port with a bit of ribbon cable. There are only 8 pins in the connector that you need to worry about, and the spacing is generous enough that there’s no problem getting in there with your iron and some standard jumper wires. You’ve also got to pull 5 V from the board to power the adapter, but that’s easy enough thanks to the system’s nearby USB ports.

There’s a perfect spot to mount the adapter board next to the console’s Ethernet connector, and once that’s tacked down with a bit of adhesive, the only thing left to do is cut a hole in the back of the enclosure for the HDMI port and snip away a bit of the metal RF shield. Presumably the same modification could be done on the original “fat” PS2, though you’ll be on your own for finding a suitable place to mount the board.

While modern game consoles can easily emulate their earlier peers, providing enhanced graphical fidelity and introducing modern conveniences like wireless controllers in the process, there’s still something to be said for playing classic games on the original hardware. Even if these projects are fueled by little more than youthful nostalgia, it’s a safe bet we’ll continue to see folks keeping these older machines running far into the future.

Continue reading “PS2 Gets Integrated HDMI”

Building Replica Amigas To Preserve Digital Artwork

A few years back, the Andy Warhol Museum ran into an unusual problem. They wanted to display digital pieces the pop artist created on his Amiga 1000 back in the 1980s, but putting the vintage computers on the floor and letting the public poke around on them wasn’t really an option. So the team at [Iontank] were tasked with creating an interactive display that looked like a real Amiga, but used all modern technology under the hood.

The technical details on the electronics side are unfortunately a bit light, as the page on the [Iontank] site simply says all of the internals were replaced with “solid-state hardware” and an Amiga emulator. To us that sounds like a Raspberry Pi is now filling in for the Amiga’s original motherboard, but that’s just a guess. The page does note that they went through the trouble of making sure the original mouse and keyboard still worked, so it stands to reason a couple microcontrollers are also along for the ride doing translation duty.

Milling the curved display lens.

While we don’t know much about the computers, [Iontank] do provide some interesting insight into developing the faux CRTs sitting atop the non-Amigas. There were some promising rear-projection experiments conducted early on, but in the end, they decided to use a standard LCD behind a milled acrylic lens. This not only made for a perfect fit inside the original monitor enclosures, but gave the screen that convex depth that’s missing on modern flat panels.

The end result looks like the best of both worlds, combining the sharp bright image of an LCD with just a hint of retro distortion. With a scanline generator in the mix, this technique would be a great way to simulate the look of a CRT display in an arcade cabinet, though admittedly being able to mill down an acrylic lens of the appropriate size would be a tough job for most home gamers.

[Thanks to Derek for the tip.]