Recent price drops put entry level masked stereolithography (MSLA) resin 3D printers at around $200 USD, making them a very compelling tool for makers and hackers. But as you might expect, getting the price this low often involves cutting several corners. One of the ways manufacturers have made their machines so cheap is by simplifying the electronics and paring down the feature set to the absolute minimum.
So it was hardly a surprise for [Luiz Ribeiro] to find that his new Elegoo Mars Pro didn’t offer WiFi connectivity or a remote control interface. You’re supposed to just stick a USB flash drive into the printer and select the object you want to print from its menu system. But that doesn’t mean he couldn’t hack the capability in himself.
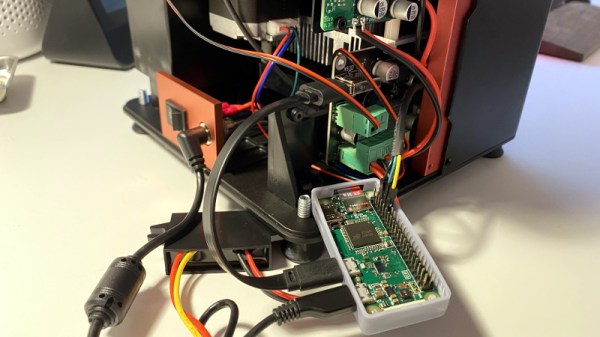
If this were a traditional 3D printer, he might have installed OctoPrint and been done with it. But resin printers are a very different beast. In the end, [Luiz] had to develop his own remote control software that worked around the unique limitations of the printer’s electronics. His software runs on a Raspberry Pi Zero and uses Linux’s “USB Gadget” system to make it appear as a flash drive when plugged into the USB port on the Elegoo Mars Pro.
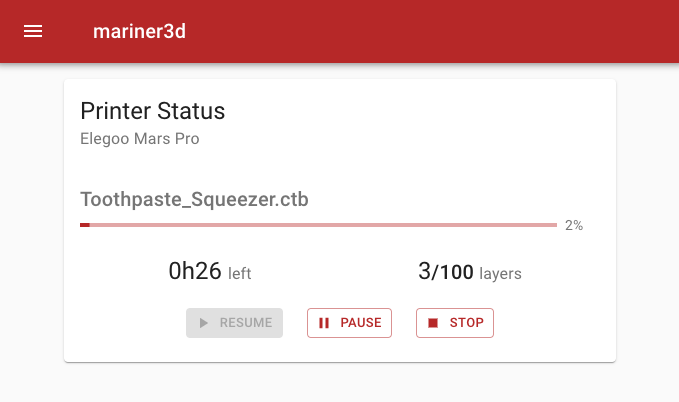
This allows sending object files to the printer over the network, but there was a missing piece to the puzzle. [Luiz] still needed to manually go over to the printer and select which file he wanted to load from the menu. Until he realized there was an exposed serial port on control board that allowed him to pass commands to the printer. Between the serial connection and faux USB Mass Storage device, his mariner software has full control over the Mars Pro and is able to trigger and monitor print jobs remotely.
It might not offer quite the flexibility of adding OctoPrint to your FDM 3D printer, but it’s certainly a start.