Official Arduboy Upgrade Module Nears Competition

We’ve been big fans of the Arduboy since [Kevin Bates] showed off the first prototype back in 2014. It’s a fantastic platform for making and playing simple games, but there’s certainly room for improvement. One of the most obvious usability issues has always been that the hardware can only hold one game at a time. But thanks to the development of an official add-on, the Arduboy will soon have enough onboard storage to hold hundreds of games

Even the rear silkscreen was a community effort.

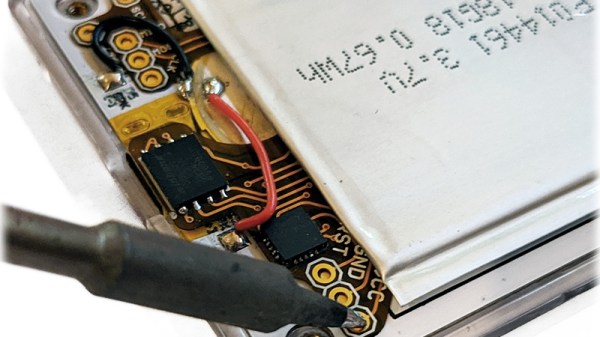
The upgrade takes the form of a small flexible PCB that gets soldered to existing test points on the Arduboy. Equipped with a W25Q128 flash chip, the retrofit board provides an additional 16 MB of flash storage to the handheld’s ATmega32u4 microcontroller; enough to hold essentially every game and program ever written for the platform at once.

Of course, wiring an SPI flash chip to the handheld’s MCU is only half the battle. The system also needs to have its bootloader replaced with one that’s aware of this expanded storage. To that end, the upgrade board also contains an ATtiny85 that’s there to handle this process without the need for an external programmer. While this is a luxury the average Hackaday reader could probably do without, it’s a smart move for an upgrade intended for a wider audience.

The upgrade board is currently available for pre-order, but those who know their way around a soldering iron and a USBasp can upgrade their own hardware right now by following along with the technical discussion between [Kevin] and the community in the “Project Falcon” forum. In fact, the particularly astute reader may notice that this official upgrade has its roots in the community-developed Arduboy cartridge we covered last year.

Continue reading “Official Arduboy Upgrade Module Nears Competition”

ESP32 Turned Open Source COVID-19 Contact Tracer

Over the past few months we’ve heard a lot about contact tracers which are designed to inform users if they’ve potentially come into close proximity with someone who has the virus. Generally these systems have been based on smartphone applications, but there are also hardware solutions that can operate independently for those who are unable or unwilling to install the software. Which is precisely what [Tom Bensky] has implemented using an ESP32 and a USB battery bank.

The idea is simple: the software generates a unique ID which is broadcast out by the ESP32 over Bluetooth Low Energy. Appended to that ID is a code that indicates the person’s current physical condition. There’s no centralized database, each user is expected to update their device daily with any symptoms they may be experiencing. If your tracker is blinking, that means somebody has come in close enough proximity that you should look at the collected data and see how they were feeling at the time.

It’s not a perfect system, of course, as for one thing the number of people that are willing and able to flash this firmware onto a spare ESP32 and carry the thing around with them all day is going to be extremely small. This might have filled an interesting niche if we were still going to hacker and maker cons this summer, but all of those have gone virtual anyway. That said, it’s an interesting look at how a decentralized contact tracing system can be implemented cheaply and quickly.

Another detail worth taking a look at is how [Tom] handled the user experience in his firmware. In an effort to make the tracer as easy as possible to configure, he’s using the Web Bluetooth capability of Google Chrome. Just open up the local web page in your browser, and it will handle talking to the hardware for you. Even if you’re not in the market for a contract tracer, we think this is a great example for how to handle end-user configuration on the ESP32.

We’ve already looked at contact tracer APIs from Google and Apple, dedicated COVID-19 hardware tokens, and even other open source attempts at decentralized proximity tracking. It’s a lot to process, and everyone seems to have their own idea on how it should be done. In the end, the most practical solution is probably to just stay at home as much as possible.

Smoking Meat With A Commodore 64

When [Deadline] couldn’t find a replacement control module for his Masterbuilt electric smoker, he could have just tossed the thing in the trash. Instead, he decided to come up with his own system to take over for the smoker’s original brain. Basing it around the nearly 40 year old Commodore 64 probably wouldn’t have been our first choice, but it’s hard to argue with the end result.

Connectors to control the smoker’s hardware.

At the most basic level, controlling an electric smoker like this only requires a temperature sensor, a relay to control the heating element, and something to get those two devices talking to each other. But for the best results you’ll also want some kind of a timer, and an easy way to change the target temperature on the fly. Connecting the relay and temperature sensor up to the back of the C64 was easy enough, all he had to do was write the BASIC code to glue it all together.

This hack was made considerably easier thanks to the fact that the Masterbuilt’s original controller interfaced with the smoker by way of a couple relatively well documented connectors. So instead of having to mess with any of the mains voltage electronics, he simply had to bring a wire in the connector high to fire up the smoker’s heating element. This bodes well for anyone looking to replace the controller in a similar smoker, with a C64 or otherwise.

In the past we’ve seen some very impressive custom smoker controllers that look as though they could easily be adapted for use with these commercial units. Though the true smoke aficionados might prefer building the entire thing to their exacting specifications.

Continue reading “Smoking Meat With A Commodore 64”

Falcon 9 Beats Shuttle’s Reflight Record, But Still Has A Long Way To Go

Put simply, the goal of any reusable booster is to reduce the cost of getting a payload into space. The comparison is often made to commercial aviation: if you had to throw away the airliner after every flight, nobody could afford the tickets. The fact that the plane can be refueled and flown again and again allows operators to amortize its high upfront cost.

In theory, the same should hold true for orbital rockets. With enough flight experience, you can figure out which parts of the vehicle will need replacement or repair, and how often. Assuming the fuel is cheap enough and the cost of refurbishment doesn’t exceed that of building a new one, eventually the booster will pay for itself. You just need a steady stream of paying customers, which is hardly a challenge given how much we rely on our space infrastructure.

But there’s a catch. For the airliner analogy to really work, whatever inspections and repairs the rocket requires between missions must be done as quickly as possible. The cost savings from reuse aren’t nearly as attractive if you can only fly a few times a year. The key to truly making space accessible isn’t just building a reusable rocket, but attaining rapid reusability.

Which is precisely where SpaceX currently finds themselves. Over the years they’ve mastered landing the Falcon 9’s first stage, and they’ve even proven that the recovered boosters can be safely reused for additional flights. But the refurbishment process is still fairly lengthy. While their latest launch officially broke the record for fastest reflight of a space vehicle that had previously been set by Space Shuttle Atlantis, there’s still a lot of work to be done if SpaceX is ever going to fly their rockets like airplanes.

Continue reading “Falcon 9 Beats Shuttle’s Reflight Record, But Still Has A Long Way To Go”

Vintage Aircraft Controls Turned USB Button Box

The Gables Engineering G-2789 audio selector panels aren’t good for much outside of the aircraft they were installed in, that is, until [MelkorsGreatestHits] replaced most of the internals with a Teensy 3.2. Now they are multi-functional USB input devices for…well, whatever it is you’d do with a bunch of toggle switches and momentary push buttons hanging off your computer.

Tracing wires from the panel switches.

With the Teensy going its best impression of a USB game controller, the host operating system has access to seven momentary buttons, twelve toggles, and one rotary axis for the volume knob.

Right now [MelkorsGreatestHits] says the code is set up so the computer sees a button press on each state change; in other words, the button assigned to the toggle switch will get “pressed” once when it goes up and again when it’s flicked back down. But of course that could be modified depending on what sort of software you wanted to interface the device with.

As we’ve seen with other pieces of vintage aircraft instrumentation, lighting on the G-2789 was provided by a series of incandescent bulbs that shine through the opaque front panel material. [MelkorsGreatestHits] replaced those lamps with white LEDs, but unfortunately the resulting light was a bit too harsh. As a quick fix, the LEDs received a few coats of yellow and orange paint until the light was more of an amber color. Using RGB LEDs would have been a nice touch, but you work with what you’ve got.

This isn’t the first time that [MelkorsGreatestHits] has turned an old aircraft cockpit module into a USB input device, and we’re certainly interested in seeing what the next project will look like. Though we’re perhaps more interested in finding out where all all these old school airplane parts are coming from…

Laser Cutting Your Way To An RGB LED Table

You’ve got the RGB keyboard, maybe even the RGB mouse. But can you really call yourself master of the technicolor LED if you don’t have an RGB table to game on? We think you already know the answer. Luckily, as [ItKindaWorks] shows in his latest project, it’s easy to build your own. Assuming you’ve got a big enough laser cutter anyway…

The construction of the table is quite straightforward. Using an 80 watt laser cutter, he puts a channel into a sheet of MDF to accept RGB LED strips, a pocket to hold a Qi wireless charger, and a hole to run all the wires out through. This is then backed with a second, solid, sheet of MDF.

Next, a piece of thin wood veneer goes into the laser cutter. In the video after the break you can see its natural tendency to roll up gave [ItKindaWorks] a little bit of trouble, but when strategically weighted down, it eventually lays out flat. He then uses the laser to blast an array of tiny holes in the veneer, through which the light from the LEDs will shine when it’s been glued over the MDF. A few strips of plastic laid over the strips serve both to diffuse the light and support the top surface.

The end result is truly gorgeous and has a very futuristic feel. Assuming you’ve got the equipment, it’s also a relatively simple concept to experiment with. It’s yet another example of the unique construction techniques possible when you add a high-powered laser to your arsenal.

Continue reading “Laser Cutting Your Way To An RGB LED Table”

RGB Minecraft Sign Isn’t Just For Looks

This laser cut and LED illuminated version of the Minecraft logo created by [Geeksmithing] looks good enough to occupy a place of honor on any gamer’s shelf. But it’s not just decoration: it can also notify you about your Minecraft’s server status and tell you when players are online by way of its addressable LEDs.

In the first half of the video after the break, [Geeksmithing] shows how the logo itself was built by cutting out pieces of white and black acrylic on his laser cutter. When stacked up together, it creates an impressive 3D effect but also isolates each letter. With carefully aligned rows of RGB LEDs behind the stack, each individual letter can be lit in its own color (or not at all) without the light bleeding into either side.

Once he had a way of lighting up each letter individually, it was just a matter of writing some code for the Raspberry Pi that can do something useful with them. Notifying him when the server goes down is easy enough, just blink them all red. But the code [Geeksmithing] came up with also associates each letter with one of the friends he plays with, and lights them up when they go online. So at a glance he can not only tell how many friends are already in the game, but which ones they are. Naturally this means the display can only show the status of nine friends…but hey, that’s more than we have anyway.

We’ve been seeing people connect the real world to Minecraft in weird and wonderful ways for years now, and it doesn’t seem like there’s any sign of things slowing down. While we recognize the game isn’t for everyone, but you’ve got to respect the incredible creativity it’s inspired in young and old players alike.

Continue reading “RGB Minecraft Sign Isn’t Just For Looks”