Phantom Express: The Spaceplane That Never Was

Even for those of us who follow space news closely, there’s a lot to keep track of these days. Private companies are competing to develop new human-rated spacecraft and assembling satellite mega-constellations, while NASA is working towards a return the Moon and the first flight of the SLS. Between new announcements, updates to existing missions, and literal rocket launches, things are happening on a nearly daily basis. It’s fair to say we haven’t seen this level of activity since the Space Race of the 1960s.

With so much going on, it’s no surprise that not many people have heard of the XS-1 Phantom Express. A project by the United States Defense Advanced Research Projects Agency (DARPA), the XS-1 was designed to be a reusable launch system that could put small payloads into orbit on short notice. Once its mission was complete, the vehicle was to return to the launch site and be ready for re-flight in as a little as 24 hours.

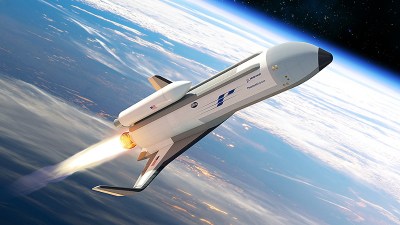
Alternately referred to as the “DARPA Experimental Spaceplane”, the vehicle was envisioned as being roughly the size of a business jet and capable of carrying a payload of up to 2,300 kilograms (5,000 pounds). It would take off vertically under rocket power and then glide back to Earth at the end of the mission to make a conventional runway landing. At $5 million per flight, its operating costs would be comparable with even the most aggressively priced commercial launch providers; but with the added bonus of not having to involve a third party in military and reconnaissance missions which would almost certainly be classified in nature.

Or at least, that was the idea. Flight tests were originally scheduled to begin this year, but earlier this year prime contractor Boeing abruptly dropped out of the program. Despite six years in development and over $140 million in funding awarded by DARPA, it’s now all but certain that the XS-1 Phantom Express will never get off the ground. Which is a shame, as even in a market full of innovative launch vehicles, this unique spacecraft offered some compelling advantages.

Continue reading “Phantom Express: The Spaceplane That Never Was”

Introducing The Hackaday Calendar Of Virtual Events

For many of us, the social distancing procedures being used to help control the spread of COVID-19 have been a challenge. We can’t go to our hackerspaces, major events have been postponed or canceled entirely, and even getting parts has become difficult due to the immense pressure currently being placed on retailers and delivery services. For even the most stoic hacker, these are difficult times.

But you don’t have to go through it alone. We might not be able to meet in person, but that doesn’t mean the exchange of thoughts and ideas has to stop. Hackaday has started up a calendar of events you can use to keep track of virtual classes and hangouts that you can take part in from the comfort of your own home. You don’t even need to wear pants (but you should, just to be safe).

Hacker Check-in returns tomorrow at 5pm Eastern time and this weekend is packed with must-see entries. You can start your Saturday by taking part in a KiCad/FreeCAD meetup, sit in on the BSides Atlanta security conference, jump over to a hardware show and tell in New Delhi, and then cap things off with an introduction to quantum computing presented by Kitty Yeung.

Looking to be more than an idle participant? If you want to teach a class, host a show and tell, or put together a round-table discussion, drop a line to superconference@hackaday.io. Pretty much anything of interest to the hacking and making community is fair game, and who knows when you’ll ever get another chance at a captive audience like this. When you haven’t left the house in a week, there’s not a whole lot you won’t watch online.

It’s easy to see social distancing as an overreaction, but the numbers don’t lie. Things are serious out there, especially in the dense population centers where hacker events generally take place. By staying home and taking part in events virtually, we can do our part to control the spread of this virus and hopefully return things to normal that much sooner.

Stay Informed: How To Pull Your Own COVID-19 Data

For all the technology we have, it can still be frustratingly difficult to get any concrete information from the media. Sometimes all you want to do is to cut through the noise and see some real numbers. Watching talking heads argue for a half hour probably isn’t going to tell you much about how the COVID-19 virus is spreading through your local community, but seeing real-time data pulled from multiple vetted sources might.

Having access to the raw data about COVID-19 cases, fatalities, and recoveries is, to put it mildly, eye-opening. Even if day to day life seems pretty much unchanged in your corner of the world, seeing the rate at which these numbers are climbing really puts the fight into perspective. You might be less inclined to go out for a leisurely stroll if you knew how many new cases had popped up in your neck of the woods during the last 24 hours.

But this article isn’t about telling you how to feel about the data, it’s about how you can get your hands on it. What you do with it after that is entirely up to you. Depending on where you live, the numbers you see might even make you feel a bit better. It’s information on your own terms, and in these uncertain times, that might be the best we can hope for.

Continue reading “Stay Informed: How To Pull Your Own COVID-19 Data”

Classic Macintosh Gets An IPad Infusion

We know the classic Mac fans in the audience won’t be happy about this one, but the final results are simply too clean to ignore. With a laser-cut adapter and a little custom wiring, [Travis DeRose] has come up with a repeatable way to modernize a Compact Macintosh (Plus, SE, etc) by swapping out all of its internals for an iPad mini.

He goes over the whole process in the video after the break, while being kind enough to spare our sensitive eyes from having to see the Mac’s enclosure stripped of its original electronics. We’ll just pretend hope that the computer was so damaged that repair simply wasn’t an option.

Anyway, with a hollow Mac in your possession, you can install the adapter that allows the iPad to get bolted in place of the original CRT monitor. You won’t be able to hit the Home button anymore, but otherwise it’s a very nice fit.

Those with some first hand iPad experience might be wondering how you wake the tablet up once the Mac is all buttoned back up. That’s an excellent question, and one that [Travis] wrestled with for awhile. In the end he came up with a very clever solution: he cuts into a charging cable and splices in a normally-closed momentary push button. Pushing the button essentially “unplugs” the iPad for a second, which just so happens to wake it up. It’s an elegant solution that keeps you from having to make any modifications to that expensive piece of Apple hardware.

If there’s one thing we’re not thrilled with, it’s the empty holes left behind where the ports, switches, and floppy drive were removed. As we’ve seen in the past, you can simply cut the ports off of a motherboard and glue them in place to make one of these conversions look a little more convincing. If you’re going to do it, might as well go all the way.

Continue reading “Classic Macintosh Gets An IPad Infusion”

Motorized LEGO Train Gets Qi Charging In The Track

This project started, as many do, with a simple idea. [Ben Hoad] just wanted to take a static LEGO Hogwarts Express train kit and make it motorized. It was compatible with standard LEGO track pieces, so all he should have to do was figure out how to shoehorn a motor in there and be done with it. Right?

Well, you already know how things like this go. It started with adding the motor, which ended up being relatively straightforward once [Ben] used some community LEGO CAD tools to figure out which kits had the specific parts he needed to redesign the train in such a way that he’d have enough space inside for the motor without ruining the way it looked. But then the feature creep kicked in, and he found himself falling down that familiar rabbit hole.

A 3D representation of the train’s internal components.

The first problem was how to reliably power the train. It turns out the rear car was more or less empty already, so that became home for two 18650 batteries (the project details say “16850” but we believe that is merely a typo). [Ben] didn’t want to have to take the thing apart every time it ran down, so he wondered if it would be possible to add wireless charging.

A Qi coil in the bottom of the train car and one in a specially designed section of track got the power flowing, but getting them lined up proved a bit finicky. So he added a Hall effect sensor to the car and a strong magnet to the track, so the train would know when the coils were lined up and automatically pump the brakes.

So now he had a motorized train that could recharge itself, but how should he turn it on and off? Well, with an ESP8266 along for the ride, he figured it would be easy to add WiFi control. With a bit of code and the Homebridge project, he was able to get the train to appear as a smart switch to Apple’s HomeKit. That allows him to start and stop the train from his smartphone, complete with a routine that returns the train to the charging station once it’s finished making the rounds. [Ben] says the next steps are to put some sanity checks in, such as shutting the motors down if the train hasn’t passed the charging station in a few minutes; a sure sign that it’s not actually moving.

All [Ben] needs to do now is implement automatic LEGO train decoupling before the plastic Hogwarts students come back from spring break.

Compact Slayer Exciter For Your High Voltage Needs

Tesla coils are incredible pieces of hardware, but they can be tricky to build. Between the spark gap, capacitors, and finely tuned coils, it’s not exactly a beginners project. Luckily, there’s hope for anyone looking for a less complex way to shoot some sparks: the Slayer Exciter. This device can be thought of as the little cousin to the Tesla coil, and can be used for many of the same high voltage experiments while being far easier to assemble.

Now [Jay Bowles] is obviously no stranger to building his own Tesla coils, but since so many of his fans wanted to see his take on this less complex option, he recently built his own Slayer Exciter. After putting on a few of his own unique touches, the end result looks very promising. It might not be able to throw sparks as far as some of the other creations featured on his YouTube channel, but it’s still impressive for something so simple.

[Jay] uses two transistors in parallel for reliability
When we say simple, we mean it. Building a bare-bones Slayer Exciter takes only takes five components: the two coils, a transistor, a diode, and a resistor. For this build, power is provided by a trio of rechargeable 9 V batteries in the base of the unit which can be easily swapped out as needed.

In the video, [Jay] does a great job explaining and illustrating how this basic circuit creates exceptionally high frequency energy. In fact, the frequency is so high that the human ear can’t hear it; unfortunate news for fans of the Tesla coil’s characteristic buzz.

Generally speaking Slayer Exciters would have the same sort of vertical coils that you’d see used on a traditional Tesla coil, but in this case, [Jay] has swapped that out for a pancake coil held in the upper level of the device. This makes for a very compact unit that would be perfect for your desk, if it wasn’t for the fact that the arcs produced by this gadget are hot enough to instantly vaporize human skin. Just something to keep in mind.

We’ve seen Slayer builds in the past, but none as well designed as this one. Incidentally, if you’re wondering about the array of neon indicator lights that [Jay] uses to visualize the electrical field, we covered that project as well.

Continue reading “Compact Slayer Exciter For Your High Voltage Needs”

Expansion Board Puts Spotify On The Amiga 500

No doubt some purists in the audience will call this one cheating, since this Amiga 500 from 1987 isn’t technically connecting to Spotify and playing the music by itself. But we also suspect those folks might be missing the point of a site called Hackaday. With all the hoops [Daniel Arvidsson] hopped through to make this happen, what else could it be if not a hack?

This one starts, like so many projects these days, with the Raspberry Pi. Don’t worry Amiga aficionados, this classic machine hasn’t been gutted and had its internals replaced with a diminutive Linux board. But thanks to an expansion card known as the A314, you could say it’s received a penguin infusion. This clever board allows an internally mounted Raspberry Pi to communicate with the Amiga 500 through shared memory, making all sorts of trickery possible.

In this case, the Raspberry Pi is actually the one connecting to the Spotify Connect service with raspotify and decoding the stream. But thanks to a few pipes and an ALSA plugin, the audio itself is actually pushed into the Amiga’s sound hardware. In the video after the break, the process is demonstrated with tunes that are befitting a computer of this vintage.

This process is similar to how one classic Apple fan got Spotify running on their Macintosh SE/30 with a similar respect for the vintage hardware. Of course if you actually want to gut your Amiga 500 and replace it with a Raspberry Pi, we’ve seen some pretty good conversions to get you started.

Continue reading “Expansion Board Puts Spotify On The Amiga 500”