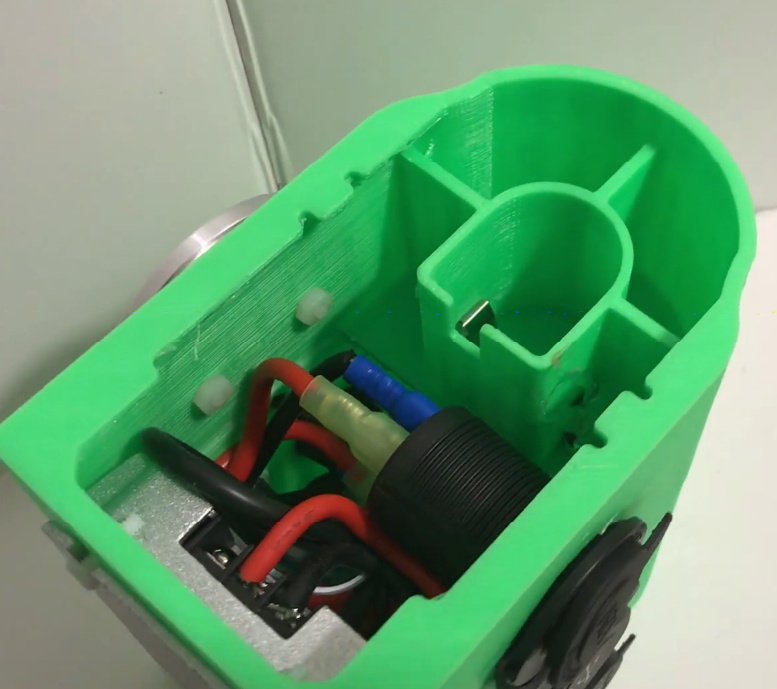
A Very Buttoned Up Raspberry Pi Media Server

Projects that turn the Raspberry Pi into a low-cost Network Attached Storage (NAS) solution are very common; all you need is the right software, the Pi itself, and some USB storage devices. But unless you particularly like the “Medusa” look, with loose cables running all over the place, you’ll probably want to put the hardware into a suitable enclosure. Unfortunately, that’s where the somewhat unusual layout of the Pi can make things tricky.

Which is why [AraymBox] came up with this unique “capsule” enclosure for the Raspberry Pi and two USB-attached hard drives. Every effort has been made to keep the outside of this design as clean and streamlined as possible. The asymmetrical loops of wires that we so often see on other projects are gone, with everything been brought inside thanks to some clever wiring. This enclosure looks like a professional product, and if you’re willing to put in the effort, you can have one to call your own.

The good news is that the 3D printed enclosure only has four parts, albeit rather large ones, and none of which require support material. So it should be an easy print even on a relatively low-end machine. Of course, you’re not going to get that futuristic metallic look without a little work. You’ll need to do a considerable amount of sanding, filling, and paint work to get that kind of a surface finish. Then again, that rough “just printed” look has a certain cyberpunk appeal to it as well.

But the printed enclosure is only half the battle. Inside, [AraymBox] has soldered the USB to SATA adapter cables directly to the Raspberry Pi to keep things tight and compact. A micro USB breakout board was then used to add a power connector on the back of the device where the Ethernet and USB ports are, solving the issue of having one lonely USB cable coming out of the side of the case.

In the past we’ve seen other attempts to create a 3D printable enclosure for Pi servers, with varying levels of success. While some would argue that the better solution is to just throw the Pi and the drives in a large enough enclosure that it doesn’t matter what the wiring looks like, we appreciate the effort that some hackers are willing to put in to make something custom.

Raspberry Pi Serves Up 24 Hour Simpsons Channel

Commercial-free video on demand was every couch potato’s dream for decades, and now we’ve got it. But nostalgia has a funny way of making some folks miss the old days, even if we know it’s technically be a step backwards. Wanting to recreate the TV watching experience circa 1998, [probnot] has come up with a way to run his very own television channel.

With the Raspberry Pi and a digital modulator, he’s got the only house on the block that’s wired to show The Simpsons all day. He has absolutely no control over which episode plays next, he can’t pause it, and its in presented in standard definition (a nightmare for anyone who grew up in the Netflix era) but a familiar viewing experience for the rest of us.

Where we’re going, we don’t need HDMI.

The key to this project is the Channel Plus Model 3025 modulator. It takes the feed from the antenna and mixes in two composite video sources on user-defined channels. All [probnot] had to do was find a channel that wouldn’t interfere with any of the over-the-air stations. The modulator has been spliced into the house’s coax wiring, so any TV connected to the wall can get in on the action. There’s no special setup required: when he wants to watch The Simpsons he just tunes the nearest TV to the appropriate channel.

Providing the video for the modulator is a Raspberry Pi, specifically, the original model that featured composite video output. While the first generation Pi is a bit long in the tooth these days, playing standard definition video is certainly within its capabilities. With a USB flash drive filled with a few hundred episodes and a bit of scripting it’s able to deliver a never-ending stream direct from Springfield. There’s still that second channel available on the modulator as well, which we’re thinking could be perfect for Seinfeld or maybe The X-Files.

Interestingly, this isn’t the first time we’ve seen a Raspberry Pi used to provide a never-ending stream of The Simpsons. But compared to previous attempts which had to be directly connected to the TV, we like the idea of using the modulator and creating a more authentic experience.

Continue reading “Raspberry Pi Serves Up 24 Hour Simpsons Channel”

Arduino Handheld Game System Gets A Grip

With little more than an Arduino, an OLED display, and some buttons, it’s easy to build your own faux-retro game system. There’s even a growing library of titles out there that target this specific combination of hardware, thanks in no small part to the Arduboy project. But unless you’re content to play Circuit Dude on a breadboard, at some point you’ll probably want to wrap the build up in a more convenient form.

Like many that came before it, the OLED handheld created by [Alex Zidros] takes inspiration from a Nintendo product; but it’s not the Game Boy. Instead, his design is based on a 3D printed grip for the Switch Joy-Cons that he found on Thingiverse. After tacking on a holder for the PCB, he had the makings of a rather unique system.

We especially like the offset SSD1306 OLED display. Not because we think a game system with an asymmetrical layout is a particularly sound design decision, but because it gives the whole build a rather cyberpunk feel. When combined with the exposed electronics, the whole system looks like it could have been cobbled together from a futuristic dumpster. Which is high praise, as far as we’re concerned.

Opposite the display is a LiPo pouch battery that [Alex] says was liberated from a portable speaker, and down below is an Adafruit Feather 328P. There are two tactile switches mounted to the front of the Feather, and in something of a departure from these sort of builds, there are two more on the shoulders of the 3D printed case. Everything is held together with nothing more exotic than a scrap of perfboard, making it easy for anyone who might want to build their own version.

If you prefer your Arduino and OLED gaming to come in a slightly more familiar form factor, the build that was done inside of a Dreamcast Visual Memory Unit (VMU) has always been a favorite around these parts.

A Network Attached VFD Tube Clock

The elegance of Power over Ethernet (PoE) is that you can provide network connectivity and power over a single cable. Unfortunately not nearly enough hardware seems to support this capability, forcing intrepid hackers to take matters into their own hands. The latest in this line of single-cable creations is this beautiful Vacuum Fluorescent Display (VFD) clock from [Glen Akins].

Testing the VFD tube socket

One of the key advantages VFDs have over their Nixie predecessors is greatly reduced energy consumption, and after [Glen] ran the numbers, he saw that a display using six VFD tubes could easily be powered with standard PoE hardware. With this information, he started designing the PCB around the early 1990s era IV-12 tube, which has the advantage of being socketed so he could easily remove them later if necessary.

[Glen] first had to create a schematic and PCB footprint for the IV-12 tube that he could import into Eagle, which he was kind enough to share should anyone else be working with these particular tubes down the line. After a test of the newly designed socket was successful, he moved onto the rest of the electronics.

The clock is powered by a Microchip PIC18F67J60, which connects to the Ethernet network and pulls the current time down from NTP. After seeing so many clocks use an ESP to connect to the Internet over WiFi, there’s something refreshing about seeing a wired version. The tube segments are driven by a HV5812, also Microchip branded. Lastly, [Glen] used a number of DC/DC converters to generate the 1.5 V, 3.3 V, 5 V, and 25 V necessary to drive all the electronics and VFDs.

We absolutely love the simplicity of this clock, from its sleek aluminum enclosure to that single RJ45 jack on the back. But if you’re looking for something with a bit more flash, [Glen] also put together some PoE Christmas lights over the holidays which share a number of design elements with this project.

Continue reading “A Network Attached VFD Tube Clock”

3D Printed GIFs For Stop Motion Memes

Lithophanes are nothing new, with examples going back to the 1800s. But they’ve become popular again thanks to the ease of which these pieces of artwork can be 3D printed. While the Internet would be more than happy to see somebody press a 3D image of their cat into a thin piece of translucent porcelain ready to have a light shone through it, that’s quite a bit harder than just firing up the Monoprice.

But since the machine is doing all the work for you, why stop at one? That’s precisely the sort of thinking that lead [The Mad Maker] to recreate animated GIFs with stop motion photography and a stack of printed lithophanes. Now all your favorite reaction memes can make the leap to the physical world…and then go right back into the computer.

The method here is pretty simple: [The Mad Maker] disassembles his favorite GIF to get the individual frame images, converts each one of those into a lithophane STL via an online tool, prints it out, photographs it, and then stitches all those photographs back into a new GIF. Given the incredibly time consuming nature of this process you’ll want to limit it to short animations, and even then, probably do only every 2nd or 3rd frame to preserve your sanity.

In the video after the break you can see the entire process, as well as check out the final result. While there weren’t really any technical hurdles to overcome in this project, we did like seeing how [The Mad Maker] experimented to find the ideal position for the backlight and camera. The wooden frame he came up with to hold everything in position should make subsequent meme conversions a lot easier, now he just needs to add a little color. Continue reading “3D Printed GIFs For Stop Motion Memes”

Lathe And 3D Printer Help Repair Buried Buttons

Usually corroded buttons on a piece of electronic equipment wouldn’t be that big a deal to repair, but as [Haris Andrianakis] recently found out, things can get a little tricky when they are sealed inside a device meant to operate in a marine environment. Figuring out how to get into the case to clean the buttons up is only half the battle, when you’re done you still need to close it back well enough that the elements can’t get in.

The device in question is a tachometer intended for a Yamaha outboard motor, and the buttons are sealed between the guage’s face and the compartment in the rear that holds the electronics. Pulling the guts out of the back was no problem, but that didn’t get [Haris] any closer to the defective buttons. In light of the cylindrical design of the gauge, he decided to liberate the front panel from the rest of the unit with his lathe.

Removing the face was a delicate operation, to put it mildly. The first challenge was getting the device mounted securely in the chuck, but then the cutting had to be done very carefully so as not to damage the housing. Once he cut through the side far enough to get the face off, the actual repair of the buttons was fairly straightforward. But how to get it back together?

After a few missteps, [Haris] finally found a solution that have him the results he was looking for. He 3D printed a ring that fit the front of the gauge tightly, hot glued it into place, and used it as a mould to pour in black epoxy resin. Once the epoxy had cured, the mould was cut off and the gauge went back on the lathe so he could trim away the excess. He had to do some hand sanding and filing to smooth out the bezel, but overall the end result looks very close to factory.

We get it, there’s a lot to consider when you add a lathe to your workshop. But hacks like these are wonderful reminders of how many tricks these versatile machines are really capable of.

Continue reading “Lathe And 3D Printer Help Repair Buried Buttons”

Stinger: The Hacked Machine Gun Of Iwo Jima

During the Second World War, the United States was pumping out weapons, aircraft, and tanks at an absolutely astonishing rate. The production of military vehicles and equipment was industrialized like never before, and with luck, never will be again. But even still, soldiers overseas would occasionally find themselves in unique situations that required hardware that the factories back at home couldn’t provide them with.

A Stinger machine gun in WWII

Which is precisely how a few United States Marines designed and built the “Stinger” light machine gun (LMG) during the lead-up to the invasion of Iwo Jima in 1945. The Stinger was a Browning .30 caliber AN/M2, salvaged from a crashed or otherwise inoperable aircraft, that was modified for use by infantry. It was somewhat ungainly, and as it was designed to be cooled by the air flowing past it while in flight, had a tendency to overheat quickly. But even with those shortcomings it was an absolutely devastating weapon; with a rate of fire at least twice that of the standard Browning machine guns the Marines had access to at the time.

Six Stingers were produced, and at least on a Battalion level, were officially approved for use in combat. After seeing how successful the weapon was during the invasion of Iwo Jima, there was even some talk of putting the Stinger into larger scale production and distributing them. But the war ended before such a plan could be put into place.

As such, the Stinger is an exceedingly rare example of a field modified weapon that was not only produced in significant numbers, but officially recognized and even considered for adoption by the military. But the story of this hacked machine gun actually started years earlier and thousands of kilometers away, as Allied forces battled for control of the Solomon Islands.

Continue reading “Stinger: The Hacked Machine Gun Of Iwo Jima”