Failed Scooter Proves The Worth Of Modular Design

Like many mechanically inclined parents, [Tony Goacher] prefers building over buying. So when his son wanted an electric scooter, his first stop wasn’t to the toy store, but to AliExpress for a 48V hub motor kit. Little did he know that the journey to getting that scooter road-ready would be a bit more involved than he originally bargained for.

She cannae take anymore, Captain

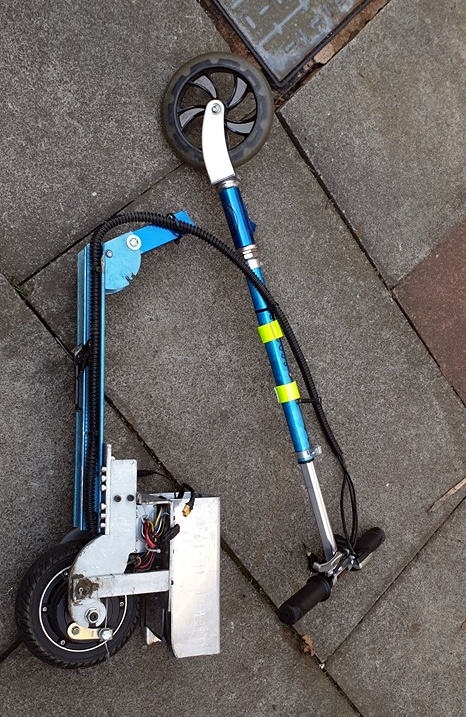
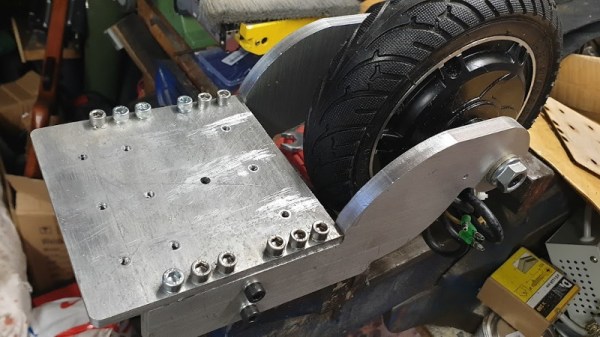
Of course, to build a motorized scooter you need a scooter to begin with. So in addition to the imported motor, [Tony] picked up a cheap kick scooter on eBay. Rather than worrying about the intricacies of cleanly integrating the two halves of the equation, he decided to build a stand-alone module that contained all of the electronics. To attach it to the scooter, he’d cut off the rear wheel and literally bolt his module to the deck.

[Tony] goes into considerable detail on how he designed and manufactured his power unit, from prototyping with laser cut MDF to the final assembly of the aluminum parts that he produced on a CNC of his own design. It’s really a fantastic look at how to go from idea to functional device, with all the highs and lows in between. When the first attempt at mounting the battery ended up cutting into the 8 Ah LiPo pack for example, and treated his son to a bit of a light show.

With all the bugs worked out and his son happily motoring around the neighborhood, [Tony] thought his job was done. Unfortunately, it was not to be. It turned out that his bolt-on power unit had so much kick that it sheared the front wheel right off. Realizing the little fellow didn’t have the fortitude for such electrified exploits, he went to a local shop and got a much better (and naturally much more expensive) donor for the project.

It’s here that his modular approach to the problem really paid off. Rather than having to redesign a whole new motor mount for the different scooter, he just lopped the back wheel off and bolted it on just as he did with the cheapo model. What could easily have been a ground-up redesign turned out to be a few minutes worth of work. Ultimately he did end up machining a new front axle for the scooter so he could fit a better wheel, but that’s another story.

Scooters would seem to be the unofficial vehicle of hackers, as we’ve seen a long line of hacked up two-wheeled rides over the years. From relatively low-key modifications of thrift store finds, to street-legal engineering marvels. We’ve even seen scooters fitted with trailers, so even the tiniest of proto-hackers can come along for the ride.

Continue reading “Failed Scooter Proves The Worth Of Modular Design”

Ditch The Switch: A Soft Latching Circuit Roundup

For some of us, there are few sounds more satisfying than the deep resonant “thunk” of a high quality toggle switch slamming into position. There isn’t an overabundance of visceral experiences when working with electronics, so we like to savor them when we get the chance. But of course there’s no accounting for taste, and we suppose there are even situations where a heavy physical switch might not be the best solution. So what do you do?

Enter the latching power circuit, often referred to as a “soft” switch. [Chris Chimienti] has recently put together a fascinating video which walks the viewer through five different circuits which can be used to add one of these so-called soft power switches to your project. Each circuit is explained, diagramed, annotated, and eventually even demonstrated on a physical breadboard. The only thing you’ve got to do is pick which one you like the most.

There’s actually a number of very good reasons to abandon the classic toggle switch for one of these circuits. But the biggest one, somewhat counterintuitively, is cost. Even “cheap” toggle switches are likely to be one of the most expensive components in your bill of materials, especially at low volume. By comparison, the couple of transistors and a handful of passive components it will take to build out one of these latching circuits will only cost you a couple of cents.

Even if you aren’t in the market for a new way to turn off your projects, this roundup of circuits is a fantastic reminder of how powerful discrete components can be. In an age where most projects seem assembled from pre-fabbed modules, it’s occasionally refreshing to get back to basics.

Continue reading “Ditch The Switch: A Soft Latching Circuit Roundup”

The Practical Approach To Keeping Your Laser In Focus

You could be forgiven for thinking that laser cutters and engravers are purely two dimensional affairs. After all, when compared to something like your average desktop 3D printer, most don’t have much in the way of a Z axis: the head moves around at a fixed height over the workpiece. It’s not as if they need a leadscrew to push the photons down to the surface.

But it’s actually a bit more complicated than that. As [Martin Raynsford] explains in a recent post on his blog, getting peak performance out of your laser cutter requires the same sort of careful adjustment of the Z axis that you’d expect with a 3D printer. Unfortunately, the development of automated methods for adjusting this critical variable on lasers hasn’t benefited from the same kind of attention that’s been given to the problem on their three dimensional counterparts.

Ultimately, it’s a matter of focus. The laser is at its most powerful when its energy is concentrated into the smallest dot possible. That means there’s a “sweet spot” in front of the lens where cutting and engraving will be the most efficient; anything closer or farther away than that won’t be as effective. As an example, [Martin] says that distance is exactly 50.3 mm on his machine.

The problem comes when you start cutting materials of different thicknesses. Just a few extra millimeters between the laser and your target material can have a big difference on how well it cuts or engraves. So the trick is maintaining that perfect distance every time you fire up the laser. But how?

One way to automate this process is a touch probe, which works much the same as it does on a 3D printer. The probe is used to find where the top of the material is, and the ideal distance can be calculated from that point. But in his experience, [Martin] has found these systems leave something to be desired. Not only do they add unnecessary weight to the head of the laser, but the smoke residue that collects on the touch probe seems to invariably mar whatever surface you’re working on with its greasy taps.

In his experience, [Martin] says the best solution is actually the simplest. Just cut yourself a little height tool that’s precisely as long as your laser’s focal length. Before each job, stick the tool in between the laser head and the target to make sure you’re at the optimal height.

On entry level lasers, adjusting the Z height is likely to involve turning some screws by hand. But you can always add a motorized Z table to speed things up a bit. Of course, you’ll still need to make sure your X and Y alignment is correct. Luckily, [Martin] has some tips for that as well.

Booting The Game Boy Advance Into Bluetooth

While it might not be quite as revered as its predecessor, the Game Boy Advance is arguably the peak of “classic” handheld gaming, before things got all 3D and dual screen on us. One of its best features is the so-called multiboot mode, which allows the GBA to download a program from its link port. Officially this feature was introduced so you could play multiplayer with your friends even if they didn’t have the game cartridge, but naturally it didn’t take long for hackers to realize you can use it to run arbitrary code on an unmodified system.

[Shyri Villar] has put this capability to excellent use with a plug-in board that allows a stock GBA to be used as a general purpose Bluetooth HID controller. Now you can emulate GBA games on your computer while using the real thing as your input device. Or if that’s a bit too redundant for you, then any 2D game you think could benefit from the classic Game Boy control layout.

An ATmega328P on the board initiates the multiboot sequence when the system powers up, and feeds it the GBA program that’s stored on a W25Q32 chip. Once the code is running on the GBA, it communicates with a common HC-05 Bluetooth module through the same link port. To perform this handoff, [Shyri] uses a HCF4066 switch IC to literally change the pin assignments in the connector from the SPI used to upload the ROM to the UART lines of the Bluetooth module.

With everything powered from the 3.3 V provided by the GBA’s link port, and some software niceties like the ability to store Bluetooth pairing information for subsequent device connections, this is actually a very practical gadget. The fact that you can do this on a completely stock GBA is very compelling, especially considering some of the previous Bluetooth Game Boy modifications we’ve seen. Granted the market might be somewhat limited, but with a custom PCB and a 3D printed enclosure, we could see this potentially being a popular accessory for the classic handheld. It’s not like it can be any more niche than using the GBA as a remote display for your multimeter.

Pi Zero Streams Video From “Fake” Security Camera

Fake security cameras are advertised as a cheap way to deter anyone who might be up to no good. This isn’t a crime and punishment blog, so we’re not really in a position to say how accurate that claim actually is, but we see enough of these things for sale that somebody out there must believe they’re worth having. Though if it were us, we’d take this tip from [Daniel Andrade] and convert our “fake” camera into a real one with the Raspberry Pi and WebRTC.

There are an untold number of makes and models of these fake cameras out there, but it seems that many of them share a fairly common design in that the enclosure they use is actually pretty useful for putting your own hardware in. They’re hollow, relatively well protected from the elements, and as most of them use a blinking LED or some other feature to make them look more authentic, they already have a functional battery compartment.

As it turns out, the one that [Daniel] picked up for $9 USD is pretty much perfect for the Raspberry Pi Zero and its camera module. He even wired the blinking LED up to the Pi’s GPIO pins so it will still look the part, though replacing it with an RGB LED and appropriate scripts to drive it would be a nice way to get some visual feedback on what the system is doing.

The software side of things is done with Balena, a suite of tools for setting up and managing Linux Internet of Things devices. They provide everything from the SD card image that runs on the Pi itself to the cloud infrastructure that pulls all the data together. [Daniel] dove a little deeper into the software stack when he created his Bitcoin traffic light last year.

For any readers who may feel a sense of déjà vu looking at this project, you aren’t going crazy. We recently saw a similar project that used an ESP8266 and a PIR sensor to add motion sensing capabilities to one of these fake cameras. Now all we need is somebody to put an Arduino in one of them, and we’ll have the Holy Trinity represented.

The Feather “FAUXBERRY” Is Now A Real Thing

Last month we featured an interesting project from Hackaday.io that was essentially trying to recreate the iconic Blackberry form factor for use with Adafruit’s line of Feather development boards. This would let you drop in modules for everything from LTE to packet radio, opening up a nearly limitless possibilities for handheld hacking. The only problem was, it didn’t actually exist yet.

But recently creator [arturo182] wrote in to tell us that not only had all the parts arrived, but that he’d completed assembly of the first prototype. He even put together a video about the current status of the device, which you can see after the break. The short version is: it works, and it looks fantastic.

For those who might not have seen this project the first time around, the front features a 2.6 inch 320×240 touch screen display, four general purpose buttons, a RGB NeoPixel LED for visual status display, a five way joystick, and what’s arguably the star of the show, a QWERTY keyboard originally designed for the Blackberry Q10. Around the back it has an SD card slot, a socket for the Feather module of your choice, and some handy GPIO expansion pads you can attach your own hardware onto.

[arturo182] says he’s looking at a couple cosmetic changes, but on the whole, everything works and he considers the PCB essentially done. He’ll soon be sending out a handful of test units to individuals who’ve expressed interest in helping him develop the project and then…well, he’s not really sure what’s going to happen then. Some kind of commercial release seems like the logical conclusion given the interest he’s already seen in the project, but he hasn’t quite worked out whether that will be a kit or as assembled devices.

Until then, anyone who’s looking for a pocket sized device that will let them bang out some Python with a physical keyboard will have to stick with their TI-83s.

Continue reading “The Feather “FAUXBERRY” Is Now A Real Thing”

An Evening With Space Shuttle Atlantis

When I got the call asking if I’d be willing to fly down to Kennedy Space Center and cover an event, I agreed immediately. Then about a week later, I remembered to call back and ask what I was supposed to be doing. Not that it mattered, I’d gladly write a few thousand words about the National Crocheting Championships if they started holding them at KSC. I hadn’t been there in years, since before the Space Shuttle program had ended, and I was eager to see the exhibit created for the fourth member of the Shuttle fleet, Atlantis.

So you can imagine my reaction when I learned that the event Hackaday wanted me to cover, the Cornell Cup Finals, would culminate in a private viewing of the Atlantis exhibit after normal park hours. After which, the winners of the competition would be announced during a dinner held under the orbiter itself. It promised to be a memorable evening for the students, a well deserved reward for the incredible work they put in during the competition.

Thinking back on it now, the organizers of the Cornell Cup and the staff at Kennedy Space Center should truly be commended. It was an incredible night, and everyone I spoke to felt humbled by the unique experience. There was a real, palpable, energy about it that you simply can’t manufacture. Of course, nobody sitting under Atlantis that night was more excited than the students. Though I may have come in as a close second.

I’ll admit it was somewhat bittersweet to see such an incredible piece of engineering turned into a museum piece; it looked as if Atlantis could blast off for another mission at any moment. But there’s no denying that the exhibit does a fantastic job of celebrating the history and accomplishments of the Space Shuttle program. NASA officially considers the surviving Shuttle orbiters to be on a “Mission of Inspiration”, so rather than being mothballed in a hangar somewhere in the desert, they are out on display where the public can get up close and personal with one of humanities greatest achievements. Judging by the response I saw, the mission is going quite well indeed.

If you have the means to do so, you should absolutely make the trip to Cape Canaveral to see Atlantis and all the other fascinating pieces of space history housed at KSC. There’s absolutely no substitute for seeing the real thing, but if you can’t quite make the trip to Florida, hopefully this account courtesy of your humble scribe will serve to give you a taste of what the exhibit has to offer.

Continue reading “An Evening With Space Shuttle Atlantis”