Put An Arduino Enigma In Your Pocket

The German Enigma device has always been a fascinating gadget for hackers. We’ve seen various replicas and emulators created over the years, and it was recently even the subject of our weekly Hack Chat. But if you think about it it’s not really a surprise; the Enigma has the perfect blend of historical significance and engineering wizardry, with a healthy dash of mystery thrown in. Why do the bad guys always have the coolest toys?

If you’ve ever wanted your own little Enigma replica to explore, [Mark Culross] has put together a project which makes it easier than ever. In fact, it’s so straightforward that some of you reading this post will probably be able to put one together as soon as you’ve read this post from stuff you already have lying around in the parts bin. All you need is an Arduino Uno, an Adafruit 2.8″ TFT Touch Shield, and a penchant for World War II technology.

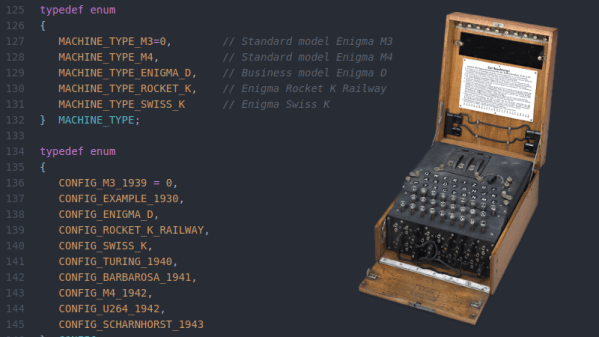
Thanks to the relatively high-resolution touch screen, [Mark] was able to develop a user interface for his Enigma that really gives you a feel for how the original machine worked. Obviously it’s considerably simplified from the real-world version, but using a stylus to tap the rotors you want to spin or the wires you want plugged in makes for a more immersive experience than many of the previous attempts we’ve seen. With a tap you’re even able to load historical machine configurations, such as how the Enigma aboard the submarine U-262 was configured when the Allies intercepted its encoded messages in 1942.

[Mark] says this project was always about developing the software, and he leaves the actual hardware implementation as an exercise for the user. Just to play around with the software it’s enough to hook up an Arduino and the touch screen, but we’d love to see somebody really take the idea and run with it. Add some batteries, a charging circuit, and put it all in a little wooden box for that authentic Enigma look. Can’t forget that iconic wrinkle finish paint, either.

Over the years, we’ve seen replica Enigma machines in all shapes and sizes. From ones you could mount on your wrist, to full size replicas using modern components. We’ve even seen one variation that you can print out on a couple of sheets of paper. The parade of recreations shows no sign of stopping, and we wouldn’t have it any other way.

Continue reading “Put An Arduino Enigma In Your Pocket”

Building An Artisanal Tape Measure

Some tools are so common, so basic, that we take them for granted. A perfect example is the lowly tape measure. We’ve probably all got a few of these kicking around the lab, and they aren’t exactly the kind of thing you give a lot of thought to when you’re using them. But while most of us might not give our tape measure a second thought, [Ariel Yahni] decided to create an absolutely gorgeous new enclosure for his. Because if you’re going to measure something, why not look good doing it?

A CNC router is used to carve the body of the new tape measure out of a solid block of wood and cut a top plate out of clear acrylic. [Ariel] then used an angle grinder to cut off a small section of steel rod which he secured into a carved pocket in the base using epoxy. Finally, the internals of a commercial tape measure were inserted into this new enclosure, and the acrylic top was screwed down into place.

[Ariel] has made the DXF files for this project public for anyone else who wants to carve out their own heirloom tape measure, though it seems likely the designs will need some tweaking depending on the make and model of donor tape measure. While this might not be the most technically impressive project to run on Hackaday, it’s still a fantastic example of the sort of bespoke designs that are made possible with modern manufacturing methods.

This design reminds us of a similar project to turn a basic Honda key fob into a true conversation piece with the addition of some CNC’d hardwood and aluminum.

Continue reading “Building An Artisanal Tape Measure”

Monitor Your 3D Printer With Node-RED And Tasker

Anyone with a desktop 3D printer knows that it can be a bit nerve-wracking to leave the machine alone for any extended period of time. Unfortunately, it’s often unavoidable given how long more complicated prints can take. With big prints easily stretching beyond the 20 hour mark, at some point you’re going to need to leave the house or go to sleep. We hope, anyway.

In an effort to make his time away from his printer a bit less stressful, [Mat] from NotEnoughTECH has put together a comprehensive framework for monitoring his machine on the go. After looking at existing remote monitoring solutions, he found none gave him the level of information he was after. His system collects up an incredible number of data points about the printer’s current status and pushes it all to his Android phone as a rich notification. Best of all, he’s documented the entire system in exquisite detail for anyone else who might want to follow in his footsteps.

There’s a considerable amount of hardware and software involved in this system, and getting it up and running won’t be quite as straightforward as using some of the turn-key solutions out there. Octoprint is responsible for controlling and monitoring the printer, and [Mat] is pulling data from its API using Node-RED. That data is formatted and ultimately delivered to his Android device as a notification with Tasker. On the hardware side he’s got a Sonoff POW R2 to not only turn the printer on and off but measure its energy consumption, a USB camera to provide a live view of the printer, and a couple of Raspberry Pis to run it all.

Even if you don’t have a 3D printer, or maybe just don’t leave the house to begin with, the video [Mat] has put together after the break that shows how all the elements of this system are pulled together in Node-RED is a fascinating look at the flow-based visual programming tool. Similarly, it’s a great demonstration on how Tasker can be used to add some very slick Android notifications for your project without having to commit to developing a native application for the platform.

If you like the idea of remotely monitoring your printer but aren’t ready to dive into the deep end like [Mat], there are easier options. With a Raspberry Pi running Octoprint added to your 3D printer and one of the existing mobile monitoring and control front-ends installed, you’ll be well on the way to tackling those big prints without having to pitch a tent in the lab.

Continue reading “Monitor Your 3D Printer With Node-RED And Tasker”

Repairing A Vintage Sharp MemoWriter

As you may know, we’re rather big fans of building things here at Hackaday. But we’re also quite partial to repairing things which might otherwise end up in a landfill. Especially when those things happen to be interesting pieces of vintage hardware. So the work [ekriirke] put in to get this early 1980’s era Sharp MemoWriter EL-7000 back up and running is definitely right up our alley.

There were a number of issues with the MemoWriter that needed addressing before all was said and done, but none more serious than the NiCd batteries popping inside the case. Battery leakage is a failure mode that most of us have probably seen more than a few times, but it never makes it any less painful to see that green corrosion spreading over the internals like a virus. When [ekriirke] cracked open this gadget he was greeted with a particularly bad case, with a large chunk of the PCB traces eaten away.

The corrosion was removed with oxalic acid, which dropped the nastiness factor considerably, but didn’t do much to get the calculator back in working order. For that, [ekriirke] reconnected each damaged trace using a piece of wire; he even followed the original traces as closely as possible so the final result looked a little neater. Once everything was electrically solid again, he covered the whole repair with a layer of nail polish to adhere the wires and add a protective coating. Nail polish might not have been our first choice for a sealer, and likely not that particular shade even if it was, but sometimes you’ve got to use what you have on hand.

After years of disuse the ribbon cartridge was predictably dry, so [ekriirke] rejuvenated it with the fluid from a permanent marker applied to the internal sponge. He also made some modifications to the battery compartment so he could insert rechargeable Ni-MH AA batteries rather than building a dedicated pack. There’s no battery door in the enclosure, so removing the batteries will require opening the calculator up, but at least he has the ability to remove the batteries before putting the device in storage. Should help avoid a repeat of what happened the first time.

If you’re a fan of a good restoration, we’ve got plenty to keep you entertained. From bringing a destroyed Atari back from the dead to giving some cherished children’s toys a new lease on life, fixing old stuff can be just as engrossing as building it from scratch.

Continue reading “Repairing A Vintage Sharp MemoWriter”

Could Orion Ride Falcon Heavy To The Moon?

Things aren’t looking good for NASA’s Space Launch System (SLS). Occasionally referred to as the “Senate Launch System”, or even less graciously, the “Rocket to Nowhere”, the super heavy-lift booster has long been a bone of contention for those in the industry. Designed as an evolution of core Space Shuttle technology, the SLS promised to reuse existing infrastructure to deliver higher payload capacities and lower operating costs than its infamous winged predecessor. But in the face of increased competition from commercial launch providers and proposed budget cuts targeting future upgrades and expansions of the core booster, the significantly over budget and behind schedule program is in a very precarious position.

Which is not to say the SLS doesn’t look impressive, at least on paper. In its initial configuration it would easily take the title as the world’s most powerful rocket, capable of lifting nearly 105 tons into low Earth orbit (LEO), compared to 70 tons for SpaceX’s Falcon Heavy. It would still fall short of the mighty Saturn V’s 155 tons to LEO, but the proposed “Block 2” upgrades would increase SLS payload capability to within striking distance of the iconic Apollo-era booster at 145 tons. Since the retirement of the Space Shuttle in 2011, NASA has been adamant that the might of SLS was the only way the agency could accomplish bigger and more ambitious missions to the Moon, Mars, and beyond.

Or at least, they were. On March 13th, NASA Administrator Jim Bridenstine testified to Congress that in an effort to avoid further delays, the agency is exploring the possibility of sending their Orion spacecraft to the Moon with a commercial launcher. The statement came as a shock to many in the aerospace community, as it would seem to call into question the future of the entire SLS program. If commercial rockets can do the job of SLS, at least in some cases, why does the agency need it?

NASA is currently preparing a report which investigates what physical and logistical modifications would need to be made to missions originally slated to fly on SLS; a document which is sure to be scrutinized by SLS supporters and critics alike. Until the report is released, we can speculate about what this hypothetical flight to the Moon might look like.

Continue reading “Could Orion Ride Falcon Heavy To The Moon?”

Get Moving With New Software From OpenBuilds

If you’re reading Hackaday, you’ve probably heard of OpenBuilds. Even if the name doesn’t sound familiar, you’ve absolutely seen something on these pages that was built with their components. Not only is OpenBuilds a fantastic place to get steppers, linear rails, lead screws, pulleys, wheels, and whatever else you need to make your project go, they’re also home to an active forum of people who are passionate about developing open source machines.

As if that wasn’t enough reason to head over to the OpenBuilds website, [Peter Van Der Walt] recently wrote in to tell us about some new free and open source software he and the team have been working on that’s designed to make it easier than ever to get your creations cutting, lasing, milling, and whatever else you could possibly imagine. If you’ve got a machine that moves, they’ve got some tools you’ll probably want to check out.

BlackBox CNC controller

“OpenBuilds CAM” is a web-based tool which imports SVG and DXF files and creates toolpaths for all sorts of cutting, whether your machine does the business using a beam of angry photons or a simple drag knife. The resulting GCode can then be plugged into “OpenBuilds CONTROL”, which as you may have guessed, does the actual controlling of the piece of hardware connected to your computer. There’s no worries about vendor lock in here either, CONTROL will talk to any Grbl-compatible board.

But what if you don’t have a board? Well, it just so happens that OpenBuilds offers a very slick new piece of gear they’re calling the BlackBox. This beefy CNC controller includes a laundry list of features that [Peter] says the team is very excited about, including stepper drivers powerful enough to run NEMA 23 motors. As an interesting note, they’ve actually made the enclosure for the BlackBox out of cleverly solder masked PCBs; a fantastic trick we don’t see often enough.

The video after the break shows the CNC router version of “Hello World” using CAM and CONTROL, and should give you a pretty good idea of the typical workflow. If it looks familiar to you, it might be from our previous coverage of LaserWeb, a similar web-based project spearheaded by [Peter Van Der Walt] a few years back. Continue reading “Get Moving With New Software From OpenBuilds”

Hackaday Podcast 011: Weird Keyboards, Salvaging LCD Screens, And Mike Interviews Ivan Of Espressif In Shanghai

With our intrepid Editor in Chief Mike Szczys off being kind of a big deal in China, Managing Editor Elliot Williams is joined by Staff Writer Tom Nardi to talk about all the hacks that were fit to print over the past week. Join us as we talk about the wide world of custom mechanical keyboards, reviving a woefully antiquated display technology, building your own RC transmitter out of stuff you have laying around the lab, and the unexpected parallels between Pepto Bismol and rocket fuel. We’ll also look at what it takes to build a robust embedded system, and see if we can’t figure out a way to draw schematics worth looking at. Plus, hang around until the end of the episode to hear Mike interview the man instrumental in getting the ESP8266 to play nice with Arduino, and now running firmware for the ESP32.

Take a look at the links below if you want to follow along, and as always, tell us what you think about this episode in the comments!

Take a look at the links below if you want to follow along, and as always, tell us what you think about this episode in the comments!

Direct download (60 MB or so.)

Continue reading “Hackaday Podcast 011: Weird Keyboards, Salvaging LCD Screens, And Mike Interviews Ivan Of Espressif In Shanghai”