Arduino One Pixel Camera Sees All (Eventually)

Taking pictures in the 21st century is incredibly easy. So easy in fact that most people don’t even own a dedicated camera; from smartphones to door bells there are cameras built into nearly electronic device we own. So in this era of ubiquitous photography, you might think that a very slow and extremely low resolution camera wouldn’t be of interest. Under normal circumstances that’s probably true, but this single pixel camera built by [Tucker Shannon] is anything but normal.

Continue reading “Arduino One Pixel Camera Sees All (Eventually)”

Welcome To The Slow Death Of Satellite TV In America

During an earnings call on November 29th, CEO of AT&T Communications John Donovan effectively signed the death warrant for satellite television in the United States. Just three years after spending $67 billion purchasing the nations’s largest satellite TV provider, DirecTV, he made a comment which left little doubt about the telecom giant’s plan for the service’s roughly 20 million subscribers: “We’ve launched our last satellite.

The news might come as a surprise if you’re a DirecTV customer, but the writing has been on the wall for years. When the deal that brought DirectTV into the AT&T family was inked, they didn’t hide the fact that the actual satellite content delivery infrastructure was the least of their concerns. What they really wanted was the installed userbase of millions of subscribers, as well as the lucrative content deals that DirecTV had already made. The plan was always to ween DirecTV customers off of their satellite dishes, the only question was how long it would take and ultimately what technology they would end up using.

Now that John Donovan has made it clear their fleet of satellites won’t be getting refreshed going forward, the clock has officially started ticking. It won’t happen this year, or even the year after that. But eventually each one of the satellites currently beaming DirecTV’s content down to Earth will cease to function, and with each silent bird, satellite television (at least in the United States) will inch closer to becoming history.

Continue reading “Welcome To The Slow Death Of Satellite TV In America”

AI Bot Plays Castlevania So You Don’t Have To

We’re not allowed to have TV here in the Hackaday Wonder Bunker, but occasionally we’ll pool together the bandwidth credits they pay us in and gather ’round the old 3.5 inch TFT LCD to watch whatever Netflix assures us is 93% to our liking. That’s how we found out they’ve made a show based on, of all things, one of the Castlevania games for the NES. We wanted to play the game to understand the backstory, but since it hails from the era of gaming where primitive graphics had to be supplemented with soul-crushing difficulty, we didn’t get very far.

But thanks to a very impressive project developed by [Michael Birken] maybe we’ll have it all figured out by the time we’ve saved enough credits to watch Season 2 (no spoilers, please). The software, which he’s quick to point out is not an example of machine learning, is an attempt to condense his personal knowledge of how to play Castlevania into a plugin for the Nintaco NES emulator. The end result is CastlevaniaBot, which is capable of playing through the original Castlevania from start to finish without human intervention. You can even stop and start it at will, so it can play through the parts you don’t want to do yourself.

[Michael] started this project with a simple premise: if he could make a bot successfully navigate the many levels of Dracula’s castle, then getting it to kill a few monsters along the way should be easy enough. Accordingly, he spent a lot of time perfecting the path-finding for CastlevaniaBot, which included manually playing through the entire game in order to get an accurate map of the background images. These images were then analyzed to identify things like walls and stairs, so the bot would know where it could and couldn’t move protagonist Simon Belmont. No matter what the bot is doing during the game it always considers where it is and where it needs to be going, as there’s a time limit for each stage to contend with. Continue reading “AI Bot Plays Castlevania So You Don’t Have To”

Maze Generator Keeps Plotter (and Kids) Busy

We can tell that [Jon Howell] is our kind of guy. After updating his vintage 1985 Hewlett-Packard plotter with WiFi and the ability to load SVG files, he obviously needed to find a bunch of stuff to run off with it. Gotta justify those hacks somehow. So he doubled down and decided support a hack with another hack by writing a maze generator to keep his plotter well fed. He was kind enough to unleash his creation on an unsuspecting Internet as an open source project, and now we all can benefit from a couple of reams worth of mazes.

The generator itself is written in Java, and should work on whatever operating system your box happens to be running thanks to the *nix and Windows wrapper scripts [Jon] provides. To create a basic maze, one simply needs to provide the script with the desired dimensions and the paper size. You can define the type of paper with either standard sizes (such as --paper a4) or in the case of a plotter with explicit dimensions (--paper 36x48in).

If you aren’t a big fan of right angles, there’s support for changing the internal geometry of the maze to use a hexagonal or triangle grid. You can even pass the program a black and white PNG “mask” which it will use as the boundaries for the maze itself, allowing for personalized puzzles of whatever shape catches your fancy. [Jon] even ran the Wrencher though his software, leading to the creation of a maze which we can neither confirm nor deny will be making an appearance on our Christmas cards this year.

Whether you need to prove to your significant other that the hours you spent fiddling with your plotter are well spent, or an easy way to entertain the junior humans in your life, you can thank [Jon] for your solution.

Vintage Plotter Turned Fruit Spectrometer

Fruit can be a tricky thing: if you buy it ripe you’ll be racing against time to eat the pieces before they turn into a mushy mess, but if you buy the ones which are a bit before their prime it’s not always easy to tell when they’re ready to eat. Do you smell it? Squeeze it? Toss it on the counter to see if it bounces? In the end you forget about them and they go bad anyway. That’s why here at Hackaday we sustain ourselves with only collected rainwater and thermo-stabilized military rations.

But thankfully Cornell students [Christina Chang], [Michelle Feng], and [Russell Silva] have come up with a delightfully high-tech solution to this decidedly low-tech problem. Rather than rely on human senses to determine when a counter full of fruit has ripened, they propose an automated system which uses a motorized spectrometer to scan an arrangement of fruit. The device measures the fruit’s reflectance at 678 nm, which can be used to determine the surface concentration of chlorophyll-a; a prime indicator of ripeness.

If that sounds a bit above your pay grade, don’t worry. The students were able to build a functional prototype using a 1980’s era plotter, a Raspberry Pi, and a low-cost AS7263 NIR spectral sensor from SparkFun which just so happens to have a peak responsivity of 680 nm. The scanning is performed by a PIC32MX250F128B development board with an attached TFT LCD display so the results can be easily viewed. The Raspberry Pi is used in conjunction with a Adafruit PCA9685 I2C PWM driver to control the plotter’s stepper motors. The scanning and motor control could be done with the PIC32 alone, but to save time the students decided to use the Raspberry Pi to command the PCA9685 as that was what the documentation and software was readily available for.

To perform a scan, the stepper motors home the AS7263 sensor module, and then passes it under the fruit which is laying on a clear acrylic sheet. Moving the length of the acrylic sheet, the sensor is able to scan not only multiple pieces of fruit but the entirety of each piece; allowing it to determine for example if a section of a banana has already turned. The relative ripeness of the fruit is displayed to the user on the LCD display as a heatmap: the brighter the color the more ripe it is.

At the end of their paper, [Christina], [Michelle], and [Russell] note that while the scanner worked well there’s still room for improvement. A more scientific approach to calculating how ripe each fruit is would make the device more accurate and take out the guess work on the part of the end user, and issues with darker colored fruit could potentially be resolved with additional calibration.

While a spectrometer might sound like the kind of equipment that only exists in multi-million dollar research laboratories, we occasionally see projects like this which make the technology much more accessible. This year we saw a compact spectrometer in the Hackaday Prize, and going a bit farther back in time we even featured a roundup of some of the most impressive spectrometer builds on Hackaday.io.

Continue reading “Vintage Plotter Turned Fruit Spectrometer”

Arduino-Powered Rocket Test Stand

If you’re into amateur rocketry, you pretty quickly outgrow the dinky little Estes motors that they sell in the toy stores. Many hobbyists move on to building their own homebrew solid rocket motors and experimenting with propellant mixtures, but it’s difficult to know if you’re on the right track unless you have a way to quantify the thrust you’re getting. [ElementalMaker] decided he’d finally hit the point where he needed to put together a low-cost test stand for his motors, and luckily for us decided to document the process and the results.

The heart of the stand is a common load cell (the sort of thing you’d find in a digital scale) coupled with a HX711 amplifier board mounted between two plates, with a small section of vertical PVC pipe attached to the topmost plate to serve as a motor mount. This configuration is capable of measuring up to 10 kilograms with an 80Hz sample rate, which is critically important as these type of rocket motors only burn for a few seconds to begin with. The sensor produces hundreds of data points during the short duration of the burn, which is perfect for graphing the motor’s thrust curve over time.

Given such a small window in which to make measurements, [ElementalMaker] didn’t want to leave anything to chance. So rather than manually igniting the motor and triggering the data collection, the stand’s onboard Arduino does both automatically. Pressing the red button on the stand starts a countdown procedure complete with flashing LED, after which a relay is used to energize a nichrome wire “electronic match” stuck inside the motor.

In the video after the break you can see that [ElementalMaker] initially had some trouble getting the Arduino to fire off the igniter, and eventually tracked the issue down to an overabundance of current that was blowing the nichrome wire too fast. Swapping out the big lead acid battery he was originally using with a simple 9V battery solved the problem, and afterwards his first test burns on the stand were complete successes.

If model rockets are your kind of thing, we’ve got plenty of content here to keep you busy. In the past we’ve covered building your own solid rocket motors as well as the electronic igniters to fire them off, and even a wireless test stand that lets you get a bit farther from the action at T-0.

Continue reading “Arduino-Powered Rocket Test Stand”

Every Computer Deserves A Rotary Encoder

In the era of touch screens and capacitive buttons, we’d be lying if we said we didn’t have the occasional pang of nostalgia for the good old days when interfacing with devices had a bit more heft to it. The physical clunk and snap of switches never seems to get old, and while you can always pick up a mechanical keyboard for your computer if you want to hear that beautiful staccato sound while firing off your angry Tweets, there’s a definite dearth of mechanical interface devices otherwise.

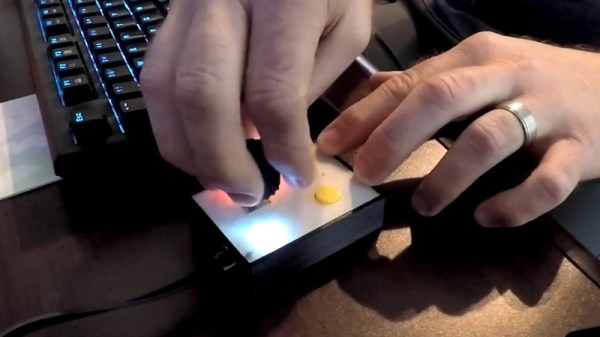
[Jeremy Cook] decided to take matters into his own hands (literally and figuratively) by designing his own multipurpose USB rotary input device. It’s not a replacement for the mouse or keyboard, but a third pillar of the desktop which offers a unique way of controlling software. It’s naturally suited to controlling things like volume or any other variable which would benefit from some fine tuning, but as demonstrated in the video after the break even has some gaming applications. No doubt the good readers of Hackaday could think of even more potential applications for a gadget like this.

The device is built around the diminutive Arduino-compatible PICO board by MellBell, which features a ATmega32u4 and native USB. This allowed him to very rapidly spin up a USB Human Interface Device (HID) with minimal headaches, all he had to do was hang his buttons and rotary encoder on the PICO’s digital pins. To that end, he [Jeremy] used the fantastic I2C rotary encoder designed by [fattore.saimon], which readers may remember as a finalist in the Open Hardware Design Challenge phase of the 2018 Hackaday Prize. He also added a NeoPixel ring around the encoder to use for some visual feedback and because, well, it just looks cool.

Since all of the core components are digital, there’s not a whole lot required in the way of wiring or passive components. This let [Jeremy] put the whole thing together on a piece of perfboard, freeing him up to spend time designing the 3D printed enclosure complete with translucent lid so he can see the NeoPixel blinkenlights. He got the tolerances tight enough that the whole device can be neatly press-fit together, and even thought to add holes in the bottom of the case so he could push the perfboard back out if he needed to down the line.

[Jeremy] spends a good chunk of the video going over the software setup and development of the firmware, and details some of the nuances he had to wrap his head around when working with the I2C encoder. He also explains the math involved in getting his encoder to emulate a mouse cursor moving in a circle, which he thinks could be useful when emulating games that originally used an encoder such as Tempest or Pong.

We’ve seen similar USB “knobs” in the past for controlling volume, but the additional inputs that [Jeremy] built into his version definitely makes it a bit more practical. Of course we’re suckers for interesting USB input devices to begin with.

Continue reading “Every Computer Deserves A Rotary Encoder”