Direction Finding And Passive Radar With RTL-SDR

To say that the RTL-SDR project revolutionized hacker’s capabilities in the RF spectrum would be something of an understatement. It used to be that the bar, in terms of both knowledge and hardware, was so high that only those truly dedicated were able to explore the radio spectrum. But today anyone with $20 can pick up an RTL-SDR device, combine it with a wide array of open source software, and gain access to a previously invisible world.

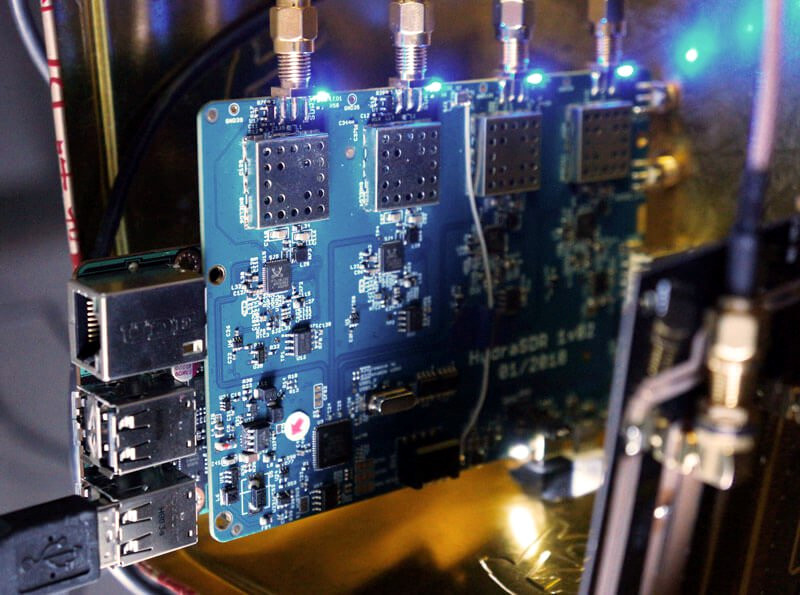
That being said, RTL-SDR is usually considered an “Economy Ticket” to the world of RF. It gets your foot in the door, but experienced RF hackers are quick to point out you’ll need higher-end hardware if you want to start doing more complex experiments. But the KerberosSDR may soon change the perception of RTL-SDR derived hardware. Combining four R820T2 SDRs on a custom designed board, it allows for low-cost access to high concept technologies such as radio direction finding, passive radar, and beam forming. If you get bored with that, you can always just use it as you would four separate RTL-SDR dongles, perfect for applications that require monitoring multiple frequencies such as receiving trunked radio.

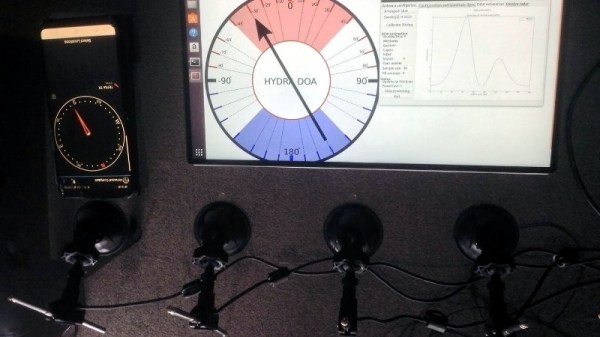
KerberosSDR (which was previously known as HydraSDR) is a collaborative effort between the Othernet engineering team and the folks over at RTL-SDR.com, who earlier in the year put out a call for an experienced developer to come onboard specifically for this project. Tamás Peto, a PhD student at Budapest University of Technology and Economics, answered the call and has put together a system which the team plans on releasing as open source so the whole community can benefit from it. In the videos after the break, you can see demonstrations of the direction finding and passive radar capabilities using an in-development version of KerberosSDR.

As for the hardware, it’s a combination of the RTL-SDR radios with an onboard GPIO-controlled wide band noise source for calibration, as well as an integrated USB hub so it only takes up one port. Everything is wrapped up in a shielded metal enclosure, and the team is currently experimenting with a header on the KerberosSDR PCB that would let you plug it directly into a Raspberry Pi or Tinkerboard.

The team hopes to start final hardware production within the next few months, and in the meantime has set up a mailing list so interested parties can stay in the loop and be informed when preorders start.

If you can’t wait until then, we’ve got a detailed write-up on DIY experiments with passive radar using RTL-SDR hardware, and you can always use your browser if you want to get your radio direction finding fix.

Continue reading “Direction Finding And Passive Radar With RTL-SDR”

Cheap RC Boat Turned Weirdly Capable Seaplane

What do you get when you combine a cheap RC boat from Walmart, foam board, a couple powerful motors, and some aluminum cans? Most people would just end up with a pile of garbage, but we’ve already established [Peter Sripol] is fairly far from “most people”. In his hands, this collection of scraps turns into an almost unbelievably nimble seaplane, despite looking like something out of a TailSpin and Mad Max crossover episode.

In his latest YouTube video, [Peter] takes viewers through the process of turning one of these rather lame RC boats into an impressive flying machine. His took inspiration from the Sikorsky S-38, an American amphibious aircraft introduced in 1928. The S-38 looked like a fairly traditional boat bolted to the bottom of a set of huge wings, so it’s little surprise that he patterned this build after it.

The construction of the seaplane is very simple, and boils down to cutting some big wings out of foam board, using some sticks to give it some rigid framing, and putting a tail on it. The biggest problem is that the boat’s hull lacks the “steps” that a seaplane would have, so it’s not an ideal shape to lift out of the water. But with enough thrust and a big enough control surface, it all works out in the end.

Which is in effect the principle by which the whole plane flies. There’s a large elevator cantilevered far astern to help leverage the boat out of the water, but otherwise all other control is provided by differential thrust between the two top mounted motors. The lack of a rudder does make its handling a bit sluggish in the water, but it obviously has no problem once it’s airborne.

If [Peter] and his foam board artistry seem familiar, it’s probably from the not one but two homemade aircraft he built with shockingly similar techniques to this current project.

Continue reading “Cheap RC Boat Turned Weirdly Capable Seaplane”

SMART Response XE Gets Wireless Bootloader

A few months back we first brought word of the progress being made in unlocking the SMART Response XE, an ATmega128RFA powered handheld computer that allowed teachers to create an interactive curriculum in the days before all the kids got Chromebooks. Featuring 2.4 Ghz wireless communication, a 384×160 LCD, and a full QWERTY keyboard, schools paid around $100 each for them 2010. Now selling for as little as $5 on eBay, these Arduino-compatible devices only need a little coaxing and an external programmer to get your own code running.

The previous post inspired [Larry Bank] to try his hand at hacking the SMART Response XE, and so far he’s made some very impressive progress. Not only has he come up with his own support library, but he’s also created a way to upload Arduino code to the devices through their integrated 802.15.4 radio. With his setup, you no longer need to open the SMART Response XE and attach a programmer, making it much easier to test and deploy software.

[Larry] has written up a very detailed account of his development process, and goes through the trouble of including his ideas that didn’t work. Getting reliable communication between two of these classroom gadgets proved a bit tricky, and it took a bit of circling around until he hit on a protocol that worked.

The trick is that you need to use one SMART Response XE attached to your computer as a “hub” to upload code to other XEs. But given how cheap they are this isn’t that big of a deal, especially considering the boost in productivity it will net you. [Larry] added a 5 x 2 female header to his “hub” XE so he could close the device back up, and also added a physical power switch. In the video after the break, you can see a demonstration of the setup sending a simple program to a nearby XE.

Between this wireless bootloader and the Arduboy compatibility covered previously, we’d suggest you get your SMART Response XE now. We wouldn’t be surprised if the prices of these things start going up like they did with the IM-ME. Continue reading “SMART Response XE Gets Wireless Bootloader”

Cheap FPV Goggles Turned Pocket Sized Display

Thanks to the exploding popularity of First Person View (FPV) RC flying over the last couple of years, the cost of the associated hardware has dropped rapidly. Today you can get entry-level FPV goggles for under $40 USD on various import sites. For the money you’re getting a 5.8 GHz receiver, battery, and an LCD display; even if the components themselves aren’t exactly high end, at that price it’s essentially an impulse buy.

[nomand] didn’t necessarily have a use for a cheap FPV headset, but he did like the idea of having a pocket sized display that he could pass off to others so they could see what he’s seeing during flights. So he harvested the principle components from a Eachine VR006 headset and designed a new 3D printed enclosure for them. The final result looks fantastic, and is much cheaper than commercial alternatives on the market.

He’s created an exceptionally detailed step-by-step guide on how you can perform the conversion yourself in the project’s GitHub repository, and has also put together a video where he goes over the modification and discusses the end result. [nomand] clearly intends for this to be a project for others to duplicate instead of a one-off build, and given the price and final results, we wouldn’t be surprised if this conversion becomes popular in FPV circles.

Perhaps the best part of this project is that it requires almost no modification of the original hardware; just soldering two wires because the original connector is too large. Otherwise just need to take the headset apart carefully, and transplant the components into the 3D-printed case [nomand] has meticulously designed. The case is so well designed it doesn’t even need any fasteners, it slides together and everything is held in with some strategically placed pieces of foam.

Between this modification and the custom built spectator display we covered recently, it looks like there’s a clear demand for sub-$50 portable FPV monitors. Seems odd that no manufacture is trying to fill this niche so far.

Continue reading “Cheap FPV Goggles Turned Pocket Sized Display”

Create Your Own ESP8266 Shields

The ESP8266 has become incredibly popular in a relatively short time, and it’s no wonder. Cheap as dirt, impressively powerful, Arduino-compatible, and best of all, includes Wi-Fi right out of the box. But for all its capability and popularity, it’s still lagging behind the Arduino in at least one respect. Namely, the vast collection of add-on “Shields” which plug into the Arduino to add everything from breadboards to GPS receivers.

Until such time as the free market decides to pick up the pace and start making standardized shields for the various ESP8266 development boards, it looks as if hackers are going to have to pick up the slack. [Rui Santos] has put together a very detailed step-by-step guide on the creation of a simple shield for the popular Wemos D1 Mini board, which should give you plenty of inspiration for spinning up your own custom add-on modules.

Presented as a written tutorial as well as a two part video, this guide covers everything from developing and testing your circuit on a breadboard to designing your PCB in KiCad and sending it off for fabrication. The end result is a professional looking PCB that matches the footprint of the stock D1 Mini and adds a DS18B20 temperature sensor, PIR motion detector, photoresistor, and some screw down terminals.

[Rui] goes on to show how you can utilize the new sensors shield via a web interface hosted on the ESP8266, and even wraps the whole thing up in a 3D printed enclosure. All worthwhile skills to check out if you’re looking to produce more cohesive finished products.

If you’re looking for a similar project for the ESP32, [Rui] has you covered there as well. You may also be interested in the series of ESP8266 tutorials we recently highlighted.

Continue reading “Create Your Own ESP8266 Shields”

Scooter Hauls Kids With A Little Heavy Metal

Where there’s a will, there’s a way. Similarly, where there’s a paying customer and a well stocked metalworking shop, there will also be a way. That’s about all the backstory you need to understand this latest creation from [Richard Day] of 42Fab. A customer asked him to build something that didn’t exist, and in a few hours he not only fabricated it from scratch but documented the whole thing for our viewing pleasure.

The object in question is a mount that would allow the customer to pull a “Burley Bee” kid trailer behind their electric scooter. The trailer is only meant for a bicycle, but the expected stresses of getting pulled around by a scooter seemed similar enough that [Richard] figured it should work. Especially since the ride height of the scooter lined up almost perfectly with the trailer’s tongue. The trick is, he wanted to avoid making permanent changes to either the scooter or the trailer.

On the scooter side, [Richard] came up with a clamp arrangement that would squeeze onto the frame. This gave him plenty of strength, without having to put any holes in the scooter. To create the clamp he took two pieces of 1/4″ x 2″ steel flat bar and welded 5/16″ nuts to them. By drilling the threads out of outer nuts they act as bushings, so cranking down on the bolts draws the two pieces together. To simplify the alignment, he welded the nuts to the bars while the bolts were threaded in, so he knew everything would be in place.

For the trailer side, he took another piece of flat steel and turned it into a “U” shape by cutting almost all the way through the back of it and then folding it over in his vice. A bead of metal was then laid in the cut with the welder to strengthen it back up. [Richard] used this opportunity to demonstrate the difference between pushing and pulling the torch while welding, which is an interesting tip to file away. A hole drilled through the two sides and a little grinding, and it’s ready to mount.

Between the two fabricated components is some flat stock welded at an eyed up angle. As [Richard] says in the video, the nice thing about these one-off projects is that you can basically design on the fly. Plus you can always use a hammer to make some final adjustments.

While his isn’t the first bike trailer hack we’ve seen here at Hackaday, it would be fair to say it’s something of a rarity around these parts. Usually we get word of somewhat larger bits of kit getting dragged around.

Continue reading “Scooter Hauls Kids With A Little Heavy Metal”

FOSSCON 2018: Where Open Source And LEGO Collide

It probably won’t come as a surprise to anyone reading this, but hackers and makers absolutely love LEGO. We think you’d be hard pressed to find a Hackaday reader, young or old, that hasn’t spent some quality time with the little plastic bricks from Billund, Denmark. So it follows that there’s a considerable community of individuals who leverage their better than average technical prowess to utilize LEGO in new and unique ways. But the activities and history of these LEGO hackers is not exactly common knowledge to those who aren’t heavily vested in the hobby.

During the recent FOSSCON 2018 in Philadelphia, Daniel Pikora gave attendees a comprehensive look at the intersection of open source development and the world’s most popular brand of construction toys. A software developer with a penchant for open source code by trade, he’s also an avid member of what’s known as the Adult Fan of LEGO (AFOL) community who’s exhibited his creations at shows across the United States and Canada. Such a unique perspective, with a foot in both the FOSS and LEGO camps, makes Daniel an ideal tour guide for this particular microcosm of toys and tech.

In a whirlwind presentation that took attendees through 49 slides in about as many minutes, Daniel covered LEGO’s beginnings in the 1930s to the rise of 3D printed custom bricks, and everything in between. Some of the engineering-centric product lines, such as Technic and Mindstorms, were already fairly well known to the types of folk who spent a beautiful Saturday in Philadelphia at an open source conference. But Daniel’s deep-dive into the long history of open source LEGO projects brought to light the work of so many dedicated developers that everyone walked away with a newfound respect for the amount of work the AFOL community has put into elevating LEGO from a child’s toy to a legitimate tool. Join me below for a look at the particulars of that deep dive.

Continue reading “FOSSCON 2018: Where Open Source And LEGO Collide”