Respectfully Modifying The Amiga 500

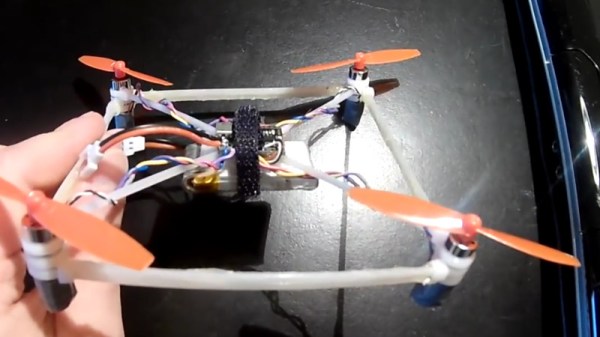
Modifying the Amiga 500 to speed up access to RAM in a memory expansion pack is a well documented procedure, with guides on the process written in the early 1990’s when the hardware was only a few years old. But as they were written for contemporary hardware, they make no concessions for how one should be treating a vintage computer that’s now over 30 years old. In 1993, cutting traces on the Amiga 500 motherboard was just a last ditch effort to eek a few more months of service life out of an outdated desktop computer. But in 2018, it’s kind of like when that old lady tried to “restore” a fresco of Jesus in Spain; it might be done with the best of intentions, but you still screwed the thing up good and proper.

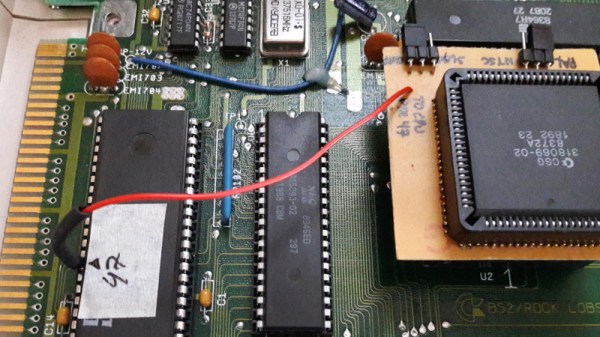
Such things don’t fly over at [Inkoo Vintage Computing]. There you can find a guide that details the impressive lengths one can go to if they want to perform the classic modification without any irreversible changes to the motherboard. To avoid the cut traces and soldered bodge wires, this version of the modification makes use of a novel adapter that breaks out the necessary connections on the 8372A chip.

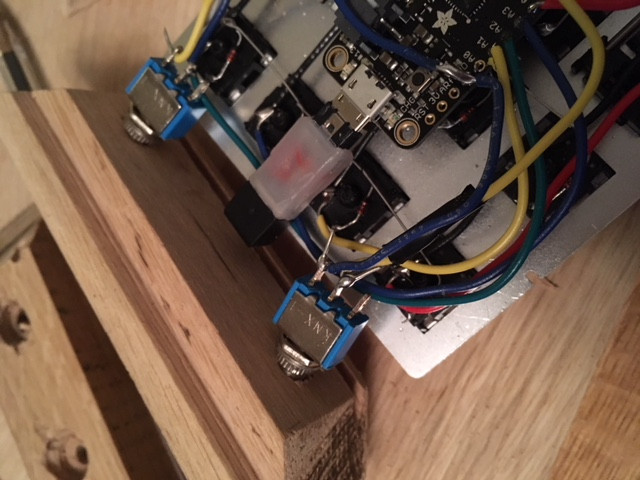
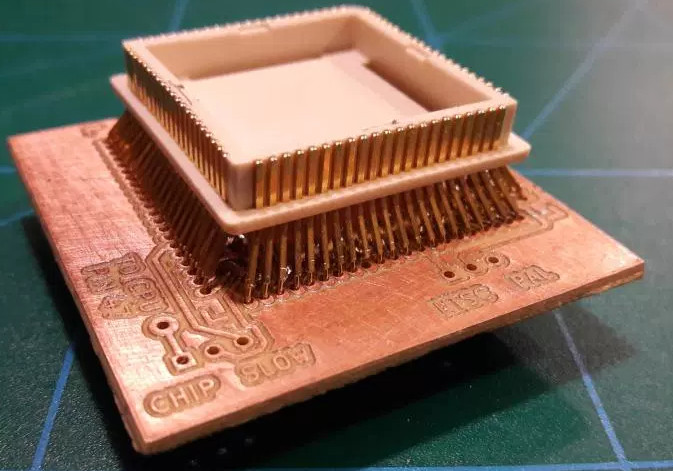
The adapter is simply a homemade PCB with both male and female plastic leaded chip carrier (PLCC) connectors. The few pins on the chip that needed rerouting are exposed as solder pads on the adapter for easy wiring. There are even a couple jumpers on the adapter to turn the modifications on and off.

Not surprisingly, the trickiest part of building this adapter was sourcing the antiquated PLCC connectors. Assuming you can even find them, you are then left with the challenging task of soldering them together. Judging by the pictures on the [Inkoo Vintage Computing] page, it’s no walk in the park.

Another similar arrangement is used in the expansion bay of the Amiga, where a pin is virtually “cut” in the connector. A tiny PCB is soldered to a 3×2 header to reroute the signals, and another jumper is used to enable and disable the pin. Luckily, the long pins on the Amiga memory expansion are forgiving enough that the little board can fit in between them without breaking electrical contact.

We’re no stranger to the Amiga 500 around these parts. We’ve covered how to get the 1987-vintage machine online in the 21st century, as well as employing a Raspberry Pi to emulate the original floppy drive. You can even make your own faux-Amiga with a 3D printed case, if you suffer from a sort of existential dread when working on a computer that’s older than you are.

Open Source Hardware Video Game Music Player

[Aidan Lawrence] likes classic synthesized video game music in the same way that other people “like” breathing and eating. He spent a good deal of 2017 working on a line of devices based on the Yamaha YM2612 used in the Sega Genesis to get his feet wet in the world of gaming synths, and is now ready to take the wraps off his latest and most refined creation.

One of his earlier attempts at a hardware VGM player.

The YM2151 Arcade Classic is an open source hardware player for Video Game Music (VGM) files. It uses no emulation, the files are played on the device’s YM2151 chip in the same way they would have been on a real arcade cabinet at the time of their release. Interestingly, as some arcade machines were exceedingly rare or even scrapped before release, [Aidan] believes that his player may be the first time some of these songs have ever been played (at least in public) on real hardware.

The YM2151 synthesizer is powered by a STM32 “Blue Pill” board, which was selected as much for its capabilities as it was its low cost. The STM32 loads the VGM files from an SD card, and puts track information for the currently playing song on the 128×32 OLED display. A few tactile switches under the screen allow for shuffling through the songs stored on the card, and a slide switch for mute rounds out the simplistic but functional user interface.

In the GitHub repository, [Aidan] has provided the source code, schematics, Bill of Materials, and KiCad-generated Gerber files; everything you need to create your own version of his player. After listening to it rock out for a few minutes in the video after the break, we’re tempted to take him up on that offer.

This player reminds us of a similar design, also using original hardware, that we covered last year. The logical next step for this project would be to flesh out the UI and put it into an enclosure like this SNES chiptune player.

Continue reading “Open Source Hardware Video Game Music Player”

DIY Planetarium Built From PVC Pipes And Cardboard

When you think about DIY projects, you probably don’t consider building your own planetarium. Why would you? Building the thing is surely outside the capabilities of the individual, and even if you could figure it out, the materials would be far too expensive. There’s a limit to DIY projects, and obviously building a planetarium is on the wrong side of the line. Right?

Well, apparently not. [Gabby LeBeau] has documented the planetarium she built as her senior project, and if you’ll forgive the pun, it’s absolutely out of this world. Using readily available parts and the help of family and friends, she built a fully functional planetarium big enough to seat the Physics Department. No word on what grade she got, but it’s a safe bet she screwed the curve up for the rest of the class.

After two months of research and a couple of smaller proof of concept builds, she was able to find a business who graciously allowed her to construct the full scale planetarium in their warehouse. The frame is made of PVC pipes held together with zip ties. The big advantage to using the PVC pipes (beyond being cheap and easy to works with) is that they will automatically find a hemispherical shape when bent; saving the time and trouble it would take to create the shape with more rigid building materials.

Once the PVC frame was up, white cardboard panels were cut to shape and attached to the inside. The panels were lined up as closely as possible, but gaps were covered with white tape so the fit didn’t need to be perfect. When the dome was finished, it was lifted and placed on metal trusses to get some room underneath, and finally covered with a black tarp and stage curtain to block out all light.

Of course, she didn’t go through all this trouble to just stick some glow in the dark stars on the inside of this thing. The image from a standard projector is directed at a flat mirror, which then bounces off of a convex mirror. Driving the projector is a laptop running Stellarium. While there were some imperfections she couldn’t get polished or cleaned off of the mirrors, the end result was still very impressive.

Unfortunately, you can’t really do a planetarium justice with a camera, so we aren’t able to see what the final image looked like. But judging by the slack-jawed faces of those who are pictured inside of it, we’re going to go out on a limb and say it was awesome.

We might suggest trying to quiet down the projector or adding some lasers to the mix, but overall this is a truly exceptional project, and we’re jealous of everyone who got to experience it first hand.

On A Quest For The Perfect Numpad

Often times, the only way to get exactly what you want in a device is to just build it yourself. Well, maybe not the only way, but we’ve all certainly told ourselves it was the only way enough that it might as well be true. We don’t know if the DIY imperative felt by [Olav Vatne] to construct his own Bluetooth mechanical number pad was genuine or self-imposed, but in either event, we’re glad he documented the process for our viewing pleasure.

Broken up into three separate posts on his blog, the construction of his custom numpad starts innocently enough with buying a kit from AliExpress. In a rather bizarre twist, the kit arrived assembled, which lead to an arduous period of desoldering to separate all the principle parts [Olav] wanted in the first place. So much for saving time.

Once he freed all the mechanical keys from the kit’s PCB, he went to town hand-wiring the matrix. After testing to make sure all the keys were wired correctly, the matrix got connected to an Adafruit Feather 32u4 Bluefruit. With the electronics sorted, [Olav] moved on to the software side. Here he was able to accomplish one of his primary goals, having a numpad that works over both USB and Bluetooth.

The last step of the process was creating the wooden enclosure. It basically goes together like a picture frame, with special care given to make sure there are appropriate openings in the case for the switches and USB port to pop through without ruining the overall look of the device.

Thanks to cheap USB-capable microcontrollers, hand-made artisan keyboards are now a thing. This project is a nice way to get started with custom input devices, and it only gets better from here.

Gramazon Gives Your Echo Dot A 1920’s Makeover

Unless you’re particularly fond of hockey pucks, you probably aren’t really keen on the aesthetics of the NSA’s Amazon’s diminutive listening device, the Echo Dot. It’s not exactly ugly, but if anyone at Amazon spent more than ten minutes considering the visual design of the thing when it was being developed, we’d be shocked.

Luckily for us, there are hackers and makers who not only have the artistic chops to come up with visually appealing designs, but are kind enough to share them with those of us who are a few crayons short of a full box in that department. Such is the case with the jaw-dropping Gramazon by [Bård Fleistad], a 3D printed acoustic amplifier for the Echo Dot that converts the ho-hum looking device into a classic 1920’s style “horn” speaker.

[Bård] has wanted a horn speaker for awhile, but the prices on a real one in decent condition are getting pretty high. If he couldn’t have the real deal he figured the next best thing would be to 3D print his own version, but he’d still need electronics to put into it. Since the Echo is readily available and works as a Bluetooth speaker (not to mention plays audio from various online sources), it made sense to use it as the heart of his faux-horn.

The design he came up with is very slick, but the finish work on the printed parts is really what puts this project over the edge. [Bård] used Bondo and multiple primer coats to smooth the outside of the horn, and XTC-3D for the hard-to-reach internal curves. Plus sanding. Lots, and lots, of sanding.

If you’re looking for more information on putting high quality finishes on your 3D printed parts like this, check out our Visual 3D Print Finishing Guide. Or if you’d rather just find a swanky home for your always-listening hockey puck, we’ve got plenty of inspiration for you there as well.

Continue reading “Gramazon Gives Your Echo Dot A 1920’s Makeover”

Zip Tie Quadcopter Frame Is As Cheap As They Come

We’ve seen some cheap quadcopter builds over the years, but this one takes the cake. After seeing somebody post a joke about building a quadcopter frame out of zip ties and hot glue, [IronMew] decided to try it for real. The final result is a micro quadcopter that actually flies half-way decently and seems to be fairly resistant to crash damage thanks to the flexible structure.

The first attempts at building the frame failed, as the zip ties (unsurprisingly) were too flexible and couldn’t support the weight of the motors. Eventually, [IronMew] realized that trying to replicate the traditional quadcopter frame design just wasn’t going to work. Rather than a body with arms radiating out to hold the motors, the layout he eventually came up with is essentially the reverse of a normal quadcopter frame.

Zip ties reinforced with a healthy coating of hot glue are arranged into a square, with a motor at each corner. Then four zip ties are used to support the central “pod” which holds the battery and electronics. No attempt is made to strengthen this part of the frame, and as such the heavy central pod hangs down a bit in flight. [IronMew] theorizes that this might actually be beneficial in the end, as he believes it could have a stabilizing effect when it comes time to record FPV video.

He mentions that he’s still struggling to get the PID values setup properly in the flight computer, but in the video after the break you can see that it’s flying fairly well for a first attempt. We wouldn’t recommend you tear into a bag of zip ties when it comes time to build your first quadcopter, but it does go to show that there’s plenty of room for experimentation.

We’ve covered a number of unique quadcopter frames if you’re looking for something to set your next build apart from the rest. If you’ve got a big enough bed you can 3D print a very nice frame, but if you’ve got more time than equipment, you could always cut one out of a piece of plywood.

Continue reading “Zip Tie Quadcopter Frame Is As Cheap As They Come”

Adding Optics To A Consumer Thermal Camera

[David Prutchi] writes in to tell us about his recent experiments with building lenses for thermal imaging cameras, which to his knowledge is a first (at least as far as DIY hardware is concerned). With his custom designed and built optics, he’s demonstrated the ability to not only zoom in on distant targets, but get up close and personal with small objects. He’s working with the Seek RevealPro, but the concept should work on hardware from other manufacturers as well.

In his detailed whitepaper, [David] starts by describing the types of lenses that are appropriate for thermal imaging. Glass doesn’t transmit the wavelengths that thermal camera is looking for, so the lenses need to be made of either germanium or zinc selenide. These aren’t exactly the kind of thing you can pick up at the local camera shop, and even small lenses made of these materials can cost hundreds of dollars. He suggests keeping an eye out on eBay for surplus optics you could pull them out of to keep costs down.

Creating the macro adapter is easy enough, you simply put a convex lens in front of the thermal camera. But telephoto is a bit more involved, and the rest of the whitepaper details the math and construction techniques used to assemble it the optics. [David] gives a complete bill of materials and cost breakdown for his telephoto converter, but prepare for a bout of sticker shock: the total cost with all new hardware is nearly $500 USD. The majority of that is for the special lenses though, so if you can score some on the second-hand market it can drop the cost significantly.

We’ve seen an impressive array of thermal camera hacks and projects recently, no doubt due to the falling prices of consumer-level imaging hardware. Given their utility as a diagnostic tool, a thermal camera might be something worth adding to your bag of tricks.