Imperial Rocker For Stopping Tiny Rebel Scum

Some of the luckiest kids in the world have to be the ones with hackers and makers as parents. While normal kids are stuck playing with cookie cutter mass produced toys, these kids get one-off gadgets and creations that will be the envy of the playground. Frankly, some of the stuff ends up being so cool that it’ll get the adults wishing they could go back in time and play with it.

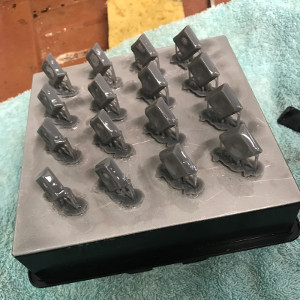
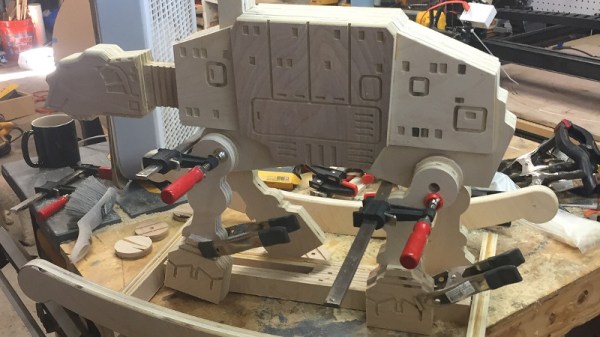
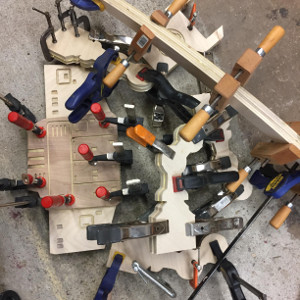
One such parent, and one such project, is the Imperial Rocker by [Matthew Regonini]. Hoping to instill an obsession with a galaxy far, far, away on his offspring, [Matthew] designed this AT-AT rocking horse piece by piece in Illustrator, and then cut it all out of birch using his XCarve CNC router. Each piece was then meticulously glued together to produce a final 3D effect from the individual cutouts.

With a liberal application of spring clamps to hold it all together while it dried, all that was left to do was painstakingly sand all the parts so the edges of the laminated construction would be smooth. Dowels were then added for the handlebars and foot pegs, and a few coats of polyurethane seal up the plywood while bringing out a natural look.

[Matthew] notes some issues here and there, notably quite a bit of blowout in some of the detail cuts and a couple miscalculated dimensions. But he reasons that the rocker is going to live a pretty hard life anyway, so best not to sweat the small stuff.

While the Imperial Rocker has that quaint old-school charm, we wonder how long it will be before [Matthew’s] little Stormtrooper starts yearning for the blinking lights and buttons that youngsters just can’t get enough of.

Continue reading “Imperial Rocker For Stopping Tiny Rebel Scum”

DIY Laptop Aims For Complete Hardware Freedom

Open source software has unquestionably gone from fringe idealism to mainstream, even if the average person doesn’t really know it. From their web browser to their smartphone operating system, more people are running open source software today than at any other time in the history of computing, and the numbers are only getting bigger. While we can debate how well some companies are handling their responsibilities to the open source community, overall this is probably a lot closer to an open source utopia that many of us ever believed we’d get.

For argument’s sake, let’s say the software is settled. What’s next? Well, if we’ve got all the open source software we could ever ask for, naturally we now need to run it on open source hardware. Just like our software, we want to see how it works, we want to modify it, and to fix it ourselves if we want. These goals are precisely what [Lukas Hartmann] had in mind when he started work on Reform, the latest entry in the world of fully open source laptops.

A plate of fresh keycaps

Like the Novena that came before it, the Reform leverages the four-core ARM Cortex-A9 NXP i.MX6 SoC to deliver tablet-level performance, though [Lukas] mentions the design may migrated to the upgraded six-core version of the chip in the future which should give it a little more punch. The SoC is paired with the Vivante GC2000 GPU which can be used under Linux without any binary blobs. Most hardware is connected to the system via the USB 2.0 bus, though networking is provided by a ThinkPenguin mini PCI-e wireless adapter, and on-board SATA handles the 128 GB SSD.

While the internals are relatively run-of-the-mill these days, the work that [Lukas] has done on the case and input devices is definitely very impressive. He partnered with industrial designer [Ana Dantas] to get the look and feel of the system down, and built almost everything out of 3D printed parts. Even the keyboard caps and the trackball were manufactured in house on a Formlabs Form 2. Rather than using an off-the-shelf USB HID solution, [Lukas] is using Teensy LC boards to interface the custom input hardware with the OS.

[Lukas] is still working on how and when the Reform will be made available to the public. After some refinements, the team hopes to make both kits and individual parts available, and of course put all the files up so you can build your own if you’ve got the equipment. A mockup Amazon listing for the Reform has been posted to get the public’s feedback on the look and features of the machine, and [Lukas] asks that anyone with comments and suggestions send him an email.

Between the Reform, Novena, and the Olimex, competition in the realm of DIY laptops is frankly staggering. Now we just need more people working on open hardware smartphones.

Thanks to [Adrian] for the tip.

MakerBot Really Wants You To Like Them Again

For the last couple years, a MakerBot press release has generally signaled that more pink slips were going to be heading out to the already shell-shocked employees at their NYC factory. But just last week something that could almost pass as good news came out of the once mighty 3D printer manufacturer, the unveiling of “MakerBot Labs”. A number of mainstream tech sites heralded this as MakerBot’s first steps back into the open source community that launched it nearly a decade ago; signs of a newer and more thoughtful MakerBot.

Reading the announcement for “MakerBot Labs”, you can almost believe it. All the buzz words are there, at least. In fact, if this announcement came from anyone else, in any other field, I’d probably be on board. Sharing knowledge and listening to the community is essential if you want to connect with hackers and makers. But this is MakerBot, and they’ve dug themselves into a very deep hole over the years.

The spectacular fall from grace that MakerBot has experienced, from industry leader to afterthought, makes this hat-in-hand peace offering hard to take seriously. It reads like a company making a last ditch effort to win back the users they were so sure they didn’t need just a few years ago. There is now a whole new generation of 3D printer owners who likely have never even seen a MakerBot printer, and it’s hard to imagine there’s still enough innovation and life in the company to turn that around before they completely fade into obscurity.

Continue reading “MakerBot Really Wants You To Like Them Again”

FruitNanny: The Raspberry Pi Baby Monitor For Geeks

Having a child is perhaps the greatest “hack” a human can perform. There’s no soldering iron, no Arduino (we hope), but in the end, you’ve managed to help create the most complex piece of machinery in the known galaxy. The joys of having a child are of course not lost on the geekier of our citizens, for they wonder the same things that all new parents do: how do we make sure the baby is comfortable, how many IR LEDs do we need to see her in the dark, and of course the age old question, should we do this with a web app or go native?

If you’re the kind of person who was frustrated to see that “What to Expect When You’re Expecting” didn’t even bother to mention streaming video codecs, then you’ll love FruitNanny, the wonderfully over-engineered baby monitor created by [Dmitry Ivanov]. The product of nearly two years of development, FruitNanny started as little more than a Raspberry Pi 1n a plastic lunch box. But as [Dmitry] details in his extensive write-up, the latest iteration could easily go head-to-head with products on the commercial market.

[Dmitry] gives a full bill of materials on his page, but all the usual suspects are here. A Raspberry Pi 3 paired with the official NoIR camera make up the heart of the system, and the extremely popular DHT22 handles the environmental monitoring. A very nice 3D printed case, a lens intended for the iPhone, and a dozen IR LEDs round out the build.

The software side is where the project really kicks into high gear. Reading through the setup instructions [Dmitry] has provided is basically a crash course in platform-agnostic video streaming. Even if a little bundle of joy isn’t on your development roadmap, there’s probably a tip or two you can pick up for your next project that requires remote monitoring.

It probably won’t surprise you that geeky parents have been coming up with ways to spy on their kids for some time now, and if you can believe it, some don’t even include a Raspberry Pi.

SegaPi Zero Shows Game Gear Some Respect

If you were a gamer in 1991, you were presented with what seemed like an easy enough choice: you could get a Nintendo Game Boy, the gray brick with a slightly nauseating green-tinted screen that was already a couple of years old, or you could get yourself a glorious new Sega Game Gear. With full color display and games that were ported straight from Sega’s home consoles, it seemed like the Game Gear was the true future of portable gaming. But of course, that’s not how things actually went. In reality, technical issues like abysmal battery life held the Game Gear back, and conversely Nintendo and their partners were able to squeeze so much entertainment out of the Game Boy that they didn’t even bother creating a true successor for it until nearly a decade after its release.

While the Game Gear was a commercial failure compared to the Game Boy back in the 1990s and never got an official successor, it’s interesting to think of what may have been. A hypothetical follow-up to the Game Gear was the inspiration for the SegaPi Zeo created by [Halakor]. Featuring rechargeable batteries, more face buttons, and a “console” mode where you can connect it to a TV, it plays to the original Game Gear’s strengths and improves on its weaknesses.

As the name implies the SegaPi Zero is powered by the Raspberry Pi Zero, and an Arduino Pro Micro handles user input by tactile switches mounted behind all the face buttons. A TP4056 charging module and step-up converter are also hiding in there, which take care of the six 3.7 lithium-Ion 14500 batteries nestled into the original battery compartments. With a total capacity of roughly 4,500 mAh, the SegaPi Zero should be able to improve upon the 3 – 4 hour battery life that helped doom the original version.

There’s no shortage of projects that cram a Raspberry Pi into a classic game system, but more often than not, they tend to be Nintendo machines. It could simply be out of nostalgia for Nintendo’s past glories, but personally we’re happy to see another entry into the fairly short list of Sega hacks.

3D Printed Dashboard CB Mount Is Convoy Ready

Some may be surprised to hear that CB radio is alive and well in the 21st century. From disaster response to operating in areas without reliable communication infrastructure, there are plenty of reasons people are still reaching for their radio and not their smartphone. Unfortunately, modern automotive interior design doesn’t have such an enlightened view. It’s hard enough to get decent cup holders in some cars, let alone a spot to hang your microphone.

When presented with this problem in his Subaru Forester, [Alex Loizou] did what any modern hacker would, he 3D printed a mount that snaps into the stock dash. No drilling was required to attach his radio mount, it simply replaces a decorative trim piece that wasn’t doing anything anyway. Obviously this particular mount would only really work on the same year and make of vehicle as [Alex] has, but this is a good demonstration of how 3D printing can be used to adapt to existing hardware.

As is often the case when trying to print something to match perfectly with an existing object, there was a fair amount of trial and error required. It took a few attempts before [Alex] got the proper shape, and things weren’t made any easier by the fact he was doing his designing in TinkerCAD. While we appreciate the fact that TinkerCAD provides a web-based CAD tool that is easy enough for anyone to use, using a parametric design tool like OpenSCAD is generally preferred when you need to make slight adjustments to your model.

Software limitations aside, [Alex] managed to come up with a mount that not only holds his CB microphone, but also his handheld transmitter. All while looking about as close to stock hardware as something like this could. We especially like that he switched to a darker filament color for his final version to blend it into the dashes color scheme a bit better.

If your radio interest is a little full-fat for CB, take a look at what keeps ham radio alive and well in 2017, and if you’re a radio amateur with a hankering for the CB days we’ve got you covered.

3D Printed Gear Serves Seven Months Hard Labor

Even the staunchest 3D printing supporter would have to concede that in general, the greatest strength of 3D printing is not in the production of final parts, but in prototyping. Sure you can make functional prints, as the pages of this site will attest; but few would argue that you wouldn’t be better off getting your design cut out of metal or injection molded if you planned on putting the part into service over the long term. Especially if the part was to be subjected to rough service in an industrial setting.

While that’s valid advice, it certainly isn’t the definitive word on the issue. Just because a part is printed in plastic on a desktop 3D printer doesn’t necessarily mean it can’t be put into real service, at least for as long as it takes to get proper replacement parts. A recent success story from [bloomautomatic] serves as a perfect example, when one of the gears in his MIG welder split, he decided to try and print up a replacement in PLA while he waited for the nylon gear to get shipped out to him. Fast forward seven months and approximately 80,000 welds later, and [bloomautomatic] reports it’s finally time to install those replacement gears he ordered.

In the pictures [bloomautomatic] posted you can see the printed gear finally wore down to the point the teeth were essentially gone where they meshed with their metal counterparts. To those wondering why the gear was plastic to begin with, [bloomautomatic] explains that it’s intended to be a sacrificial gear that will give way instead of destroying the entire gearbox in the event of a jam. According to the original post he made when he installed the replacement gear, the part was printed in Folgertech PLA on a Monoprice Select Mini. There’s no mention of infill percentage, but with such a small part most slicers would likely have made it essentially solid to begin with.

While surviving seven tortuous months inside of the welder is no small feat, we wonder if hardier PLA formulationstreatment of the part post-printing, or even casting it in a different material couldn’t have turned this temporary part into a permanent replacement.