Terminus Is A Text Only Phone Because Telephony Is Dead Anyway

This may say more about us than the current state of the telephone network, but unless your Grandma is still kicking, how many phone calls do you take that are actually worth picking up? Around here it’s one variety of scam or another, with the odd cold-calling salesperson to round it out.

So when we saw [Bolan Xu]’s texting-only TERMINUS cell phone project, it took but a minute to decide that, yeah, we wouldn’t miss the telephone part of the phone very much either.

The trade-offs are immense when compared to your smartphone; there’s no voice, no web browser, no social media, and no camera. But on the flip side there’s also no spyware and no annoying spam calls. Besides, he’s built a QWERTY keyboard onto this thing, and that does seem to be what most of us miss in this era of black rectangles.

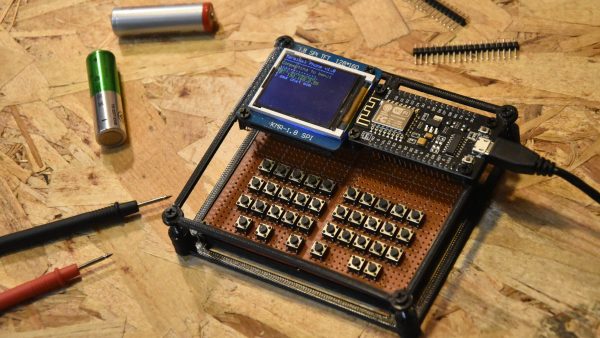
In terms of electronics, its rocking a tiny OLED display for you to read your messages on, driven by an ESP8266. When WiFi is available the plan was to bridge over the internet in an SMS version of VOIP, but [Bolan Xu] ended up installing a cellular modem in it anyway.

As you can tell from the skeletal case, this is very much a prototype, but it is a promising project. We’ve seen ESP-based phones before, but they tend to be a bit smarter, and run on ESP32 instead of the more modest ESP8266.

From Sugar To Ethanol Fuel With A Little Microbial Help

In these trying times it seems appropriate to work through some ‘what if ‘ scenarios, such as the local gas station suddenly not having any more gasoline to sell you, or said gas station ceasing to exist altogether. In that case it can be incredibly useful to be able to create your own gasoline alternative in the form of ethanol. As demonstrated by [Hyperspace Pirate] in a recent video this process is fairly straightforward once you have procured an appropriate feedstock, such as here sugar (sucrose).

Although baker’s yeast (Saccaromyces cerevisiae) is more commonly associated with the production of ethanol-laced drinks, there’s nothing that says that you cannot distill out the approximately 10-15% ethanol that results from a yeast feeding frenzy and resulting waste products.

How to do this distillation step is explained in the video, with the mixture heated and put through a self-made reflux column to deal with the fact that the water/ethanol mixture is an azeotropic mixture, meaning that a lot of water is expected to make its way out of the condenser along with ethanol without this measure to condense as much of the water vapor before it can make its way to the top of the column.

Ultimately the conversion rate of plain white sugar to ethanol is about 54%, with the rest turning into CO2. With an appropriately converted combustion engine for running on 100% ethanol, it runs pretty well, though the final cost per liter of ethanol will heavily depend on your feedstock.

With the full costs of the electric heater of the distillation column taken into account – at 2.57 kWh/L – as well as the cost of the off-the-shelf sugar, [Hyperspace Pirate] with his Florida kWh cost of $0.12 paid around $2.62/L, or $9.91 per gallon. Even with how much prices at the gas pump have shot up recently, you’d pretty much need to find a free source of feedstock and otherwise optimize the process for it to make much sense, even in this economy.

That said, it’s crazy that the world of Mad Max doesn’t run on ethanol. If tomorrow a certain bubble were to implode and the global economy fell apart as a result, producing bioethanol would seem to be a highly marketable skill.

Continue reading “From Sugar To Ethanol Fuel With A Little Microbial Help”

How To Remove Bounce When Bouncy Objects Encounter Bounciness

We all love a good bit of bounce now and then, with everything from trampolines to bouncy castles and bouncy balls forming the staple of a wholesome childhood for many. That said, most of our bouncy experiences in day to day life concern bouncy objects that meet immovable or rigid objects, including said child having a blast in a bouncy castle. Where the physics get arguably more interesting and less intuitive is when you combine two objects that are both bouncy, with [Steve Mould] recently taking a look at the tuning of said bounciness to even kill the bounce completely.

Understanding how to achieve this tuning means understanding how the kinetic energy is stored in each flexible material, and how to dissipate it in a way that doesn’t result in the aforementioned bounciness. In the simple physical demonstration setup the addition or removal of weights to the lower sprung platform tunes the response to the bouncy ball that is dropped on top of it.

After going through the science behind bounciness and springiness using the practical application of this science in the context of golf balls and clubs, [Steve] introduces the simulation tool that he created. This allows you to tweak the parameters of such a double spring system, which may bring back some high school physics lessons for some.

In a system like that of a golf club and the ball, having undesirable oscillations (bouncing) reduces the final kinetic energy transferred to the ball. Although ‘bouncy’ is perhaps not the first thought that comes to mind when handling a golf ball or a club, ultimately they are just as bouncy as a bouncy ball or an electric switch, just on their own scales, with their own opportunities for optimization and analysis.

Continue reading “How To Remove Bounce When Bouncy Objects Encounter Bounciness”

A rectangular black box is shown, connected to a coil of fiber-optic wire. Out of the end of the fiber, purple light is emitted. A label in the lower right corner says "405nm Singlemode Light Source".

Building A Fiber-Coupled Laser Source For Precision Optics

Laser diodes are convenient light sources, but for precise optical work their often-elliptical beam profile leaves something to be desired. One way to get around this is to couple the beam into a single-mode optical fiber, which then emits a circular Gaussian beam from the other end. For more advanced experiments, therefore, [Diffraction Limited] built this fiber-coupled laser source.

The simplest approach is to place the fiber directly against a light source, but this results in most of the light missing the three-micron fiber core. Optical fibers have an acceptance cone, and only light approaching from within this cone is coupled into the fiber. The design therefore uses an aspheric lens to focus light from the laser diode down to a tiny point matching the diameter of the fiber core, creating a cone of incoming light narrower than the acceptance cone.

The body of the laser source was CNC machined out of brass, with the laser-diode press-fit in one end. The lens stands in front of the diode, and was glued in place so that its focal point was just above the end of a mounting pin for the glass fiber. Positioning and fixing the fiber in place was the biggest challenge; [Diffraction Limited] could use the micro-manipulator from a previous video to position the fiber, but the UV-set glue used to fix it in place shrinks during curing, pulling it out of position. To deal with this, two set screws under the mounting pin allowed its position to be adjusted slightly after gluing. As expected, adhesive shrinkage meant that the completed source initially produced no light, but after the set screws were adjusted, the beam appeared.

For more on fiber-coupled lasers, check out [Les Wright]’s work. If you don’t have access to an aspheric lens, an anti-bumping bead could be a reasonable alternative.

Retro Gear And The Mystery Of Cables Melting Into Cases While In Storage

The phenomenon of cable-shaped indents in the plastic cases of retro systems is one that’s probably painfully familiar to many a collector of such systems. Although in these situations neither side got hot enough to cause any melting – especially while disconnected in storage – it still has that same melted appearance. The real cause here is not heat, but plasticizer migration, as detailed in a recent video by [Run Stop Restored] over on YouTube.

Plasticizers are an additive to many plastics that aim to make it more flexible (‘plastic’), as well as improve other characteristics of the base material, with PVC in particular relying on plasticizers to give it its desired properties for applications where PVC has to be flexible. Here the flexible cable insulation of these devices generally uses PVC, which over time can migrate to other polymers when brought into close contact for extended periods of time.

The – usually ABS – enclosures of e.g. Commodore tape drives as in this video demonstration thus get correspondingly inundated with the same type of plasticizers that ABS is also highly susceptible to. Since in storage the cables tend to be wrapped – tightly – around the device they’re attached to, this results in a solid contact which thus enables this gradual process to work its magic, whether it’s a Commodore datasette or a power supply brick.

Correspondingly the PVC insulation becomes brittle as it loses its plasticizer, with the process sped up by higher environmental temperatures. To prevent this, never wrap a PVC cable around a device, and keep it physically separated from susceptible plastics like ABS as much as reasonably possible. Along with a cool environment this should prevent plasticizer migration from ruining what used to be a pristine case.

This problem is particularly significant for retro gear from the 1980s and thereabouts, before phthalate-free plasticizer alternatives were developed, along with other changes such as more stable formulations that prevent this migration process. Adding a coating can also help, especially for protecting older gear, but flexible PVC in particular should be viewed with suspicion and treated carefully.

Continue reading “Retro Gear And The Mystery Of Cables Melting Into Cases While In Storage”

A grey box surrounding a circular red component is mounted on an aluminium extrusion frame. The circular red face has a protrusion extending from it with a white ball bearing at the tip.

Building A Micrometer-Level Displacement Sensor With 3D Printed Parts

Every experienced machinist knows the value of taking regular measurements. If one works carefully and checks dimensions frequently, it’s possible to make a part much more precise than could be made by relying on the machine’s accuracy alone. In a similar vein, it’s possible to make a measuring device out of comparatively crude parts, as long as their behavior is well understood. Related to both principles is [BubsBuilds]’s displacement sensor, which uses a 3D printed frame but reaches precision better than two micrometers.

Admittedly the printed parts aren’t the source of the sensor’s precision, that comes from an opto-interrupter. This design has a central stylus, one end of which contacts the object under measurement. The other end flattens to a knife-edge blade, which fits between the diodes of the opto-interrupter. As the stylus point is pressed in, the blade blocks off more light from reaching the photodiode, creating an output signal proportional to displacement. To keep the stylus from twisting or moving side-to-side, two flat, circular flexures hold the stylus in the center of a cylindrical housing.

[Bubs] printed several flexure variations to see how well they resisted and permitted various torques and forces, and a symmetrical flexure design proved best for his purposes. Once the sensor was assembled, he tested it against the measurements recorded by a laser confocal displacement sensor. This design was an update from a previous version, and it improved in a few regards: the non-linearity had decreased, and the repeatability was now better than two microns, though the range had been halved. Significantly, though, it’s now much easier to mount, making this an actually practical tool.

If, however, this doesn’t fit your needs, there are many other ways to build a linear displacement sensor, ranging from capacitive to magnetostrictive. On the manual side of things, we’ve also covered a comparison of calipers.

Continue reading “Building A Micrometer-Level Displacement Sensor With 3D Printed Parts”