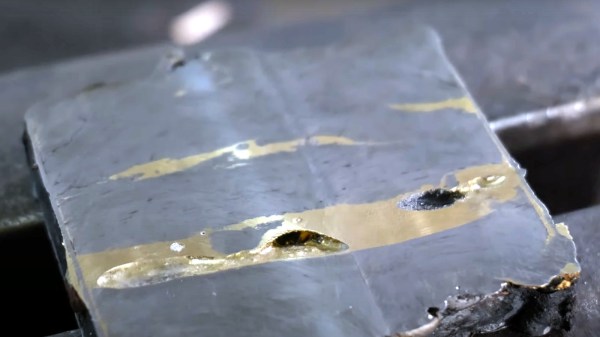
Watch A Complete Reflector Telescope Machined From A Single Block Of Glass

If this is the easy part of making a complete reflector telescope from a single piece of glass, we can’t wait to get a load of the hard part!

A little backstory may be in order for those who don’t follow [Jeroen Vleggaar]’s Huygens Optics channel on YouTube. A few months ago, he released a video discussing monolithic telescopes, where all the reflective and refractive surfaces are ground into a single thick block of glass. Fellow optical engineer [Rik ter Horst] had built a few tiny monolithic Schmidt-Cassegrain reflectors for use in cube sats, so [Jeroen] decided to build a scaled-up version himself.

The build starts with a 45 mm thick block of crown glass, from which a 50 mm cylinder is bored with a diamond hole saw. The faces of the blank are then ground into complex curves to reflect incoming light, first off the parabolic rear surface and then onto the hyperbolic secondary mirror ground into the center of the front face. A final passage through a refracting surface in the center of the rear face completes the photons’ journey through the block of glass, squeezing a 275 mm focal length into a compact package.

All this, of course, vastly understates the work required to pull it off. Between the calculations needed to figure out the surface shapes in the first place to the steps taken to machine a famously unforgiving material like glass, every step is fraught with peril. And because the design is monolithic, any mistakes mean starting all over again. Check out the video below and marvel at the skills needed to get results like this.

What strikes us most about [Jeroen]’s videos is the mix of high-tech and age-old methods and materials used in making optics, which we’ve seen him put to use to make everything from tiny Tesla valves to variable-surface mirrors.

Continue reading “Watch A Complete Reflector Telescope Machined From A Single Block Of Glass”

Linux Fu: An Odd Use For Fork()

If you are a Star Trek fan, you’ll probably remember the phrase “You have to learn why things work on a starship.” The truth is, in most episodes, knowing how to override another ship’s console or make gunpowder didn’t come in very handy, but boy when it did, it really saved the day. Linux is a lot like that. There are a few things you probably don’t need to know very often, but when you do need to know, it makes a huge difference. In this particular post, I want to look at an odd use of the fork system call. For many purposes, you’ll never need to know this particular irregular use. But when you need it, you are really going to need it.

This is actually based on an old client of mine who used Unix to run a massive and very critical report every day.  The report had a lot of math since they were trying to optimize something and then generate a lot of reports. In those days, the output of the report was on old green-bar paper on a line printer. The problem was that the report took something like 14 hours to run including the printouts. If someone discovered something wrong, there was no time to run the report again because the next day’s report would have to start before the second run would finish.

The client had a bunch of Windows programmers and — at that time — there wasn’t anything really analogous to a real fork call in Windows. I looked at the code and realized that probably most of the code was spending time waiting to print the output. The computer had multiple CPUs and there were multiple printers, but that one program was hanging on the one printer. There was a lot of data, so writing it to a database and then running different reports against it wasn’t a great option. The answer was to use the power of fork. With a change in the code that took less than 30 minutes, the report ran in five hours. They were very pleased.

So how did I do it? The answer lies in how fork works. Just about every time you see a fork, you see some sort of exec call to start a new program. So if you think about fork at all, you probably think it is part of how you start a new program and, most of the time, that’s true. Continue reading “Linux Fu: An Odd Use For Fork()”

Modular Laptop Maker Provides Mainboard Documentation For Non-Laptop Projects

If you’ve been following the latest advancements in computing for a while, you already know that there’s a big problem with laptops: When they’re no longer useful as a daily driver, it can be a struggle to find a good use for all its parts. Everything is proprietary, and serious amounts of reverse engineering are required if you decide to forge ahead. This is where Framework, a laptop company building modular laptops comes in. They’ve made it clear that when you upgrade your Framework laptop with a new mainboard they want you to be able to continue to use the old mainboard outside of the laptop.

When it's done powering your laptop, use it for a cyberdeck?
When it’s done powering your laptop, use it for a cyberdeck?

To that end, Framework have provided 2D mechanical drawings of their mainboard and 3D printable cases that can of course be modified as needed. “But what about peripherals?” you might ask. Framework has provided pinouts for all of the connectors on the board along with information on which connectors to use to interface with them. No reverse engineering needed!

While it’s possible to buy a mainboard now and use it, their stated goal is to help people make use of used mainboards leftover from upgrades down the line. With just a stick of memory and a USB-C power adapter, the board will spring to life and even has i2c and USB immediately available.

What would you do with a powerful Intel i5-1135G7 mainboard? Framework wants to know, and to that end, they are actually giving away 100 mainboards to makers and developers. Mind you this is a program created and ran by Framework — and is not associated in any way Hackaday or our overlords at Supplyframe.

If you’ve read this far and still don’t know what the Framework laptop is, go check out this introduction by our own [Jenny List].

Hoverbike Turns Hoverboard Into Ebike

Hoverboards were a popular trend with the youths and in-crowd a few years ago, and now that the fad has largely died out there are plenty of them sitting unused in closets and basements around the world. That only means opportunities to put the parts from these unique transportation devices into other builds. A more practical method of transportation is a bicycle, and this build scavenges most of the parts from a hoverboard to turn a regular bicycle into a zippy ebike.

This bike build starts with a mountain bike frame and the parts from the hoverboard are added to it piece by piece. The two motors are mounted to the frame and drive the front chain ring of the bike, allowing it to still take advantage of the bike’s geared drivetrain. Battery packs from two hoverboards were combined into a single battery which give the bike a modest 6-10 km of range depending on use. But the real gem of this build is taking the gyroscopic controller board from the hoverboards and converting it, with the help of an Arduino Due, to an ebike controller.

Eventually a battery pack will be added to give the bike a more comfortable range, but for now we appreciate the ingenuity that it took to adapt the controller from the hoverboard into an ebike controller complete with throttle and pedal assist. For other household objects turned into ebikes, be sure to check out one of our favorites based on a washing machine motor: the Spin Cycle.

SMT Part Counter Aims To Ease Taking Inventory

[Nick Poole] has an interesting idea for a new tool, one that has the simple goal of making accurate part counts of SMT reels as easy as pulling tape through a device. That device is the BeanCounter, an upcoming small handheld unit of his own design that counts parts as quickly as one can pull tape through a slot. The device is powered by a CR2032 cell and and works with 8 mm wide tapes up to 2 mm in height, which [Nick] says covers most 0805 or smaller sized parts, as well as things like SOT-23 transistors.

Why would one want to make such a task easier? Two compelling reasons for such a tool include: taking inventory of parts on partial reels or cut tape, and creating segments that contain a known number of parts.

The first is handy for obvious reasons, and the second is useful for things like creating kits. In fact, the usefulness of this tool for creating tape segments of fixed length is perhaps not obvious to anyone who hasn’t done it by hand. Sure, one can measure SMT tape with a ruler or a reference mark to yield a segment containing a fixed number of parts, but that involves a lot of handling and doesn’t scale up very well. In fact, the hassle of cutting tape segments accurately and repeatedly is a common pain point, so making the job easier has value.

If you looked at the photos and suspected that the big, 7-segment numeric display is done with clever PCB fabrication options (making segments by shining LEDs through PCB layers, a trick we always like to see) you’re not alone. After all, [Nick] has a lot of experience in getting clever with board fabrication, and eagle-eyed readers may even suspect that the reset and setup buttons on the edge of the tool are created by using flex PCB segments as switches. Want the nitty-gritty details? Visit the GitHub repository for the project and see it all for yourself at the CAD level.

Turning Scrap Copper Into Beautiful Copper Acetate Crystals

Crystals, at least those hawked by new-age practitioners for their healing or restorative powers, will probably get a well-deserved eye roll from most of the folks around here. That said, there’s no denying that crystals do hold sway over us with the almost magical power of their beauty, as with these home-grown copper acetate crystals.

The recipe for these lovely giant crystals that [Chase Lean] shares is almost too simple — just scrap copper, vinegar, and a bit of hydrogen peroxide — and just the over-the-counter strength versions of those last two. The process begins with making a saturated solution of copper acetate by dissolving the scrap copper bits in the vinegar and peroxide for a couple of days. The solution is concentrated by evaporation until copper acetate crystals start to form. Suspend a seed crystal in the saturated solution, and patience will eventually reward you with a huge, shiny blue-black crystal. [Chase] also shares tips for growing crystal clusters, which have a beauty of their own, as do dehydrated copper acetate crystals, with their milky bluish appearance.

Is there any use for these crystals? Probably not, other than their beauty and the whole coolness factor of watching nature buck its own “no straight lines” rule. And you’ll no doubt remember [Chase]’s Zelda-esque potassium ferrioxalate crystals, or even when he turned common table salt into perfect crystal cubes.

Bring Precision To The Woodshop With An Electronic Router Lift

One of the knocks that woodworkers get from the metalworking crowd is that their chosen material is a bit… compliant. Measurements only need to be within a 1/16th of an inch or so, or about a millimeter, depending on which side of the Atlantic you’re on. And if you’re off a bit? No worries, that’s what sandpaper is for.

This electronic router lift is intended to close the precision gap and make woodworking a bit less subjective. [GavinL]’s build instructions are clearly aimed at woodworkers who haven’t dabbled in the world of Arduinos and stepper motors, and he does an admirable job of addressing the hesitancy this group might feel when tackling such a build. Luckily, a lot of the mechanical side of this project can be addressed with a commercially available router lift, which attaches to a table-mounted plunge router and allows fine adjustment of the cutting tool’s height from above the table.

What’s left is to add a NEMA 23 stepper to drive the router lift, plus an Arduino to control it. [GavinL] came up with some nice features, like a rapid jog control, a fine adjustment encoder, and the ability to send the tool all the way up or all the way down quickly. Another really nice touch is the contact sensor, which is a pair of magnetic probes that attach temporarily to the tool and a height gauge to indicate touch-off. Check the video below to see it all in action.

One quibble we have with [GavinL]’s setup is the amount of dust that the stepper will be subjected to. He might need to switch out to a dustproof stepper sooner rather than later. Even so, we think he did a great job bridging the gap between mechatronics and woodworking — something that [Matthias Wandel] has been doing great work on, too.

Continue reading “Bring Precision To The Woodshop With An Electronic Router Lift”