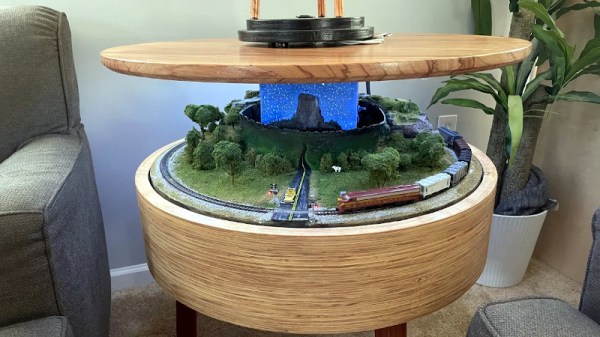
If we were to think of a retrocomputer, the chances are we might have something from the classic 8-bit days or maybe a game console spring to mind. It’s almost a shock to see mundane desktop PCs of the DOS and Pentium era join them, but those machines now form an important way to play DOS and Windows 95 games which are unsuited to more modern operating systems. For those who wish to play the games on appropriate hardware without a grubby beige mini-tower and a huge CRT monitor, there’s even the option to buy one of these machines new: in the form of a much more svelte Pentium-based PC104 industrial PC.
Ah, what fond memories we have of our misspent youth, walking around with a 9,000-volt electromagnetic pulse generator in our Levi’s 501s and zapping all the electronic devices nobody yet carried with them everywhere they went. Crazy days indeed.
We’re sure that’s not at all what [Rostislav Persion] had in mind when designing his portable EMP generator; given the different topologies and the careful measurement of results, we suspect his interest is strictly academic. There are three different designs presented, all centering around a battery-powered high-voltage power module, the Amazon listing of which optimistically lists as capable of a 400,000- to 700,000-volt output. Sadly, [Rostislav]’s unit was capable of a mere 9,000 volts, which luckily was enough to get some results.
Coupled to a spark gap, one of seven different coils — from one to 40 turns — and plus or minus some high-voltage capacitors in series or parallel, he tested each configuration’s ability to interfere with a simple pocket calculator. The best range for a reset and scramble of the calculator was only about 3″ (7.6 cm), although an LED hooked to a second coil could detect the EMP up to 16″ (41 cm) away. [Rostislav]’s finished EMP generators were housed in a number of different enclosures, one of which totally doesn’t resemble a pipe bomb and whose “RF Hazard” labels are sure not to arouse suspicions when brandished in public.
We suppose these experiments lay to rest the Hollywood hype about EMP generators, but then again, their range is pretty limited. You might want to rethink your bank heist plans if they center around one of these designs.
Finding broken test gear and fixing it up to work again is a time-honored tradition among hackers. If you’re lucky, that eBay buy will end up being DOA because of a popped fuse or a few bad capacitors, and a little work with snips and a soldering iron will earn you a nice piece of test gear and bragging rights to boot.
Some repairs, though, are in a class by themselves, like this memory module transplant for a digital scopemeter. The story began some time ago when [FeedbackLoop] picked up a small lot of broken Fluke 199C scopemeters from eBay. They were listed as “parts only”, which is never a good sign, and indeed the meters were in various states of disassembly and incompleteness.
The subject of the video below was missing several important bits, like a battery and a power connector, but most critically, its memory module. Luckily, the other meter had a good module, making reverse engineering possible. That effort started with liberating the two RAM chips and two flash chips, all of which were in BGA packages, from the PCB. From there each chip went into a memory programmer to read its image, which was then written to new chips. The chip-free board was duplicated — a non-trivial task for a six-layer PCB — and new ones ordered. After soldering on the programmed chips and a few passives, the module was plugged in, making the meter as good as new.
When you think about it, for most of human history we’ve been a pretty slow bunch. At any time before about 150 years ago, if you were moving faster than a horse can run, you were probably falling to your death. And so the need to take aerodynamics into consideration is a pretty new thing.
The relative novelty of aerodynamic design struck us pretty hard when we stumbled across this mid-1930s film about getting better performance from cars. It was produced for the Chrysler Sales Corporation and featured the innovative design of the 1934 Chrysler Airflow. The film’s narration makes it clear why the carmaker would go through the trouble of completely rethinking how cars are made; despite doubling average engine horsepower over the preceding decade, cars had added only about 15% to their top speed. And while to our 21st-century eyes, the Chrysler Airflow might look like a bulked-up Volkswagen Beetle, compared to the standard automotive designs of the day, it was a huge aerodynamic leap forward. This makes sense with what else was going on in the technology world at the time — air travel — the innovations of which, such as wind tunnel testing of models, were spilling over into other areas of design. There’s also the influence of [Orville Wright], who was called in to consult on the Airflow design.
While the Airflow wasn’t exactly a huge hit with the motoring public — not that many were built, and very few remain today; [Jay Leno] is one of the few owners, because of course he is — it set standards that would influence automotive designs for the next 80 years. It’s fascinating too that something seemingly as simple as moving the engine forward and streamlining the body a bit took so long to hit upon, and yet yielded so much bang for the buck.
We’ve all been there. Your current project has hit a wall, or the next step will take days to complete, and you need something to do in the meantime. So you start a project that you envision will fit nicely in the gap, and then, inevitably, it doesn’t. Maybe it even takes so long that the original project gets finished first. So what? There’s nothing wrong with that, especially when the filler project turns out as well as this drink temperature monitor disguised as a circuit sculpture (video, embedded below). Just put your mug on the coaster, and the weight of it activates a hidden switch, which causes the sculpture to display its secret LEDs.
[MakeFunStuff] wanted to make something that looked less like a circuit and more like art, while building a tool that could determine the relative hotness of a beverage. Such a a useful circuit sculpture sounds like a tall order to us, but [MakeFunStuff] pulled it off with finesse and style.
The circuit is based around this Sputnik-looking standalone IR temperature sensor which, as [MakeFunStuff] aptly describes, is “a single-pixel infrared camera that picks up everything in a 90° cone starting at the sensor.”
[MakeFunStuff] paired this easy-to-use sensor with an Arduino Nano and five LEDs that show how hot a beverage is on a scale from 1 to 5. The sensor is hidden in plain sight, suspended from the top of the brass rod sculpture and blending in perfectly. We love that the LEDs are hidden behind a thin layer of carefully-drilled wood and agree that a drill press would have been much easier.
The code is set up for just about every temperature scale from Celsius to Rømer, so that solves that argument. [MakeFunStuff] went with the Kelvin scale because science. Our favorite thing about this video is that [MakeFunStuff] shared their failures and fixes as they built their way toward answering the questions of how to suspend the sensor over the drink, and how best to display the heat level while hiding the electronics. Go grab a hot cup of something and check it out after the break while you let it cool off the normie way.
A couple months back, [macona] got his hands on a 300 watt Rofin CO2 laser in an unknown condition. Unfortunately, its condition became all too known once he took a peek inside the case of the power supply and was confronted with some very toasty components. It was clear that the Magic Smoke had been released with a considerable bit of fury, the trick now was figuring out how to put it back in.
The most obvious casualty was an incinerated output inductor. His theory is that cracks in the ferrite toroid changed its magnetic properties, ultimately causing it to heat up during high frequency switching. With no active cooling, the insulation cooked off the wires and things started to really go south. Maybe. In any event, replacing it was a logical first step.
If you look closely, you may see the failed component.
Unfortunately, Rofin is out of business and replacement parts weren’t available, so [macona] had to wind it himself with a self-sourced ferrite and magnet wire. Luckily, the power supply still had one good inductor that he could compare against. After replacing the coil and a few damaged ancillary wires and connectors, it seemed like the power supply was working again. But with the laser and necessary cooling lines connected, nothing happened.
A close look at the PCB in the laser head revealed that a LM2576HVT switching regulator had exploded rather violently. Replacing it wasn’t a problem, but why did it fail to begin with? A close examination showed the output trace was shorted to ground, and further investigation uncovered a blown SMBJ13A TVS diode. Installing the new components got the startup process to proceed a bit farther, but the laser still refused to fire. Resigned to hunting for bad parts with the aid of a microscope, he was able to determine a LM2574HVN voltage regulator in the RF supply had given up the ghost. [macona] replaced it, only for it to quickly heat up and fail.
This one is slightly less obvious.
Now this was getting ridiculous. He replaced the regulator again, and this time pointed his thermal camera at the board to try and see what else was getting hot. The culprit ended up being an obsolete DS8922AM dual differential line transceiver that he had to source from an overseas seller on eBay.
After the replacement IC arrived from the other side of the planet, [macona] installed it and was finally able to punch some flaming holes with his monster laser. Surely the only thing more satisfying than burning something with a laser is burning something with a laser you spent months laboriously repairing.
The past year has been quite a ride for everyone on Earth. But you never know which day is going to be your last, so you might as well live a little, eh? This clock doesn’t actually know when you’ll kick off, either. But just for fun, it predicts the number of years remaining until you go to that hackerspace in the sky by hazarding a guess that’s based on your current age and the latest life expectancy tables. Don’t like the outcome? It’s completely randomized, so just push the button and get a set of numbers: the age you might die, and the percentage of life elapsed and remaining.
We love the design of this calculated doom clock, and it’s quite simple inside — an Arduino Pro Mini outputs the graph on an 2.9″ e-paper display, and both are powered with a 5.5 V solar panel. Just suction cup that puppy to the window and you’ll get automatic updates about your impending demise on sunny days, and none on cloudy days.