Drone Buoy Drifts Along The Gulf Stream For Citizen Science

It may be named after the most famous volleyball in history, but “Wilson” isn’t just a great conversationalist. [Hayden Brophy] built the free-drifting satellite buoy to see if useful science can be done with off-the-shelf hardware and on a shoestring budget. And from the look of the data so far, Wilson is doing pretty well.

Wilson belongs to a class of autonomous vessels known as drifters, designed to float along passively in the currents of the world’s ocean. The hull of [Hayden]’s drifter is a small Pelican watertight case, which contains all the electronics: Arduino Pro Trinket, GPS receiver, a satellite modem, and a charger for the LiPo battery. The lid of the case is dominated by a 9 W solar panel, plus the needed antennas for GPS and the Iridium uplink and a couple of sensors, like a hygrometer and a thermometer. To keep Wilson bobbing along with his solar panel up, there’s a keel mounted to the bottom of the case, weighted with chains and rocks, and containing a temperature sensor for the water.

Wilson is programmed to wake up every 12 hours and uplink position and environmental data as he drifts along. The drifter was launched into the heart of the Gulf Stream on August 8, about 15 nautical miles off Marathon Key in Florida, by [Captain Jim] and the very happy crew of the “Raw Deal”. As of this writing, the tracking data shows that Wilson is just off the coast of Miami, 113 nautical miles from launch, and drifting along at a stately pace of 2.5 knots. Where the buoy ends up is anyone’s guess, but we’ve seen similar buoys make it all the way across the Atlantic, so here’s hoping that hurricane season is kind to Wilson.

We think this is great, and congratulations to [Hayden] for organizing a useful and interesting project.

Continue reading “Drone Buoy Drifts Along The Gulf Stream For Citizen Science”
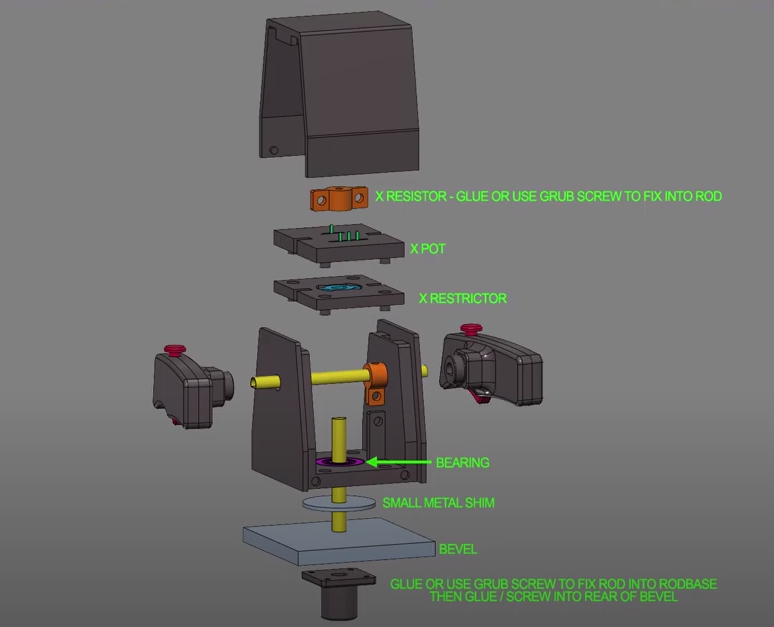
Head-Tracking NES Water Blaster Is Good Summer Fun

Super Soakers were great fun back in the day, but adults tend to get tired of the manual labour of pumping pretty quickly. [Sean] decided to build something a touch more modern, coming up with this head-tracking water blaster.

The water spray tracks the movement of the wearer’s head. With a camera mounted on the nozzle, this allows the user to simply look to designate targets. Similar technology is used in military fighter jets.

To eliminate pumping, the build instead enlists the services of an electric pump, powered by a 12 V battery. Pushing water through a tube into a 3D printed nozzle, it provides a fat stream of water with around 5 meters range, with little effort from the user. The nozzle is fitted into a NES Zapper, and attached to a servo pan-tilt platform. The camera is mounted on the water gun, and hooked up to a set of Fat Shark FPV goggles with an IMU unit. When the user looks around, the water gun moves in sync with their head movements. This allows for the user to look at targets to hit them with the water stream, a very intuitive method of aiming.

It’s a fun build that’s perfect for the summer, and an easy one to recreate for anyone with some spare servos and FPV gear. Of course, with a little face-tracking software, it would be easy to hit targets automatically. Video after the break.

Continue reading “Head-Tracking NES Water Blaster Is Good Summer Fun”

Rack ’em Stack ’em Raspberry Pi Controller Board

It isn’t that hard to assemble an array of Raspberry Pi boards and there are several reasons you might want to do so. The real trick is getting power to all of them and cooling all of them without having a mess of wires and keeping them all separated. The ClusterCTRL stack lets you stack up to five Raspberry Pi boards together. The PCB aligns vertically along the side of the stack of Pis with sockets for each pin header. Using a single 12 to 24V supply, it provides power for each board, a USB power connection, and provisions for two fans. There is also a USB port to control the fans and power.

There’s also a software component to deliver more granular control. Without using the software, the PI’s power on in one second and monitor a GPIO pin to control the fans. With the software, you can turn on or off individual nodes, gang the two fans to turn on together, and even add more stacks.

There is a case that you can print from STL files, although you can buy them preprinted on the Tindie listing where the bulk of information on ClusterCTRL is found. You could also have a 3D printing vendor run off a copy for you if you’d rather.

The power supply is a 10A 5.1V DC to DC converter. That works out to 2A per Pi and 51W total. The power supply for the input, then, needs to be enough to cover 51W, the power for the fans, and some overhead for regulator inefficiency and other small overhead.

We’ve seen a lot of Pi clusters over the years including one that is a good learning tool for cluster management. Of course, there’s always the Oracle cluster with 1,060 boards, which is going to take a bigger power supply.

RetroPlug Syncs Gameboy Emulators With Your DAW For Chiptunes Overload

The Gameboy is one of the biggest platforms in the chiptune scene. While it’s possible to play a show with a single handheld, many artists choose to use two or even more to fatten their sound and rock the crowd. To ease the workflow of creating songs for such a setup, [tommitytom] created Retroplug and you can see him walk through the features in the demo video after the break.

Retroplug is a VST wrapper for the Sameboy Gameboy emulator. This makes it possible to run multiple emulated Gameboy instances within digital audio software like Ableton or Fruityloops. Rather than having to juggle multiple 30-year old Gameboys and the associated batteries and link cables, instead, it can all be done within a hosted VST window.

Presently, the software works only with 64-bit Windows and VST2, however source is available for those eager to peek under the hood. It fully implements MIDI support for mGB, and works well with LSDJ and Arduinoboy setups. *.sav files are created for each emulated instance too, so when you’re done composing, you can throw your songs onto real hardware when you go out and perform!

We see no shortage of fresh projects, from Genesis chiptune players to MIDI control for Gameboys.  As its adherents always say, chiptune will never die. We’d love to see a similar project done with a C64 emulator, NES, or even the Genesis. If you happen to put it goether, drop us a line!

Continue reading “RetroPlug Syncs Gameboy Emulators With Your DAW For Chiptunes Overload”

Scratch Build Of This Tiny RC Car Is A Handmade Fabrication Masterpiece

Tiny remote control cars burst onto the scene from time to time, often sold from mall kiosks and covered in garish stickers. However, sometimes it’s more fun to build than to buy. [diorama111] clearly fits into this camp, building a tiny 1:150 scale RC car from the ground up.

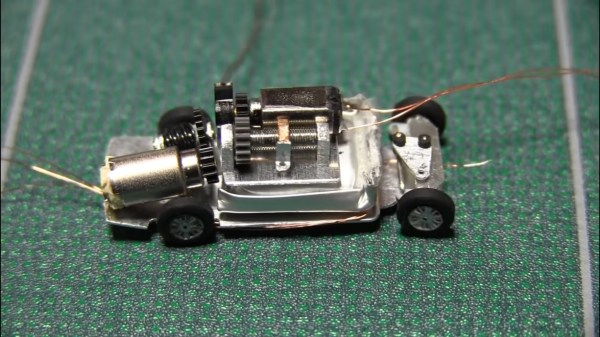
The build starts with a Tomy 1:150 model Toyota Crown / Avalon. However, only the outer shell remain. From giving the wheels rubber tires and fabricating a delicate steering assembly, to adding motors for both locomotion and turning, the mechanical build is on point. But seeing the ATtiny1616 is deadbugged with a DRV8835 motor driver, with the SMD parts hooked up with magnet wire to save the most space possible is equally impressive. A PIC79603 IR module is used to receive the commands to drive the car.

The build is an artful one, and all done by hand — no 3D printing or CNC parts involved. Watching the car drive is a delight. The smooth analog steering and slow speed give it an excellent scale appearance. The only thing we wonder about is the difficulty of driving it quickly without the aid of self-centering steering. It reminds us fondly of the 1:96 scale fully-functional Mustang RC plane we featured in 2017. Video after the break. Continue reading “Scratch Build Of This Tiny RC Car Is A Handmade Fabrication Masterpiece”

Miniature Star Wars Arcade Lets You Blow Up The Death Star On The Go

If you have fond childhood memories of afternoons spent at the local arcade, then you’ve had the occasional daydream about tracking down one of those old cabinets and putting it in the living room. But the size, cost, and rarity of these machines makes actually owning one impractical for most people.

While this fully functional 1/4th scale replica of the classic Star Wars arcade game created by [Jamie McShan] might not be a perfect replacement for the original, there’s no denying it would be easier to fit through your front door. Nearly every aspect of the iconic 1983 machine has been carefully recreated, right down to a working coin slot that accepts miniature quarters. Frankly, the build would have been impressive enough had he only put in half the detail work, but we certainly aren’t complaining that he went the extra mile.

[Jamie] leaned heavily on resin 3D printed parts for this build, and for good reason. It’s hard to imagine how he could have produced some of the tiny working parts for his cabinet using traditional manufacturing techniques. The game’s signature control yoke and the coin acceptor mechanism are really incredible feats of miniaturization, and a testament to what’s possible at the DIY level with relatively affordable tools.

The cabinet itself is cut from MDF, using plans appropriately scaled down from the real thing. Inside you’ll find a Raspberry Pi 3 Model A+ running RetroPie attached directly to the back of a 4.3 inch LCD with integrated amplified speakers. [Jamie] is using an Arduino to handle interfacing with the optical coin detector and controls, which communicates with the Pi over USB HID. He’s even added in a pair of 3,000 mAh LiPo battery packs and a dedicated charge controller so you can blow up the Death Star on the go.

Still don’t think you can fit one in your apartment? Not to worry, back in 2012 we actually saw somebody recreate this same cabinet in just 1/6th scale.

Continue reading “Miniature Star Wars Arcade Lets You Blow Up The Death Star On The Go”

RESQ Hunts For Lost Hikers From The Air

When lost hiking out in the back country, a cell phone might not seem like the most useful tool. Absent a signal from the cellular network, it’s not possible to make outgoing calls for help. However, carrying your phone may just make it a lot easier for rescuers to find you, and [Eric] is making a tool to do the job.

The handheld version of ResQ features a directional Yagi antenna to help pinpoint the location of the signal.

[Eric]’s project is named ResQ, and aims to find lost hikers by detecting the beacon packets from a cellphone’s WiFi adapter. The project comes in two forms; a handheld unit with a directional Yagi antenna, and a drone-mounted unit that can overfly terrain to scan for signals.

ResQ is built around the ESP8266, which is a cheap and accessible way to build a custom WiFI scanner. Currently, the system is able to detect WiFi devices and log MAC addresses along with timestamps and GPS location data to an SD card to help rescuers locate lost individuals. Future plans involve adding a live downlink to the drone such that any pings can be reported live for rescuers to investigate.

Similar systems exist commercially, primarily working with cell signals rather than WiFi. Costs are prohibitively high for many organisations though, so we can see ResQ filling in gaps as a useful tool to have. We’ve featured other radio gear for search and rescue before, too. Video after the break.

Continue reading “RESQ Hunts For Lost Hikers From The Air”