Building The Ultimate Raspberry Pi Automation Controller

At this point, we’ve lost count of how many automation projects we’ve seen with some variant of a Raspberry Pi at the helm. Which is hardly surprising, as the boards are cheap, powerful, and well documented. The list of reasons not to use one has never been very long, but with the PiCon One that [Frank] has been working on, it’s about to get even shorter.

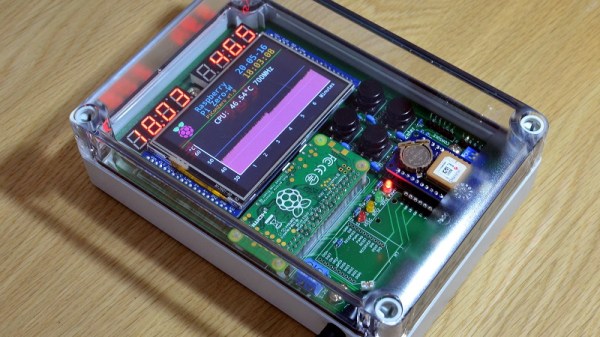
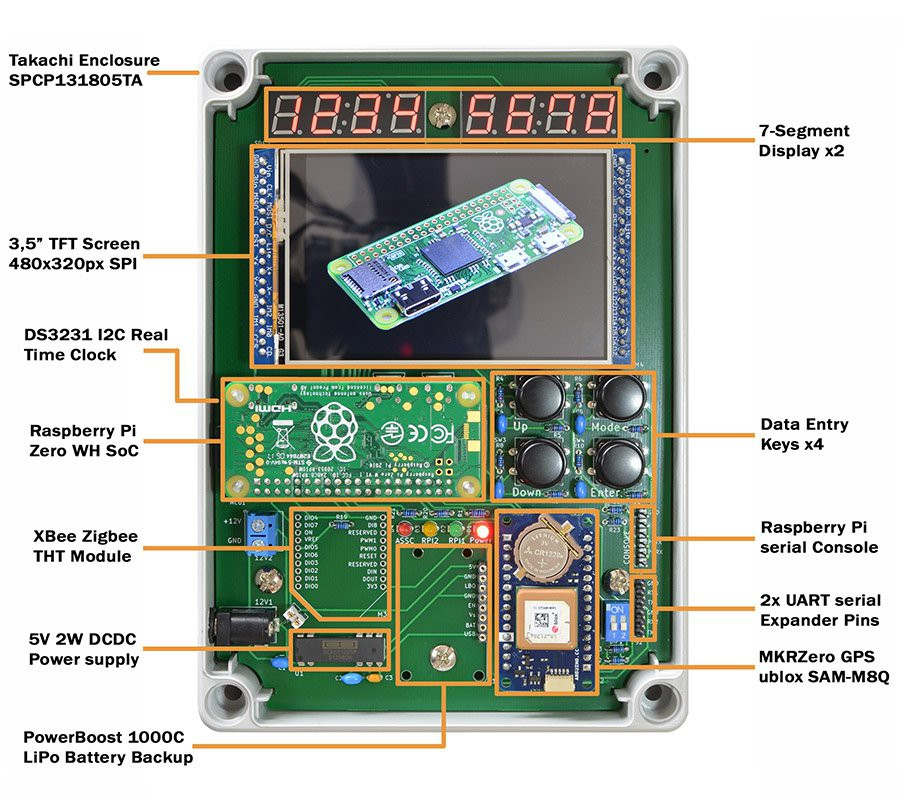
The project takes the form of an IP65 industrial enclosure and support electronics that the Raspberry Pi Zero W plugs into. While expandable in nature, [Frank] has a core set of features he’s aiming for as a baseline such as additional serial ports, integrated uninterruptible power supply, a battery-backed Real Time Clock (RTC), an array of programmable status LEDs, and support for XBee and GPS plug-in modules. Feedback is provided through a pair of four digit seven-segment displays and a color 320×480 TFT screen running a custom user interface.

[Frank] envisions the PiCon One for use as a rugged solar power controller, eventually able to measure array output, energy consumption, and even operate motorized mounts to keep the panels pointed at the sun. To that end, he’s recently been experimenting with running JPL’s Horizon software on the Pi to determine the sun’s position in real-time. But the device is capable of so much more, and would make an ideal controller for many home and potentially even industrial applications.

Continue reading “Building The Ultimate Raspberry Pi Automation Controller”

How To Get Into Cars: Aero Mods For More Grip

In 1960, Enzo Ferrari said “Aerodynamics are for people who can’t build engines”. It’s a quote that’s been proven laughably wrong in decades since. Aerodynamics are a key consideration for anyone serious about performance in almost any branch of motorsport. Today, we’ll take a look at how aero influences the performance of your car, and what modifications you might undertake to improve things.

Gains To Be Had

Improving the aerodynamics of your vehicle can mean wildly different things, depending on what your end goal is. Aerodynamics affects everything from top speed, to fuel economy, to grip, and optimizing for these different attributes can take wildly different routes. Often, it’s necessary to find a balance between several competing factors, as improvements in one area can often be detrimental in another.

To understand aerodynamics with regards to cars, we need to know about the forces of lift (or downforce), and drag. Drag is the force that acts against the direction of motion, slowing a vehicle down. Lift is the force generated perpendicular to the direction of motion. In the context of flight, the lift force is generated upwards with respect to gravity, lofting planes into the air. In an automotive context, we very much prefer to stay on the ground. Wings and aerodynamic surfaces on cars are created to create lift in the opposite direction, pushing the vehicle downwards and creating more grip. We refer to this “downwards lift” as downforce.

Continue reading “How To Get Into Cars: Aero Mods For More Grip”

Automating Mini Blinds The Rental-Friendly Way

[Chris Mullins] wanted to automate opening and closing the slats of mini blinds in his apartment, and came up with a system to do it as a fun project. Manually opening and closing the slats means twisting a rod. Seems straightforward to automate that, but as usual when having to work around something that already exists, making no permanent alterations, complications arose.

The blinds are only 1 inch wide, leaving little room for mounting any sort of hardware. While there is a lot of prior art when it comes to automating blinds, nothing he found actually fit the situation [Chris] had, so he rolled his own.

The rod that is normally twisted to control the blinds is removed, and the shaft of a stepper motor takes its place. [Chris]’ mounting solution is made to fit blinds with narrow 1 inch tracks (existing projects he found relied on 2 inch tracks) and the 3D printed mount is fully adjustable, so the 28BYJ stepper motor can be moved into exactly the right position. Speaking of the stepper motor, the 28BYJ motor is unipolar but the A4988 driver he wanted to use is for bipolar steppers only. Luckily, cutting a trace on the motor’s PCB is all it takes to turn a unipolar motor into bipolar.

To drive the motor and provide wireless functionality, the whole thing works with a Wemos D1 ESP8266, an A4988 stepper driver, and a buck converter. While it worked fine as a one-off on a perfboard, [Chris] used the project as an opportunity to learn how to make a PCB using KiCad; the PCB project is here on GitHub and the ESP8266 runs the ESPHome firmware. Be sure to check out the project page on his blog for all the details; [Chris] links to all the resources there, and covers everything from a bill of materials to walking through configuration of ESPHome with integration into the open-source Home Assistant project.

Looking to control natural light but blinds aren’t your thing? Maybe consider automated curtains.

Airlines Seek Storage For Grounded Fleets Due To COVID-19

Ask any airline executive what their plans were back in January 2020, and you’d probably get the expected spiel about growing market share and improving returns for shareholders. Of course, the coronovirus pandemic quickly changed all that in the space of just a few months. Borders closed, and worldwide air travel ground to a halt.

Suddenly, the world’s airlines had thousands of planes and quite literally nowhere to go. Obviously, leaving the planes just sitting around in the open wouldn’t do them any good. So what exactly is involved in mothballing a modern airliner?

Continue reading “Airlines Seek Storage For Grounded Fleets Due To COVID-19”

Printing, Plating, And Baking Makes DIY Microlattices Possible

To be honest, we originally considered throwing [Zachary Tong]’s experiments with ultralight metallic microlattices into the “Fail of the Week” bucket. But after watching the video below for a second time, it’s just not fair to call this a fail, so maybe we’ll come up with a new category — “Qualified Success of the Week”, perhaps?

[Zachary]’s foray into the strange world of microlattices began when he happened upon a 2011 paper on the subject in Science. By using a special photocurable resin, the researchers were able to use light shining through a mask with fine holes to create a plastic lattice, which was then plated with nickel using the electroless process, similar to the first half of the electroless nickel immersion gold (ENIG) process used for PCBs. After removing the resin with a concentrated base solution, the resulting microlattice is strong, stiff, and incredibly light.

Lacking access to the advanced materials and methods originally used, [Zachary] did the best he could with what he had. An SLA printer with off-the-shelf resin was used to print the skeleton using the same algorithms used in the original paper. Those actually turned out pretty decent, but rather than electroless plating, he had to go with standard electroplating after a coat of graphite paint. The plated skeletons looked great — until he tried to dissolve the resin. When chemical approaches failed, into the oven went the plated prints. Sadly, it turns out that the polymers in the resin expand when heated, which blew the plating apart. A skeleton in PLA printed on an FDM printer fared little better; when heated to drive out the plastic, it became clear that the tortuous interior of the lattice didn’t plate very well.

From aerogels to graphene, we love these DIY explorations of new and exotic materials, so hats off to [Zachary] for giving it a try in the first place.

Continue reading “Printing, Plating, And Baking Makes DIY Microlattices Possible”

Model Railroad Engine Gets A Tiny OLED Rollsign While Showing Off Tidy Protoboard Skills

When catching public transport, it’s very helpful if the bus or train in question has a large display indicating the route or destination. While many transit lines now rely on flipdot or LED displays, the classic rollsign still gets the job done. [diorama111] wanted to emulate this on a model railroad, and set about building a simulacrum at tiny scale.

Intended to suit an HO-scale model train, the build makes use of a tiny 0.6 inch NHD-0.6-6464G OLED display. It’s wired up with a boost converter for power and hooked up to a tiny circuit consisting of an ATMEGA328p and an infrared receiver. The microcontroller is responsible for receiving commands from the remote control, and displaying the appropriate image on the screen. The hidden beauty of this one is well shown in the video below as [diorama111] cleanly and meticulously assembles the circuit on protoboard with just an iron and tweezers.

What makes this project great is how neatly it’s integrated into the body of the train. Nestled inside the locomotive, it almost looks like a stock part of the model. While the nature of the OLED display does come across a touch anachronistic, implementing the vertical scroll really does add a lot to the final effect.

We love to see creative scale modelling projects, and we’ve seen some great work from [diorama111] in the past, too. Video after the break.

Continue reading “Model Railroad Engine Gets A Tiny OLED Rollsign While Showing Off Tidy Protoboard Skills”

Restoring Commodore’s Unloved Plus/4

The Commodore Plus/4 was not loved by the marketplace after its launch in 1984. Despite its namesake feature of having productivity programs built in, its lack of compatibility with Commodore 64 software and oddball status meant that it struggled to find acceptance. However, like so many retro computers, it maintains a following to this day. [Drygol] had collected a total of eight neglected units, and set to giving them a full workover.

First on the docket is cleaning, and [Drygol] makes short work of disassembling the computers and removing decades of dirt and dust. Keycaps are treated with Retrobright to restore their original color. The black styling of the case means it gets a simple wash down instead, and then a rub with thin oil to restore the plastic’s original sheen.

[Drygol] steps through various popular hacks for the platform too, from 6510 CPU replacements for the often-failing 7501 and 8501, to SD2IEC card interfaces to replace the much-maligned storage original storage options. Damaged keyboard studs are replaced with hacked-up Amiga parts, while LEDs that are long out of production are swapped out for cut-down modern parts.

The impressive thing is just how much community support there is for an also-ran Commodore that never truly caught the public’s eye. Efforts are ongoing, too, with projects like THED aiming to reproduce some of the custom chips used on the platform.

We’ve featured posts on the engineering that goes into Commodore’s 8-bit computers as well, like this excellent piece from [Bil Herd] on the story of the Commodore 128. Of course, if you’re working your own wonders with retro hardware, you know who to call.