Scratch Built Toe Clamps Keep Your Work In Place

[Kevin] owns a benchtop CNC mill that has proven itself to be a capable tool, but after becoming familiar with some of its shortcomings, he has made a few modifications. In order to more efficiently hold and access workpieces on his custom fixturing table, he designed and made his own toe clamps and they look beautiful.

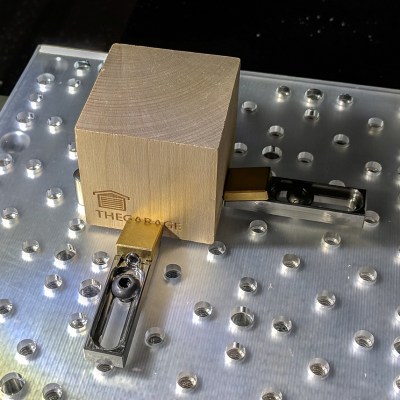
The usual way to secure a piece of stock to a fixturing table is to use top-down clamps, which hold the workpiece from the top and screw down into the table. However, this method limits how much of the stock can be accessed by the cutting tool, because the clamps are in the way. The most common way around this is to mount a vise to the table and clamp the workpiece in that. This leaves the top surface completely accessible. Unfortunately, [Kevin]’s benchtop Roland MDX-450 has a limited work area and he simply couldn’t spare the room. His solution was toe clamps, which screw down to the table and have little tabs that move inwards and downward. The tabs do the work of clamping and securing a piece of stock while maintaining a very low profile themselves.

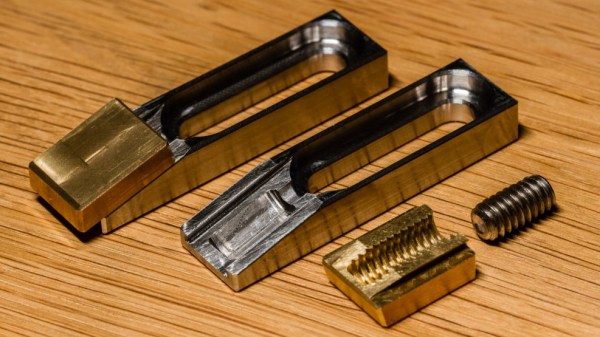
The clamp bases are machined from stainless steel and the heads are brass, and the interface between the two is a set screw. Inserting a hex wrench and turning the screw moves the head forward or back, allowing a workpiece to be clamped from the sides with minimal interference. His design was done in Fusion 360 and is shared online.

Another option for when simple clamps won’t do the job is a trick from [NYC CNC], which is to use an unexpected harmony of blue painter’s tape and superglue which yields great results in the right circumstances.

Better 3D Printing Through Magnets

Just like Goldilocks found some porridge too hot and some too cold, 3D printers often have beds that don’t stick well enough or stick too well. A few weeks ago I switched two of my three printers to use magnetic beds and thought I’d share with you how that worked out. Spoiler alert: like most things it has its plusses and minuses.

It isn’t a secret that 3D printing is not a plug-and-play operation, especially at the price most of us are willing to pay for printers. There are lots of variables to get right: temperature, speeds, bed leveling, and a bunch of other things. However, one of the things that vexes many people is the relationship between getting that first layer to stick and being able to get the print off the bed when you are done. It is hard to find a happy medium. If the first layer won’t stick, you print is doomed. If the first layer sticks too well, you are likely to damage the part or your fingers getting it removed. I switched to BuildTak surfaces long ago, and many people like PEI. But it is sometimes hard to get a big part removed. A few weeks ago, I took the plunge and bought some magnetic build surfaces for two of my printers. These were “no name” inexpensive affairs from Ali Express.

The idea is simple. There are two sheets that look like a rubberized plastic and have magnetic properties. One piece has some 3M adhesive on the back. The other has one surface that resembles BuildTak. Once you glue down the one sheet you leave it alone. Then you put the other sheet on top and print on it. When you are done, you can pull the sheet out and flex it to pop the print off. That’s the theory, anyway. Continue reading “Better 3D Printing Through Magnets”

ESP8266 Monitor Keeps An Eye On OctoPrint

At this point, you’ve almost certainly heard of OctoPrint. The web-based control interface for 3D printers is especially popular for those who’s primary computers run on an operating system that has a penchant for occasionally imploding. Even if you aren’t laboring under that common software handicap, OctoPrint offers a wide away of compelling features. Perhaps chief among them the ability to monitor your printer over the network, and if you insist, over the Internet. But while OctoPrint provides the server side for getting your printer on the net, you’re on your own for the client.

Rather than using a web browser like some kind of peon, [David Payne] has come up with a very slick desktop OctoPrint monitor using the WeMos D1 Mini ESP8266 board. With an exceptionally low part count and housed in a (what else) 3D printed enclosure, this is a cheap and easy OctoPrint accessory that we suspect will be decorating many a hacker’s desk before too long.

The electronics are simple to the extreme, just hook the 4 wires of an 128×64 OLED I2C display to the appropriate pins of the ESP8266 board, and you’re ready to upload the Arduino code [David] has come up with.

His code is very polished, from using WiFiManager for initial network setup to providing its own web-based configuration menus to get the device linked up to your OctoPrint instance, [David] clearly wanted this to be as smooth an experience as possible for the end user. When the 3D printer isn’t working on a job, the monitor will even switch over to showing you the time and weather. We’ve seen commercial products that weren’t this user-friendly.

We also love the case design on this little gadget. While the aesthetics are perhaps debatable (sort of reminds us of the little fellows from Darwinia), we appreciate any functional print that doesn’t require supports. You’ll need to provide a couple of little screws to keep the back panel on, but other than that everything snaps into place.

Of course, you could always just use your smartphone to keep an eye on OctoPrint, and even if the remote management capabilities don’t grab your interest, there’s plenty of interesting plugins to keep you occupied.

Continue reading “ESP8266 Monitor Keeps An Eye On OctoPrint”

How The Sony PlayStation Was Hacked

Playgrounds were the comment sections of their day. Every weekday from exactly 1:17 PM until 1:43 PM there were swings to be swung, rumors to be spread, and debates to be settled by whomever was the loudest (some things never change). Allegiances were formed and battle lines were drawn based solely on what video game console you supported. It was this playground system that perpetuated the urban myths of the time.

For PlayStation fans there was the myth that you could save Aerith from her fate in Final Fantasy VII if you just cast the right spell, or the secret code in Tomb Raider that would let you see all of Lara Croft. There was the myth that no one could possibly copy a PlayStation game because all the bottoms of the discs were black. Even the very existence of the first PlayStation, the Super Nintendo PlayStation prototype, was an urban legend. The difference was that last one turned out to be true.

Let’s jump in and take a look at the cat and mouse game between modchip makers looking to defeat the original PlayStation’s copy protection, and Sony’s efforts to protect their castle.
Continue reading “How The Sony PlayStation Was Hacked”

Arachnid Ale Uses Yeast To Make Spider Silk

Many people who read Hackaday hold the title of “Webmaster” but [The Thought Emporium] is after slightly different credentials with the same title. He aims to modify a strain of yeast to produce spider silk. Charlotte’s Web didn’t go into great detail about the different types of silk that a spider can produce, but the video and screencap after the break give a rundown of how spiders make different types of silk, and that each species of spider makes a unique silk. For this experiment, the desired silk is “beta sheets” which the video explains are hard and strong.

Some of the points mentioned in the video rely on things previously mentioned in other videos, but if you are the type of person excited by genetic modifications or using modified yeast to produce something made by another lifeform, you will probably be just fine. This is one of the most technical videos made by [The Thought Emporium] as he goes into the mechanisms of the modifications he will be making to the yeast. It sounds like a lot of work and the financial benefit of being able to produce spider silk affordably could be great, but in true hacker form, the procedure and results will be made freely available.

For some background into this hacker’s mind, check out how he has hacked his own lactose intolerance and even produced graphene through electrochemical exfoliation.

Continue reading “Arachnid Ale Uses Yeast To Make Spider Silk”

Pint-sized Jacob’s Ladder Packs 10,000 Volts In A Pickle Jar

File this one away for your mad scientist costume next Halloween: [bitluni]’s Pocket Jacob’s Ladder is the perfect high voltage accessory for those folks with five dollars in parts, a 3D printer, and very big pockets.

[bitluni]’s video shows you all the parts you’ll need and guides you through the very simple build process. For parts, you’ll require a cheap and readily-available high-voltage transformer, a battery holder, some silver wire for the conductors, and a few other minor bits like solder and a power switch.

Once the electronics are soldered together, they’re stuffed inside a 3d printed case that [bitluni] designed with FreeCAD. The FreeCAD and STL files are all available on Thingiverse. We’re not sure what type of jar [bitluni] used to enclose the electrodes. If your jar isn’t a match, you’ll have to get familiar with FreeCAD or start from scratch with your favorite CAD package.

Either way, we enjoy the slight nod toward electrical safety and the reuse of household objects for project enclosures.

If you’re interested in a Jacob’s Ladder with significantly higher voltage we’ve got you covered, or we’ve also written about another tiny portable Jacob’s Ladder.

The full video is embedded after the break.

Continue reading “Pint-sized Jacob’s Ladder Packs 10,000 Volts In A Pickle Jar”

Living Hinges At The Next Level

First of all, a living hinge is not a biological entity nor does it move on its own. Think of the top of a Tic Tac container where the lid and the cover are a single piece, and the thin plastic holding them together flexes to allow you to reach the candies disguised as mints. [Xiaoyu “Rayne” Zheng] at Virginia Tech designed a method of multimaterial programmable additive manufacturing which is fancy-ese for printing with more than one type of material.

The process works under the premise of printing a 3D latticework, similar to the “FILL” function of a consumer printer. Each segment of material is determined by the software and mixed on the spot by the printer and cured before moving onto the next segment. Like building a bridge one beam at a time, if that bridge were meant for tardigrades and many beams were fabricated each minute. Mixing up each segment as needed means that a different recipe results in a different rigidity, so it is possible to make a robotic leg with stiff “bones” and flexible “joints.”

We love printing in different materials, even if it is only one medium at a time. Printing in metal is useful and could be consumer level soon, but you can print in chocolate right now.

Via Phys.org. Thank you again for the tip, [Qes].