[Ben Krasnow] Looks Inside Film Camera Date Stamping

Honestly, we never wondered how those old film cameras used to put the date stamp in the lower right-hand corner of the frame. Luckily, [Ben Krasnow] does not suffer from this deplorable lack of curiosity, and his video teardown of a date-stamping film camera back (embedded below) not only answers the question, but provides a useful lesson in value engineering.

For the likely fair fraction of the audience who has never taken a photo on film before, cheap 35-mm cameras were once a big thing. They were really all one had for family snapshots and the like unless you wanted to invest in single-lens reflex cameras and all the lenses and accessories. They were miles better than earlier cartridge cameras like the 110 or – shudder – Disc film, and the cameras started getting some neat electronic features too. One was the little red-orange date stamp, which from the color we – and [Ben] assumed was some sort of LED pressed up against the film, but it ends up being much cooler than that.

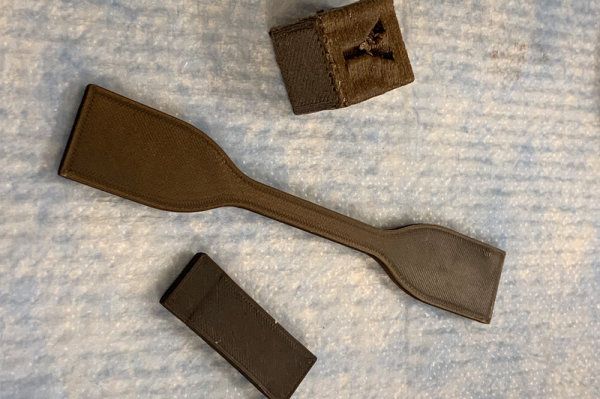
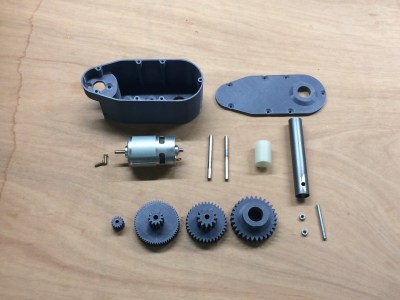
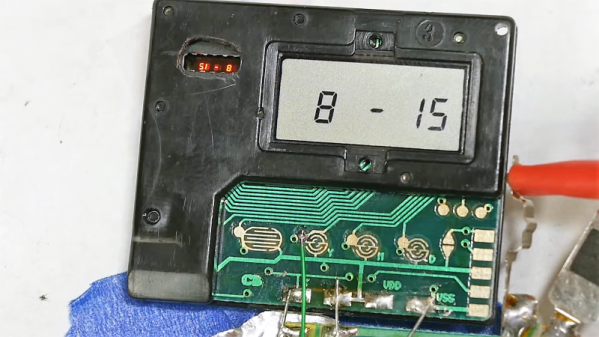
Digging into the back of an old camera, [Ben] found that there’s actually a tiny projector that uses a mirror to fold the optical path between the film and a grain-of-wheat incandescent bulb. An LCD filter sits in the optical path, but because it’s not exactly on the plane of the film, it actually has to project the image onto the film. The incandescent bulb acts as a point source and the mirror makes the optical path long enough that the date stamp image appears sharp on the film. It’s cheap, readily adapted to other cameras, and reliable.

Teardowns like this aren’t fodder for [Ben]’s usual video fare, which tends more toward homemade CT scanners and Apollo-grade electroluminescent displays, but this was informative and interesting, too.

Continue reading “[Ben Krasnow] Looks Inside Film Camera Date Stamping”

Repurposing A Toy Computer From The 1990s

Our more youthful readers are fairly likely to have owned some incarnation of a VTech educational computer. From the mid-1980s and right up to the present day, VTech has been producing vaguely laptop shaped gadgets aimed at teaching everything from basic reading skills all the way up to world history. Hallmarks of these devices include a miserable monochrome LCD, and unpleasant membrane keyboard, and as [HotKey] found, occasionally a proper Z80 processor.

It started, as such things often do, with eBay. [HotKey] found that the second hand market is flooded with these decades-old educational gadgets, often selling for just a few bucks. As it turns out, children of the smartphone and tablet era don’t seem terribly interested in a “laptop” from 1991. At any rate, he ordered about a dozen different models and started tearing into them to see what made them tick.

He found that the VTech machines of around 20+ years old were using the Z80 processor, and what’s more, they shared a fairly standardized external cartridge interface for adding additional software or saving data. Upon attempting to dump some data from the cartridge port, [HotKey] discovered that it was actually connected to the computer’s main bus. He realized that with a custom designed cartridge, it should be able to take over the system and have it run his own code.

After more than a year of tinkering and talking to other hackers in the Z80 scene, [HotKey] has made some impressive headway. He’s not only created a custom cartridge that lets him load new code and connect to external devices, but he’s also added support for a few VTech machines to z88dk so that others can start writing their own C code for these machines. So far he’s created some very promising proof of concept programs such as a MIDI controller and serial terminal, but ultimately he hopes to create a DOS or CP/M like operating system that will elevate these vintage machines from simple toys to legitimate multi-purpose computers.

We’ve seen VTech hardware hacked in the past, but it’s generally been focused on the company’s more recent hardware such as the Linux-powered InnoTab. It will be interesting to see if these educational toys can fulfill some hacker’s dreams of having a cheap and portable box for Z80 tinkering.

Coffee Makes 3D Printing Better

While we know some 3D printer operators who need coffee, Washington State University is showing an improved PLA material that incorporates used coffee waste. Regular PLA is not known for being especially strong, though It isn’t uncommon for vendors to add things to their PLA to change its characteristics.

The new material containing about 20% coffee waste showed an over 400% increase in toughness (25.24 MJ/m3) versus standard PLA. Why coffee waste? We aren’t sure. They didn’t add grounds, but rather a dry and odorless material left over after coffee grounds are processed for biodiesel production.

Continue reading “Coffee Makes 3D Printing Better”

What Better Than A Hexapod?

What’s more awesome than a normal hexapod robot? What about a MEGA hexapod?

Max the Megapod, a six-legged 3D-printed walking robot, is an open source, Arduino-based, Bluetooth controlled, Scratch programmable creation made possible by [Steven Pendergrast]. The design for Max was based on a previous hexapod project, Vorpal the Hexapod, which has since been built at hundreds of schools worldwide.

Max clocks in at two feet in diameter, expanding to three when sprawled out on the ground. In addition, the hexapod is able to dance, walk, and run as fast as the smaller version, covering ground at twice the speed due to its size.

The scaling for the project – about 200% from the original hexapod – required some creativity, as the goal was for the components to be printed on a modest-sized printer with an 8 inch cube bed. In addition, since Max weighs 9 pounds on average, real bearings (608 Skate bearings) needed to be used for the servo mounts.

The electrical system had to be changed to account for the larger currents drawn by the larger servos (MG958s). and the power distribution harness needed to be redesigned. The current harness take about two hours to build for the larger hexapod, compared to 15 minutes for the original design.

The results are both hilarious and adorable, especially given the endless modifications made to give Max a unique flair. Perhaps a GIGApod could be coming up next?

Continue reading “What Better Than A Hexapod?”

This Dry-Ice Powered Fog Machine Is Perfect For Halloween

The leaves are turning brown, and the spookier season is upon us. If you’re currently working up plans for a top-notch Halloween party, you would do well to consider building a fog machine like this unit from [DIY Machines]!

This fog machine is based around dry ice, so you’ll need to source that from an external supplier. The machine consists of a closed container filled with hot water, inside which is a movable bucket filled with dry ice. By lowering the dry ice into the water, fog is produced.

An Arduino is used to control the bucket, allowing the amount of fog produced to be controlled with a smartphone app. There are also controllable LEDs built in to give the fog a suitably eerie glow. The build relies on a series of 3D printed parts for the mechanism, and features several different nozzle designs for achieving different effects, such as a rising geyser or a thick low-lying fog.

The basic concepts are simple and it’s a build anyone could knock out in a weekend with a 3D printer and an Amazon account. It’s a great way to add to the ambience of Halloween, but of course, that’s not all fog can do. Video after the break.

Continue reading “This Dry-Ice Powered Fog Machine Is Perfect For Halloween”

A (Mostly) 3D Printed Servo/Gear Reduction

This servo/gear reduction was assembled with almost all 3D-printed parts. Apart from a brushed 36 V DC-motor, a stainless steel shaft, and screws for holding the servo together, the only other non-printed part is the BTS7960B motor driver.

Some interesting stats about the plastic servo – its stall torque is about 55 kg/cm, reaching a peak current draw of 18 A when using a 6s LiPo battery outputting 22-24 V. The shaft rotates using two 20 mm holes and lubrication. (Ball bearings were originally in the design, but they didn’t arrive on time for the assembly.)

The holes of the gears are 6.2 mm in diameter in order to fit around the shaft, although some care is taken to sand or fill the opening depending on the quality of the 3D print.

This isn’t [Brian Brocken]’s only attempt at 3D-printing gears. He’s also built several crawling robots, a turntable, and a wind up car made entirely from acrylic. The .stl files for the project are all available online for anyone looking to make their own 3D-printed servo gears.

Continue reading “A (Mostly) 3D Printed Servo/Gear Reduction”

Linux Fu: Python GUIs For Command Line Programs (Almost) Instantly

Not every programmer likes creating GUI code. Most hacker types don’t mind a command line interface, but very few ordinary users appreciate them. However, if you write command line programs in Python, Gooey can help. By leveraging some Python features and a common Python idiom, you can convert a command line program into a GUI with very little effort.

The idea is pretty simple. Nearly all command line Python programs use argparse to simplify picking options and arguments off the command line as well as providing some help. The Gooey decorator picks up all your options and arguments and creates a GUI for it. You can make it more complicated if you want to change specific things, but if you are happy with the defaults, there’s not much else to it.

At first, this article might seem like a Python Fu and not a Linux Fu, since — at first — we are going to focus on Python. But just stand by and you’ll see how this can do a lot of things on many operating systems, including Linux.

Continue reading “Linux Fu: Python GUIs For Command Line Programs (Almost) Instantly”