If you live somewhere cold, where the rain, snow and slush don’t abate for weeks at a time, you’ve probably dealt with wet boots. On top of the obvious discomfort, this can lead to problems with mold and cause blisters during extended wear. For this reason, boot dryers exist. [mark] had a MaxxDry model that had a timer, but it wasn’t quite working the way he desired. Naturally, it was begging to be hooked up to the Internet of Things.
The brains of the dryer is an ESP32, a solid choice for such a project. With WiFi on board, connecting the device to the internet is a snap. Relays are used to control the fan and heater inside the boot dryer, while MQTT helps make the device controllable remotely. It can be manually switched on and off, or controlled to always switch on at a certain time of the day.
It’s a simple project that shows how easily a device can be Internet controlled with modern hardware. For the price of a cheap devboard and a couple of relays, [mark] now has a more functional dryer, and toasty feet to boot.
Like many mechanically inclined parents, [Tony Goacher] prefers building over buying. So when his son wanted an electric scooter, his first stop wasn’t to the toy store, but to AliExpress for a 48V hub motor kit. Little did he know that the journey to getting that scooter road-ready would be a bit more involved than he originally bargained for.
She cannae take anymore, Captain
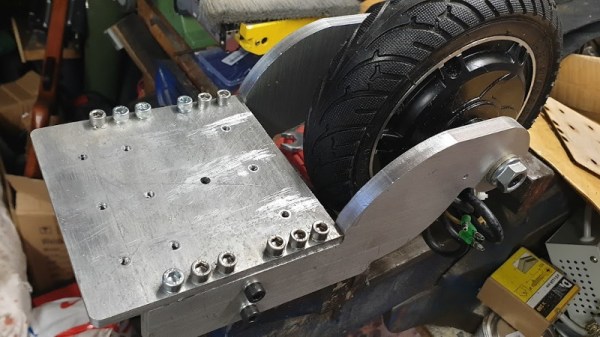
Of course, to build a motorized scooter you need a scooter to begin with. So in addition to the imported motor, [Tony] picked up a cheap kick scooter on eBay. Rather than worrying about the intricacies of cleanly integrating the two halves of the equation, he decided to build a stand-alone module that contained all of the electronics. To attach it to the scooter, he’d cut off the rear wheel and literally bolt his module to the deck.
[Tony] goes into considerable detail on how he designed and manufactured his power unit, from prototyping with laser cut MDF to the final assembly of the aluminum parts that he produced on a CNC of his own design. It’s really a fantastic look at how to go from idea to functional device, with all the highs and lows in between. When the first attempt at mounting the battery ended up cutting into the 8 Ah LiPo pack for example, and treated his son to a bit of a light show.
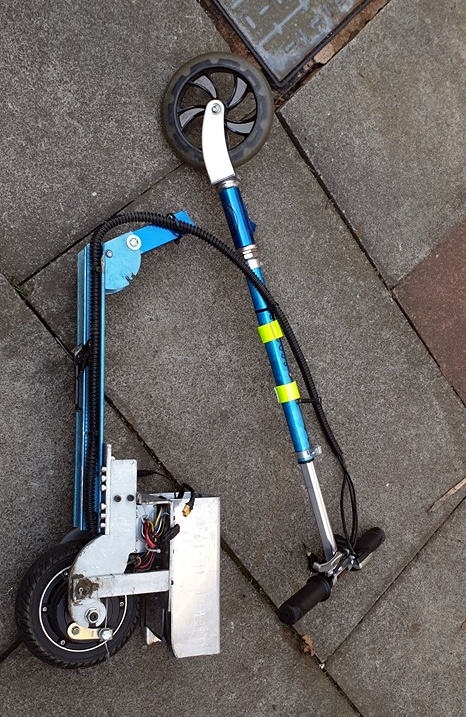
With all the bugs worked out and his son happily motoring around the neighborhood, [Tony] thought his job was done. Unfortunately, it was not to be. It turned out that his bolt-on power unit had so much kick that it sheared the front wheel right off. Realizing the little fellow didn’t have the fortitude for such electrified exploits, he went to a local shop and got a much better (and naturally much more expensive) donor for the project.
It’s here that his modular approach to the problem really paid off. Rather than having to redesign a whole new motor mount for the different scooter, he just lopped the back wheel off and bolted it on just as he did with the cheapo model. What could easily have been a ground-up redesign turned out to be a few minutes worth of work. Ultimately he did end up machining a new front axle for the scooter so he could fit a better wheel, but that’s another story.
The last decade or so has seen remarkable advances in motor technology for robotics and hobby applications. We’re no longer stuck with crappy brushed motors, and now we have fancy (and cheap!) stepper motors, brushless motors for drones, and servo motors. This has led to some incredible achievements; drones are only barely possible with brushed motors, and you can’t build a robot without encoders.
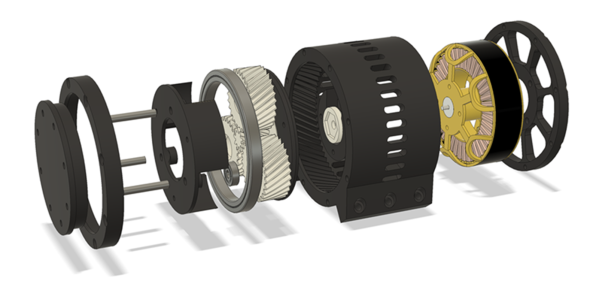
For his entry into the Hackaday Prize, [Gabrael Levine] is taking on one of the hardest robotics challenges around: the bipedal robot. It’s a chickenwalker, or an AT-ST; either way, you need a lot of power in a very small space, and that’s where the OpenTorque Actuator comes in. It’s a quasi-direct-drive motor that was originally pioneered by the MIT Biomimetics Lab.
The key feature of the OpenTorque Actuator is using a big brushless motor, a rotation encoder, and a small, 8:1 planetary gear set. This allows the motor to be backdrivable, capable of force-sensing and open-loop control, and because this actuator is 3D printed, it’s really cheap to produce.
But a motor without a chassis is nothing, and that’s where the Blackbird Bipedal Robot comes in. In keeping with best practices of robotic design, the kinematics are first being tested in simulation, with the mechanical build happening in parallel. That means there’s some great videos of this chickenwalker strutting around (available below), and so far, everything looks great. This bipedal robot can turn, walk, yaw, and work is continuing on the efforts to get this bird-legged bot to stand still.
In our age of instant access to the seeming total of human knowledge at the swipe of a finger, museums may seem a little anachronistic. But the information available at our fingertips is often only the tip of the iceberg, and institutions like the Computer History Museum in Mountain View, California are dedicated to collecting and preserving the artifacts of the information age, capturing the intellectual capital that went into making them, and perhaps more importantly, providing context and making everything accessible.
The CHM is an incredible resource for anyone doing research involving the early days of computing. Dag Spicer is the Senior Curator at CHM, or “Chief Content Officer” as he likes to put it. Dag has been collecting, cataloging, and overseeing the largest collection of computer artifacts in the world for almost 25 years, and he has some stories to tell. He’ll stop by the Hack Chat this week to share them, and to answer your questions about the history of computers and how studying the past shapes the future of computing.
Click that speech bubble to the right, and you’ll be taken directly to the Hack Chat group on Hackaday.io. You don’t have to wait until Wednesday; join whenever you want and you can see what the community is talking about.
For some of us, there are few sounds more satisfying than the deep resonant “thunk” of a high quality toggle switch slamming into position. There isn’t an overabundance of visceral experiences when working with electronics, so we like to savor them when we get the chance. But of course there’s no accounting for taste, and we suppose there are even situations where a heavy physical switch might not be the best solution. So what do you do?
Enter the latching power circuit, often referred to as a “soft” switch. [Chris Chimienti] has recently put together a fascinating video which walks the viewer through five different circuits which can be used to add one of these so-called soft power switches to your project. Each circuit is explained, diagramed, annotated, and eventually even demonstrated on a physical breadboard. The only thing you’ve got to do is pick which one you like the most.
There’s actually a number of very good reasons to abandon the classic toggle switch for one of these circuits. But the biggest one, somewhat counterintuitively, is cost. Even “cheap” toggle switches are likely to be one of the most expensive components in your bill of materials, especially at low volume. By comparison, the couple of transistors and a handful of passive components it will take to build out one of these latching circuits will only cost you a couple of cents.
When it comes to the quest for artifacts from the Space Race of the 1960s, few items are more sought after than flown hardware. Oh sure, there have been stories of small samples of the 382 kg of moon rocks and dust that were returned at the cost of something like $25 billion making it into the hands of private collectors, and chunks of the moon may be the ultimate collector’s item, but really, at the end of the day it’s just rock and dust. The serious space junkie wants hardware – the actual pieces of human engineering that helped bring an epic adventure to fruition, and the closer to the moon the artifact got, the more desirable it is.
Sadly, of the 3,000,000 kg launch weight of a Saturn V rocket, only the 5,600 kg command module ever returned to Earth intact. The rest was left along the way, mostly either burned up in the atmosphere or left on the surface of the Moon. While some of these artifacts are recoverable – Jeff Bezos himself devoted a portion of his sizable fortune to salvage one of the 65 F1 engines that were deposited into the Atlantic ocean – those left on the Moon are, for now, unrecoverable, and in most cases they are twisted heaps of wreckage that was intentionally crashed into the lunar surface.
But at least one artifact escaped this ignominious fate, silently orbiting the sun for the last 50 years. This lonely outpost of the space program, the ascent stage from the Apollo 10 Lunar Module, appears to have been located by a team of amateur astronomers, and if indeed the spacecraft, dubbed “Snoopy” by its crew, is still out there, it raises the intriguing possibility of scoring the ultimate Apollo artifact by recovering it and bringing it back home.
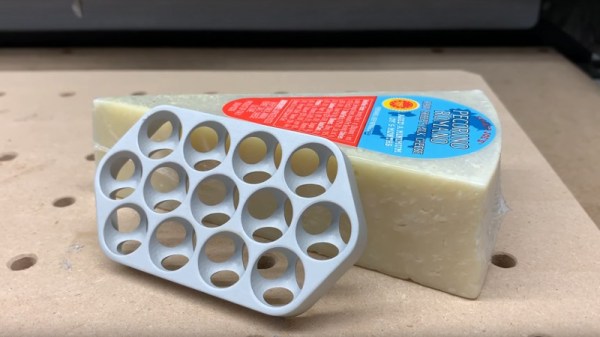
Apple’s newest Mac Pro with its distinctive machined grille continues to excite interest, but until now there has been one question on the lips of nobody. It’s acquired the moniker “Cheese grater”, but can it grate cheese? [Winston Moy] set out to test its effectiveness in the kitchen with a piece of Pecorino Romano, a great cheese.
Of course, the video is not really about cheese grating, but about the machining process to create that distinctive pattern of intersecting spherical holes. He doesn’t have a real Mac Pro because nobody does as yet, so like others his approach was to reverse engineer the manufacturing process. He takes us through the entire thing and the rationale behind his decisions as he makes a 13-hole piece of Mac Pro-like grill from a billet of aluminium. It’s first roughly cut with a pair of decreasing-size end mills, then finished with a ball mill. He’s added an extra cut to round off the sharp edge of the hole that isn’t there on the Mac.
An unexpected problem came when he machined the bottom and the holes began to intersect, it was clear that they were doing so wrongly. Turning the piece over must be done in the correct orientation, one to note for any other would-be cheese-grater manufacturers. Finally the piece is blasted for a satin finish, and then anodised for scratch-resistance.
So, the important question must be answered: does it grate? The answer’s no, the best it can manage is something close to a crumble. He doesn’t seem bothered though, we get the impression he likes eating cheese whatever its form. The whole process is in the video below the break.