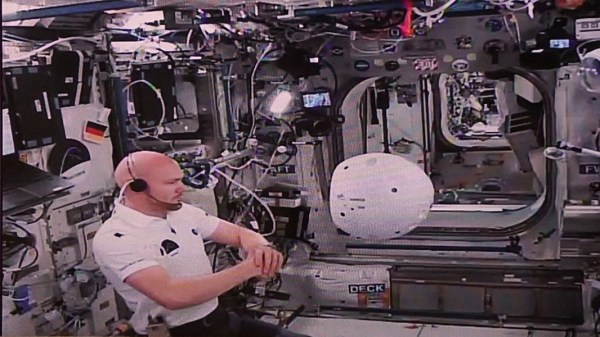
OpenSCAD Handles The Math In 3D Printed Holder For Magnetic Spheres

3D printed holder mounted to bike wheel, fitting precisely 38 magnetic spheres around its perimeter. Tedious math? Not if you make OpenSCAD do it.

Off-the-shelf components are great; the world and our work simply wouldn’t be the same without. But one of the constraints is that one has to design around them, and that’s what led [Antonio Ospite] to create a parametric design in OpenSCAD for a 3D printed holder which snugly fits a number of magnetic spheres around its diameter.

If that sounds a bit esoteric, it will become much clearer in the context of [Antonio]’s earlier work in making a DIY rotary encoder out of a ring of magnetic spheres. He found that such a ring in front of two Hall effect sensors was low in cost, high in precision, and thanks to 3D printing it also had a lot of potential for customizing. But hampering easy design changes was the need for the spheres to fit snugly around whatever shape was chosen for the hardware, which meant constraints on the encoder diameter.

In this case, [Antonio] wished to create an encoder that could be attached to a bicycle wheel but needed to know what outer diameter would best fit a ring of magnetic balls perfectly, given that the balls were each 5 mm. OpenSCAD did the trick, yielding a design that fit the bike wheel and spokes while perfectly nestling 38 magnetic balls around the outside edge with a minimum of wasted space.

OpenSCAD is a CAD program that’s really more like a programming language than anything else. For those who are not familiar with it, [Brian Benchoff] walked through how to make a simple object in OpenSCAD, and [Elliot] has sung the praises of a few advanced functions. Now that this project makes DIY encoders easier, perhaps they could be used to add intuitive new controls to OpenSCAD itself.

Martian Dust Storm May Spell Doom For Rover

Everyone knows that space is an incredibly inhospitable place, but the surface of Mars isn’t a whole lot better. It’s a dim, cold, and dry world, with a wisp of an atmosphere that provides less than 1% of Earth’s barometric pressure. As the planet’s core no longer provides it with a magnetosphere, cosmic rays and intense solar flares bathe the surface in radiation. Human life on the surface without adequate environmental shielding is impossible, and as NASA’s fleet of rovers can attest, robotic visitors to the planet aren’t completely immune to the planet’s challenges.

Opportunity Mission Patch

As a planet-wide dust storm finally begins to settle, NASA is desperately trying to find out if the Red Planet has claimed yet another victim. The agency hasn’t heard from the Opportunity rover, which landed on Mars in 2004, since before the storm started on June 10th; and with each passing day the chances of reestablishing contact are diminished. While they haven’t completely given up hope, there’s no question this is the greatest threat the go-kart sized rover has faced in the nearly 15 years it has spent on the surface.

Opportunity was designed with several autonomous fail-safe systems that should have activated during the storm, protecting the rover as much as possible. But even with these systems in place, its twin Spirit succumbed to similar conditions in 2010. Will Opportunity make it through this latest challenge? Or has this global weather event brought the long-running mission to a dramatic close?

Continue reading “Martian Dust Storm May Spell Doom For Rover”

PiPod: A Raspberry Pi Zero Portable Music Player

[Bram] wasn’t satisfied with the portable music playback devices that were currently available. He craved an offline music player that had a large storage capacity but found that this was only available in high-end, off-the-shelf options, which were far too expensive. [Bram] decided to make his own, powered by a Raspberry Pi zero. After building an initial prototype, the design was iterated a few times, with the latest version featuring a BOM cost of roughly €80.

The whole project is open source, with hardware and software files available on the project GitHub. A 2.2″ TFT displays the UI, which is of course completely customisable. Everything is squashed into a 3D printed case, which has the smallest form factor possible whilst retaining a decent amount of battery life. The electronics are what you’d expect: a boost converter to produce 5 V for the Pi from the 3.7V battery, a charge controller and a battery protection circuit. As a bonus, the battery voltage is monitored with a 12-bit ADC which reports to the Pi, enabling it to do a safe shutdown at low voltage, and display battery level on the UI.

Since the whole purpose of the device is to play audio, onboard filtered PWM wasn’t going to cut it, so instead a 24-bit DAC talks to the Pi via I2S. The audio player backend is VLC, so there’s support for plenty of different file types. A disc image of the whole system is available with everything pre-configured, and you can even buy the assembled PCB from Tindie.

Want to keep the look and feel of your old iPod? We covered an impressive restoration of a 6th gen model, upgrading the storage and battery significantly.

Where’s The Cat? Locating Your Moggy Without Eating Batteries

Where the Hackaday Cat goes when she steps over the threshold into the wider world is a mystery, she reveals her whereabouts strictly on her terms and would we suspect be very cagey were we able to ask her about it. [Andy C] however has a need to know where his cat is spending her time, so he’s made a GPS collar for a bit of feline spying.

There are commercial GPS collars for pets, but they all share the flaw of extremely limited battery life. His challenge then was to create a collar that delivered the required pinpoint fix alongside a battery life measured in months. The solution was a combination of a low-power miniature GPS receiver and a low-power PC microcontroller hooked up to an FSK radio whose frequency he doesn’t give but which we suspect is probably the usual 433 MHz. The collar remains in low power mode until it receives a call on the FSK, at which point it wakes up, gets a GPS fix, transmits it, and returns to sleep.

The summary links to a series of posts which provide an extremely detailed look at all aspects of the project, and go well beyond mere GPS trackers for a cat. If you have an interest in low power devices or antenna matching for example, you’ll find a lot of interesting stuff in these pages. Of course, if all you need is a GPS tracker though, you may prefer a simpler option.

An Abstract Kind Of Clock: The Chinese Remainder Clock

Hackaday likes clocks, a lot. Speaking personally, from my desk I can count at least eight clocks, of which seven are working. There’s normal quartz movement analog clocks, fun automatic wristwatches, run-of-the-mill digital clocks, a calculator watch, and a very special and very broken Darth Vader digital clock/radio combo that will get fixed one day — most likely. Every clock is great, and one of life’s great struggles is to see how many you can amass before you die. The more unique the clock is, the better, and nothing (so far) tops [Antonella Perucca]’s Chinese Remainder Clock.

Continue reading “An Abstract Kind Of Clock: The Chinese Remainder Clock”

The Solution To Oversized Dev Boards: A Literal Hack

Oh, there was a time when you could prototype just about everything on a breadboard. The CPU in your computer came in a DIP package, and there were no BGA packages. to be found anywhere. In the forty years since then, chips have gotten smaller, packages have gotten more cramped, and you can barely hand-solder the coolest chips anymore. No worries — companies are still spitting out dev boards with 0.1″ headers, but there’s a problem: they don’t fit on a solderless breadboard. They’re too wide. Our world is falling apart.

[Luc] had a problem when he was playing with a few NodeMCU dev boards. These are too wide for a breadboard. [Luc] came up with not just one solution, but two. This is how you prototype with dev boards that are too large.

The solution came to [Luc] when he realized the center of every breadboard has no electrical connections, and was simply held together by a little piece of plastic. Yes, he took a hacksaw to the breadboard. This is technically a hack.

With two halves of a solderless breadboard torn asunder, [Luc] had an easy way to prototype with dev boards that are just too wide. But there is a simpler solution [Luc] realized after he destroyed a breadboard: those ubiquitous solderless breadboards have detachable power rails. If you simply take one of those power rails off, you have an easy way to use two breadboards across a module that’s too wide for one solderless breadboard.

Is this a hack? Oh, absolutely. [Luc] used a hacksaw. It’s also a nice reminder of a common trick that the noobies might not know. Thanks for that, [Luc].

SCCSI2SD card in a sound board

Making A Vintage 1990s Sound Board Do Rapid Fire Silently

Sometimes a mix of old and new is better than either the old or new alone. That’s what [Brad Carter] learned when he was given an old 1990s sound board with a noisy SCSI drive in it. In case you don’t know what a sound board is, think of a bunch of buttons laid out in front of you, each of which plays a different sound effect. It’s one way that radio DJ’s and podcasters intersperse their patter with doorbells and car crash sounds.

Before getting the sound board, [Brad] used a modern touchscreen table but it wasn’t responsive enough to get a machine gun like repetition of the sound effect when pressing an icon in rapid succession. On the other hand, his 1990s sound board had very responsive physical buttons but the SCSI hard drive was too noisy. He needed the responsiveness of the 1990s physical buttons but the silence of modern solid state storage.

And so he replaced the sound board’s SCSI drive with an SD card using a SCSI2SD adaptor. Of course, there was configuration and formatting involved along with a little trial and error to get the virtual drive sizes right. To save anyone else the same difficulties, he details all his efforts on his webpage. And in the video below you can see and hear that the end result is an amazing difference. Pressing the physical buttons gives instant sound and in machine gun fashion when pressed in rapid succession, all with the silence of an SD card.

A SCSI2SD card is a nice off-the-shelf solution but if you want something a little more custom then there’s a Raspberry Pi SCSI emulator and one which uses a Teensy with a NCR5380 SCSI interface chip.

Continue reading “Making A Vintage 1990s Sound Board Do Rapid Fire Silently”