In case you missed it, prices on 3D printers have hit an all time low. The hardware is largely standardized and the software is almost exclusively open source, so it makes sense that eventually somebody was going to start knocking these things out cheap. There are now many 3D printers available for less than $300 USD, and a few are even dipping under the $200 mark. Realistically, this is about as cheap as these machines are ever going to get.
A startup by the name of 3D Cultures has recently started capitalizing on the availability of these inexpensive high-precision three dimensional motion platforms by co-opting an existing consumer 3D printer to deliver their Tissue Scribe bioprinter. Some may call this cheating, but we see it for what it really is: a huge savings in cost and R&D time. Why design your own kinematics when somebody else has already done it for you?
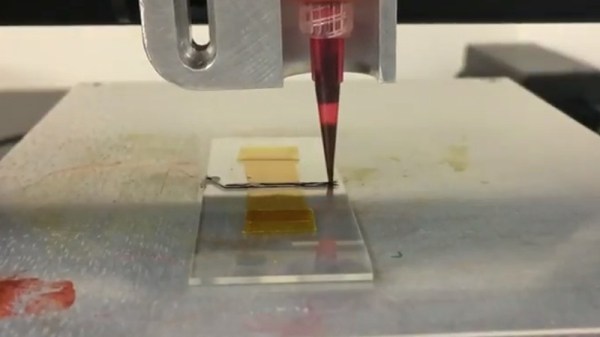
Despite the C-3PO level of disguise that 3D Cultures attempted by putting stickers over the original logo, the donor machine for the Tissue Scribe is very obviously a Monoprice Select Mini, the undisputed king of beginner printers. The big change of course comes from the removal of the extruder and hotend, which has been replaced with an apparatus that can heat and depress a standard syringe.
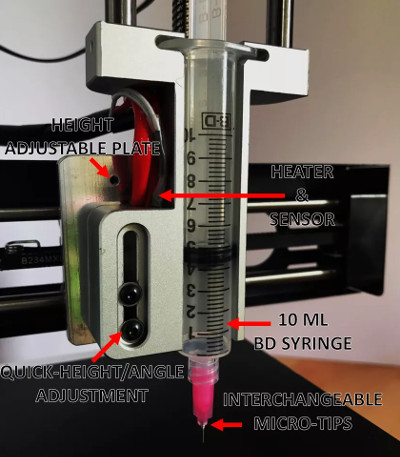
At the very basic level, bioprinting is performed in the exact same way as normal 3D printing; it’s merely a difference in materials. While 3D printing uses molten plastic, bioprinting is done with organic materials like algae or collagen. In the Tissue Scribe, the traditional 3D printer hotend has been replaced with a syringe full of the organic material to be printed which is slowly pushed down by a NEMA 17 stepper motor and 8mm leadscrew.
The hotend heating element and thermistor that once were used to melt plastic are still here, but now handle warming the metal frame used to hold the syringe. In theory these changes would have only required some tweaks to the firmware calibration to get working. Frankly, it makes perfect sense, and is certainly a much easier to pull off than some of the earlier attempts at homebrew biological printers we’ve seen.
We won’t comment on the Tissue Scribe’s price point of $999 USD except to say that in the field of bioprinters, that’s pocket change. Still, it seems inevitable that somebody will build and document their own bolt-on biological extruder now that 3D Cultures has shown how simple it really is, so they may find themselves undercut in the near future.
If all this talk of hot extruded collagen has got you interested, we’ve seen some excellent resources on the emerging field of bioprinting that will probably be right up your alley.
Continue reading “Cheap 3D Printers Make Cheaper(er) Bioprinters”