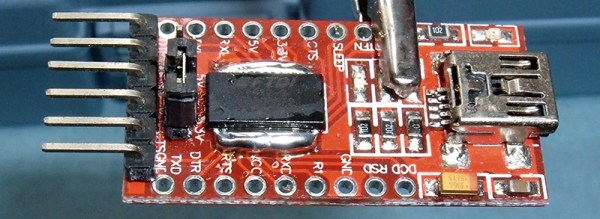
MP3 Player And Handheld GPS Is An Odd Combo Work Of Art

We think [Brek Martin] set out to build a handheld GPS and ended up adding an mp3 Player to it. Regardless, it’s beautifully constructed. Hand built circuit boards and even a custom antenna adorn this impressive build.

The core of the build is a 16 bit microcontroller a dsPIC33FJ128GP802 from Microchip. It’s a humble chip to be doing so much. It uses a UBlox NEO-6M positioning module for the location and a custom built QFH antenna built after calculations done with an online calculator for the GPS half. The audio half is based around a VLSI VS1003b decoder chip.

The whole build is done with protoboard. Where the built in traces didn’t suffice enamel and wire wrap wire were carefully routed and soldered in place. There’s a 48pin LQFP package chip soldered dead bug style that’s impressive to behold.  You can see some good pictures in this small gallery below.

Continue reading “MP3 Player And Handheld GPS Is An Odd Combo Work Of Art”

Perceptrons In C++

Last time, I talked about a simple kind of neural net called a perceptron that you can cause to learn simple functions. For the purposes of experimenting, I coded a simple example using Excel. That’s handy for changing things on the fly, but not so handy for putting the code in a microcontroller. This time, I’ll show you how the code looks in C++ and also tell you more about what you can do when faced with a more complex problem.

Continue reading “Perceptrons In C++”

Helicopter Pendulum Is PID-licious

If you’ve ever tried to tune a PID system, you have probably encountered equal parts overwhelming math and black magic folk wisdom. Or maybe you just let the autotune take over. If you really want to get some good intuition for motion control algorithms, PID included, nothing beats a little hands-on experimentation.

To get you started, [Clovis] wrote in with his budget propeller-based PID demo platform (Portuguese, translated shockingly well here).

The basic setup is a potentiometer glued to a barbecue skewer with a mini-quadcopter motor and rotor on the end of it. A microcontroller reads the voltage and PWMs the propeller through a MOSFET. The goal is to have the pendulum hover stably in midair, controlled by whatever algorithms you can dream up on the controller. [Clovis]’ video demonstrates on-off and PID control of the fan. Adding a few more potentiometers (one for P, I, and D?) would make hands-on tweaking even more interactive.

In all, it’s a system that will only set you back a few bucks, but can teach you more than you’d learn in a month in college. Chances are good that you’re not going to have exactly the same brand of sardine can on hand that he did, but some improvisation is called for here.

If you don’t know why you’d like to master open-loop closed-loop control algorithms, here’s one of the best advertisements that we’ve seen in a long time. But you don’t have to start out with hand-wound hundred-dollar motors, or precisely machined bits. As [Clovis] demonstrates, you can make do with a busted quadcopter and whatever you find in your kitchen.

Continue reading “Helicopter Pendulum Is PID-licious”

Crossing Wheatstone Bridges

The Wheatstone bridge is a way of measuring resistance with great accuracy and despite having been invented over 150 years ago, it still finds plenty of use today. Even searching for it on Hackaday brings up its use in a number of hacks. It’s a fundamental experimental device, and you should know about it.

Continue reading “Crossing Wheatstone Bridges”

Fail Of The Week: Upcycling Failed 3D Prints

Is it possible to recycle failed 3D prints? As it turns out, it is — as long as your definition of “recycle” is somewhat flexible. After all, the world only needs so many coasters.

To be fair, [Devin]’s experiment is more about the upcycling side of the recycling equation, but it was certainly worth undertaking. 3D printing has hardly been reduced to practice, and anyone who spends any time printing knows that it’s easy to mess up. [Devin]’s process starts when the colorful contents of a bin full of failed prints are crushed with a hammer. Spread out onto a properly prepared (and never to be used again for cookies) baking sheet and cooked in the oven at low heat, the plastic chunks slowly melt into a thin, even sheet.

[Devin]’s goal was to cast them into a usable object, so he tried to make a bowl. He tried reheating discs of the material using an inverted metal bowl as a form but he found that the plastic didn’t soften evenly, resulting in Dali-esque bowls with thin spots and holes. He then flipped the bowl and tried to let the material sag into the form; that worked a little better but it still wasn’t the win he was looking for.

In the end, all [Devin] really ended up with is some objets d’art and a couple of leaky bowls. What else could he have done with the plastic? Would he have been better off vacuum forming the bowls or perhaps even pressure forming them? Or does the upcycling make no sense when you can theoretically make your own filament? Let us know in the comments how you would improve this process.

Continue reading “Fail Of The Week: Upcycling Failed 3D Prints”

NASA Puts Its 3D Models Up On GitHub

NASA has a bunch of its 3D models up on GitHub, and if you didn’t know about it before, you do now. It’s a ridiculously large download, at over one and a half jiggabytes, but it’s full of textures and high-resolution models of spacecraft, landing sites, and other random NASA ephemera.

Continue reading “NASA Puts Its 3D Models Up On GitHub”

Hollow State Receiver

[Netzener] received a Radio Shack P-Box one tube receiver as a gift. However, at the time, his construction skills were not up to the task and he never completed the project. Years later, he did complete a version of it with a few modern parts substitutions. The radio worked, but he was disappointed in its performance. Turns out, the original Radio Shack kit didn’t work so well, either. So [Netzener] did a redesign using some some old books from the 1920’s. The resulting radio — using parts you can easily buy today — works much better than the original design.

The most expensive part of the build was a 22.5 V battery, which cost about $25. However, you can get away with using three 9 V batteries in series if you want to save some money. The battery provides the plate voltage for the 1T4 vacuum tube. A more conventional AA battery drives the tube’s filament. The original Radio Shack design relied on a variable inductor for tuning. These are difficult to find now, so [Netzener] uses a more conventional adjustable coil and a common tuning capacitor.

As an extra touch, [Netzener] painted the perf board to look as much like the original Radio Shack kit as possible. You can see from the pictures, it came out looking very good. If this isn’t challenging enough for you, maybe you want to roll your own tube. Or maybe you should just settle for the socket.

Continue reading “Hollow State Receiver”