Brazing Aluminum

Where do you stand on one of the eternal questions of metalwork: brazing, or welding? As your Hackaday writer, and the daughter of a blacksmith, it’s very much on the welding side here. Brazed joints can come apart too easily, which is why in the territory this is being written in at least, they are not permitted for the yearly vehicle roadworthiness test. If you’ve ever had to remove a brazed-on patch with an angle grinder, you’ll know which one you’d trust in a crisis.

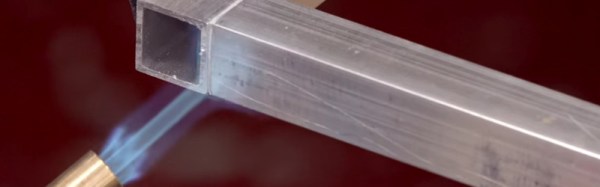
What if the metal in question is aluminum? [George Graves] sends us a link to a forum discussion on the subject from a few years ago, and to a YouTube video which we’ve embedded below the break. Miracle brazing rods claim astounding toughness, but the world divides into those who favour TIG’s strength versus those who point to brazing’s penetration far between the surfaces of the metal to be joined. Having experimented with them a while back, we’ll admit that it’s true that aluminum brazing rods join broken parts impressively well. But yet again you won’t see this Hackaday writer riding a bike that wasn’t welded with the trusty TIG torch.

Take a look at the video, and see what you think. Even if it’s not a joint you’d stake your life on it’s still a technique that’s a useful addition to your workshop arsenal.

Continue reading “Brazing Aluminum”

Laser Pointer Clock Makes Timekeeping A Drawn-Out Affair

Designing a unique clock to flex your technical skills can be a rewarding experience and result in an admirable showpiece for your home. [Andres Robam] saw an opportunity to make a laser-pointer clock that draws the current time onto a glow-in-the-dark sticker.

A pair of stepper motors tilt and pan the laser’s mount — designed in SolidWorks and 3D printed. There was an issue with the motor’s shaft having some slack in it — enough to affect the accuracy of the laser. [Andres] cleverly solved the issue by using a pen’s spring to generate enough tension in the system, correcting it. A NODEmcu v2 is the brains of the clock — chosen because of its built-in WiFi capacity and compatibility with the Arduino IDE — and a 5mW laser sketches the time onto the sticker.

Continue reading “Laser Pointer Clock Makes Timekeeping A Drawn-Out Affair”

New Part Day: Pynq Zynq

FPGAs are the future, and there’s a chip out there that brings us the future today. I speak, of course, of the Xilinx Zynq, a combination of a high-power ARM A9 processor and a very capable FPGA. Now the Zynq has been made Pynq with a new dev board from Digilent.

The heart of this board, is, of course, the Xilinx Zynq packing a Dual-core ARM Cortex A9 processor and an FPGA with 1.3 Million reconfigurable gates. This is a dev board, though, and with that comes memory and peripherals. To the board, Digilent added 512MB of DDR3 RAM, a microSD slot, HDMI in and out, Ethernet, USB host, and GPIOs, some of which match the standard Arduino configuration.

This isn’t the first Zynq board out there by any measure. Last year, [antti] had a lot of fun with the Zynq and created the ZynqBerry, a Zynq in a Raspberry Pi form factor, and a Zynq Arduino shield. Barring that, we’ve seen the Zynq in a few research projects, but not so much in a basic dev board. The Pynq Zynq is among the first that will be produced in massive quantities.

There is, of course, one downside to the Pynq Zynq, and that is the price. It’s $229 USD, or $65 with an educational discount. That’s actually not that bad for what you’re getting. FPGAs will always be more expensive than an SoC stolen from a router or cell phone, no matter how powerful it is. That said, putting a powerful ARM processor and a hefty FPGA in a single package is an interesting proposition. Adding HDMI in and out even more so. Already we’ve seen a few interesting applications of the Zynq like synthesizers, quadcopters, and all of British radio. With this new board, hopefully a few enterprising FPGA gurus will pick one up and tell the rest of us mere mortals how to do some really cool stuff.

Retrotechtacular: FAX As A Service In 1984

If you tell someone these days to send you something via FAX, you are likely to get a look similar to the one you’d get if you asked them to park your horse. But in 1984, FAX was a mysterious new technology (well, actually, it wasn’t, but it wasn’t yet common to most people).

fed-ex_zapFedEx–the people who got famous delivering packages overnight–made a bold move to seize a new market: Zapmail (not to be confused with the modern mass mailing service). The idea was simple (you can see a commercial for it in grainy VHS splendor below): Overnight is great, but sometimes you need something sent across the country now. A FedEx driver picks up your documents, carries them to a FedEx office. There the documents FAX to another FedEx office where another driver delivers the printed copy. The process took two hours to get a paper document from one side of the continent to another.

Continue reading “Retrotechtacular: FAX As A Service In 1984”

Add Data To Your Shipping Suspicions With This Power-Sipping Datalogger

One only has to ship one or two things via a container, receiving them strangely damaged on the other end, before you start to wonder about your shipper. Did they open this box and sort of stomp around a bit? Did I perhaps accidentally contract a submarine instead of a boat? Did they take a detour past the sun? How could this possibly have melted?

[Jesus Echavarria]‘s friend had similar fears and suspicions about a box he is going to have shipped from Spain to China. So [Jesus] got to work and built this nice datalogger to discover the truth. Since the logger might have to go for a couple of months, it’s an exercise in low power design.

The core of the build is a humble PIC18. Its job is to take the information from an ambient light, temperature, and humidity sensor suite and dump it all to an SD card. Aside from the RTC, this is all powered from a generic LiPo power cell. The first iteration can run for 10 days on one charge, and that’s without any of the low power features of the microcontroller enabled. It should be able to go for much longer once it can put itself to sleep for a period.

It’s all housed in a 3D printed case with some magnets to stick it to shell of the shipping container. Considering the surprisingly astronomical price of commercial dataloggers, it’s a nice build!

The Fastest Path To SuperCon Badge Firmware Hacking

Hackaday SuperConference begins tomorrow and every ticketed attendee will get their hands on this sexy piece of hardware which is the conference badge. Yes, it looks fantastic hanging around your neck, you can play a wicked game of Tetris on it, and it runs a crypto challenge. But badge hacking is a thing and this post is the most concise information you’ll find on hacking on the firmware. Whether this is your first time blinking an LED, or you cut your teeth on PIC assembly, you can make this badge do your bidding with minimal effort.
Continue reading “The Fastest Path To SuperCon Badge Firmware Hacking”

Tools Of The Trade — Injection Molding

Having finished the Tools of the Trade series on circuit board assembly, let’s look at some of the common methods for doing enclosures. First, and possibly the most common, is injection molding. This is the process of taking hot plastic, squirting it through a small hole and into a cavity, letting it cool, and then removing the hardened plastic formed in the shape of the cavity.

The machine itself has three major parts; the hopper, the screw, and the mold. The hopper is where the plastic pellets are dumped in. These pellets are tiny flecks of plastic, and if the product is to be colored there will be colorant pellets added at some ratio. The hopper will also usually have a dehumidifier attached to it to remove as much water from the pellets as possible. Water screws up the process because it vaporizes and creates little air bubbles.

Next the plastic flecks go into one end of the screw. The screw’s job is to turn slowly, forcing the plastic into ever smaller channels as it goes through a heating element, mixing the melted plastic with the colorant and getting consistent coloring, temperature, and ever increasing pressure. By the time the plastic is coming out the other end of the screw, and with the assistance of a hydraulic jack, it can be at hundreds of tons of pressure.

Finally, the plastic enters the mold, where it flows through channels into the empty cavity, and allowed to sit briefly to cool.  The mold then separates and ejector pins push the part out of the cavity.

Continue reading “Tools Of The Trade — Injection Molding”