MIDI Guitar Pedals

Ever since Jimi Hendrix brought guitar distortion to the forefront of rock and roll, pedals to control the distortion have been a standard piece of equipment for almost every guitarist. Now, there are individual analog pedals for each effect or even digital pedals that have banks of effects programmed in. Distortion is just one of many effects, and if you’ve built your own set of pedals for each of these, you might end up with something like [Brian]: a modular guitar pedal rack.

ae0fmjx
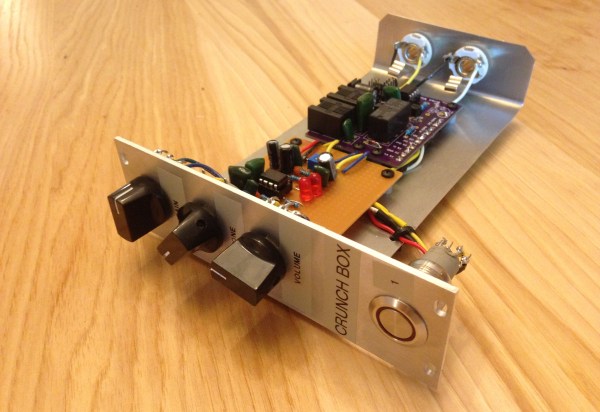
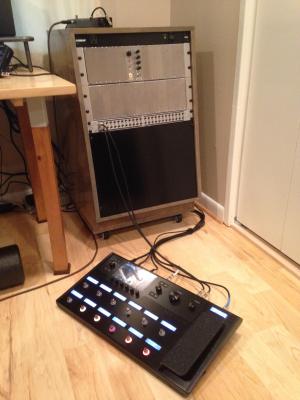
Taking inspiration from modular synthesizers, [Brian] built a rack out of wood to house the pedal modules. The rack uses 16U rack rails as a standard, with 3U Eurorack brackets. It looks like there’s space for 16 custom-built effects pedals to fit into the rack, and [Brian] can switch them out at will with a foot switch. Everything is tied together with MIDI and is programmed in Helix. The end result looks very polished, and helped [Brian] eliminate his rat’s nest of cables that was lying around before he built his effects rack.

MIDI is an extremely useful protocol for musicians and, despite being around since the ’80s, doesn’t show any signs of slowing down. If you want to get into it yourself, there are all kinds of ways that you can explore the studio space, even if you play an instrument that doesn’t typically use MIDI.

Bringing USB Devices To The Apple Desktop Bus

During the development of the greatest member of the Apple II family, the Apple IIgs, someone suggested to [Woz] that a sort of universal serial bus was needed for keyboards, mice, trackballs, and other desktop peripherals. [Woz] disappeared for a time and came back with something wonderful: a protocol that could be daisy-chained from keyboard to a graphics tablet to a mouse. This protocol was easily implemented on a cheap microcontroller, provided 500mA to the entire bus, and was used for everything from license dongles to modems.

The Apple Desktop Bus, or ADB, was a decade ahead of its time, and was a mainstay of the Mac platform until Apple had the courage to kill it off with the iMac. At that time, an industry popped up overnight for ADB to USB converters. Even today, there’s a few mechanical keyboard aficionados installing Teensies in their favorite input devices to give them a USB port.

While plugging an old Apple keyboard into a modern computer is a noble pursuit — this post was written on an Apple M0116 keyboard with salmon Alps switches — sometimes you want to go the other way. Wouldn’t it be cool to use a modern USB mouse and keyboard with an old Mac? That’s what [anthon] thought, so he developed the ADB Busboy.

Continue reading “Bringing USB Devices To The Apple Desktop Bus”

Scrap Bin Mods Move Science Forward

A first-time visitor to any bio or chem lab will have many wonders to behold, but few as captivating as the magnetic stirrer. A motor turns a magnet which in turn spins a Teflon-coated stir bar inside the beaker that sits on top. It’s brilliantly simple and so incredibly useful that it leaves one wondering why they’re not included as standard equipment in every kitchen range.

But as ubiquitous as magnetic stirrers are in the lab, they generally come in largish packages. [BantamBasher135] needed a much smaller stir plate to fit inside a spectrophotometer. With zero budget, he retrofitted the instrument with an e-waste, Arduino-controlled magnetic stirrer.

The footprint available for the modification was exceedingly small — a 1 cm square cuvette with a flea-sized micro stir bar. His first stab at the micro-stirrer used a tiny 5-volt laptop fan with the blades cut off and a magnet glued to the hub, but that proved problematic. Later improvements included beefing up the voltage feeding the fan and coming up with a non-standard PWM scheme to turn the motor slow enough to prevent decoupling the stir bar from the magnets.

[BantamBasher135] admits that it’s an ugly solution, but one does what one can to get the science done. While this is a bit specialized, we’ve featured plenty of DIY lab instruments here before. You can make your own peristaltic pump or even a spectrophotometer — with or without the stirrer.

Continue reading “Scrap Bin Mods Move Science Forward”

Portable Classroom Upgrade: Smaller, Cheaper, Faster

[Eric] at MkMe Lab has a dream: to build a cheap, portable system that provides the electronic infrastructure needed to educate kids anywhere in the world. He’s been working on the system for quite a while, and has recently managed to shrink the suitcase-sized system down to a cheaper, smaller form-factor.

The last time we discussed [Eric]’s EduCase project was as part of his Hackaday Prize 2016 entry. There was a lot of skepticism from our readers on the goals of the project, but whatever you think of [Eric]’s motivation, the fact remains that the build is pretty cool. The previous version of the EduCase relied on a Ku-band downlink to receive content from Outernet, and as such needed to stuff a large antenna into the box. That dictated a case in the carry-on luggage size range. The current EduCase is a much slimmed-down affair that relies on an L-band link from the Inmarsat satellites, with a much smaller patch antenna. A low-noise amp and SDR receiver complete the downlink, and a Raspberry Pi provides the UI. [Eric]’s build is just a prototype at this point, but we’re looking forward to seeing everything stuffed into that small Pelican case.

Yes, Outernet is curated content, and so it’s not at all the same experience as the web. But for the right use case, this little package might just do the job. And with a BOM that rings up at $100, the price is right for experimenting.

Continue reading “Portable Classroom Upgrade: Smaller, Cheaper, Faster”

Five-Watt SDR Transceiver For Hams

The availability of cheap SDR hardware created a flourishing ecosystem for SDR software, but a lot of the hardware driving the revolution was still “cheap”. In the last few years, we’ve seen quality gear replacing the TV dongles in many setups, and down-converters designed for them to allow them to work on the ham bands.

But something that’s purpose-built might be a better option if ham radio, particularly the shortwave portion thereof, is your goal. First off, you might want to transmit, which none of the TV dongles allow. Then, you might want a bit of power. Finally, if you’re serious about short-wave, you care more about the audio quality than you do immense bandwidth, so you’re going to want some good filters on the receiving end to help you pull the signal out of all the noise.

rs-hfiq_block_diagram_featuredThe RS-HFIQ 5 W SDR transceiver might be for you. It’s up on Kickstarter right now, and it’s worth looking at if you want a fully open source (schematics, firmware, and software) shortwave SDR rig. It’s also compatible with various open frontends.

The single-board radio isn’t really a full SDR in our mind — it demodulates the radio signal and sends a 96 kHz IQ signal across to your computer’s soundcard where it gets sampled and fully decoded. The advantage of this is that purpose-built audio rate DACs have comparatively high resolution for the money, but the disadvantage is that you’re limited to 96 kHz of spectrum into the computer. That’s great for voice and code transmissions, but won’t cut it for high-bandwidth data or frequency hopping applications. But that’s a reasonable design tradeoff for a shortwave.

Still, an SDR like this is a far cry from how simple a shortwave radio can be. But if you’re looking to build up your own SDR-based shortwave setup, and you’d like to hack on the controls more than on the radio itself, this looks like a good start.

Make Your Eyes Louder With Bluetooth Speaker Goggles

Your eyes are cool, but they aren’t very loud. You can remedy that with this build from [Sam Freeman]: a pair of Bluetooth speaker goggles. Combine a pair of old welders goggles with a Bluetooth receiver, a small amp and a couple of cheap speaker drivers and you’re well on your way to securing your own jet set radio future.

[Sam] found a set of speaker drivers that were the same size as the lenses of the goggles, as if they were designed for each other. They don’t do much for your vision, but they definitely look cool. [Sam] found that he could run the speakers for an hour or so from a small Lithium Ion battery that’s hidden inside the goggles, along with a large lever switch for that throwback electronics feel. The total cost of this build is a reasonably-low at $40, or less if you use bits from your junk pile.

The real trick is watching them in action and deciding if there’s any motion happening. Don’t get us wrong, they look spectacular but don’t have the visual feedback component of, say, the bass cannon. Look for yourself in the clip below. We might add a pair of googly eyes on the speakers that dance as they move, but that would get away from the more serious Robopunk look that [Sam] is going for. What would you add to build up the aesthetic of these already iconic goggles?

Continue reading “Make Your Eyes Louder With Bluetooth Speaker Goggles”

Jenkins And Slack Report Build Failure! Light The Beacons!

When you have a large software development team working on a project, monitoring the build server is an important part of the process. When a message comes in from your build servers, you need to take time away from what you’re doing to make sure the build’s not broken and, if it’s broken because of something you did, you have to stop what you’re doing, start fixing it and let people know that you’re on it.

[ridingintraffic]’s team uses Jenkins to automatically build their project and if there’s a problem, it sends a message to a Slack channel. This means the team needs to be monitoring the Slack channel, which can lead to some delays. [ridingintraffic] wanted immediate knowledge of a build problem, so with some software, IoT hardware, and a rotating hazard warning light, the team now gets a visible message that there’s a build problem.

An Adafruit Huzzah ESP8266 board is used as the controller, connected to some RF controlled power outlets via a 434MHz radio module. To prototype the system, [ridingintraffic] used an Arduino hooked up to one of the RF modules to sniff out the codes for turning the power outlets on and off from their remotes. With the codes in hand, work on the Huzzah board began.

An MQTT broker is used to let the Huzzah know when there’s been a build failure. If there is, the Huzzah turns the light beacon on via the power outlets. A bot running on the Slack channel listens for a message from one of the developers saying that problem is being worked on, and when it gets it, it sends the MQTT broker a message to turn the beacon off.

There’s also some separation between the internal network, the Huzzahs, and the Slack server on the internet, and [ridingintraffic] goes over the methods used to communicate between the layers in a more detailed blog post. Now, the developers in [ridingintraffic]’s office don’t need to be glued to the Slack channel, they will not miss the beacon when it signals to start panicking!