All The Games In One Cartridge

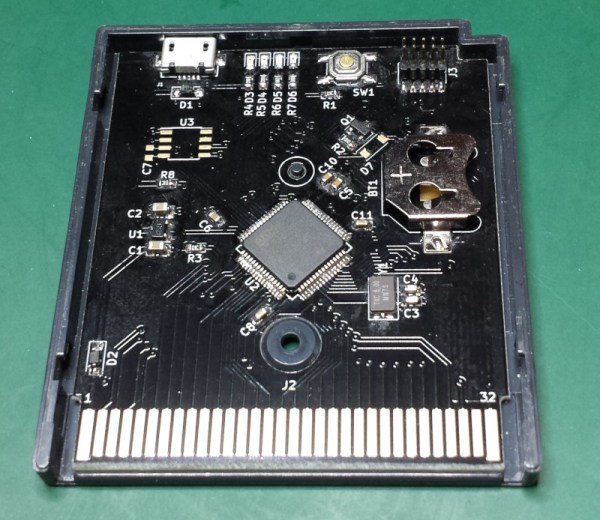
The original Game Boy was a smash success for Nintendo and has an amazing collection of games. You might relive some childhood nostalgia by booting up a Game Boy emulator, but to really get the full experience you’ll need the battery-draining green-tinted original hardware. Thanks to modern technology you can also load all of the games at one time on the original hardware with this STM32 cartridge that fits right in.

The device can load any Game Boy game (and homebrews) and ROMs can be sent to the cartridge via USB. There were are a lot of hurdles to getting this working properly, the largest of which is power management. A normal cartridge has a battery backup for save data, but using a small coin cell to run an STM32 would kill the battery quickly. To get around that, the cartridge writes the states to nonvolatile memory and then shuts itself off, although this has the side effect of crashing the Game Boy.

The creator of this project, [Emeryth], noted that we featured a similar project from [Dhole] a few years ago, also involving an STM32. [Emeryth] decided that it would be fun to build his own project anyway, and it’s certainly an interesting take on GameBoy hacking. He also has the files for this project available on his Git Hub page.

A Custom Raspberry Pi 4 Arcade Cabinet

Over the years we’ve covered quite a few Raspberry Pi based arcade cabinets, and admittedly many of them have been fairly similar. After all, there’s only so much variation you can make before it stops looking like a traditional arcade machine. But even still, we never tire of seeing a well executed build like the one [Dawid Zittrich] recently shared with us.

These days you can order a kit that has pre-cut panels to build your cabinet with, but looking for a completely custom build, [Dawid] decided to first model his design in SketchUp and then cut out the panels himself with a jigsaw. This obviously is quite a bit more work, and assumes you’ve got sufficient woodworking tools, but we think the final result looks great. Not to mention the fact that it’s going to be a lot stronger than something made out of MDF.

He also created the side artwork himself, taking the logos and names from his favorite arcade and Amiga games and putting them on a retro-looking gradient pattern.  The marquee on the top has an acrylic front and is illuminated from behind with strips of LEDs. It’s mounted on a hinge so that it can be lifted up and a new piece of art slid in without taking apart the whole cabinet. While it might be a little more labor intensive to switch out than some of the electronic marquees we’ve seen, we do like that you still have the ability to change the artwork on a whim.

With the cabinet itself completed, [Dawid] turned his attention to the electronics. Inside you’ve got the aforementioned Raspberry Pi 4 (with a Noctua fan to keep it cool), an external hard drive, a HDMI to VGA converter with scanline generator to drive the 4:3 ratio Eizo Flex Scan S2100 monitor, and a rather beefy amplifier hanging off the Pi’s 3.5 mm analog audio output. All of which is easily accessible via a maintenance hatch built into the cabinet so [Dawid] doesn’t need to tear everything down when he wants to tweak something.

If you’d like to have that arcade cabinet feel but don’t have the space and equipment to put something like this together, you could always stick a Raspberry Pi into an iCade and call it a day.

A Water Cooled Gaming PC You Can Take With You

Have you ever been stuck in a hotel room wishing you brought your VR-capable gaming PC along with you? Well [thegarbz] certainly has, which was the inspiration for this absolutely gorgeous mobile rig affectionately known as “The Nuclear Football” that brings console-level portability to those who count themselves among the PC Master Race.

OK, fine. We’ll admit that the existence of gaming laptops means you don’t actually need to carry around such an elaborate contraption just to play Steam games on the go. But if you’re going to do it, shouldn’t you do it in style? More practically speaking, [thegarbz] says the cost of this project was less than what a gaming laptop of similar specs would have cost.

The Nuclear Football features a Ryzen 5 2600 processor, a NVIDIA 2070 Super graphics card, and 16 GB of DDR4 RAM. The water cooling gear is from Alphacool, and includes a custom controller that links to the computer and allows [thegarbz] to monitor temperatures and fan speeds via a widget on the desktop.

While not nearly as mobile, this machine does remind us of the water cooled “Big O” that packed all the current-gen consoles and a gaming PC into one glorious machine.

Raspberry Pi 4 And The State Of Video Game Emulation

The modern ideal of pixel art is a fallacy. Videogame art crammed onto cartridges and floppy discs were beholden to the CRT display technology of their day. Transmitting analog video within the confines of dingy yellow-RCA-connector-blur, the images were really just a suggestion of on-screen shapes rather than clearly defined graphics. Even when using the superior RGB-video-over-SCART cables, most consumer grade CRT televisions never generated more than about 400 lines, so the exacting nature of digitized plots became a fuzzy raster when traced by an electron beam. It wasn’t until the late 90s when the confluence of high resolution PC monitors, file sharing, and open source emulation software that the masses saw pixels for the sharp square blocks of color that they are.

More importantly, emulation software is not restricted to any one type of display technology any more than the strata of device it runs on. The open-source nature of videogame emulators always seems to congregate around the Lowest Common Denominator of devices, giving the widest swath of gamers the chance to play. Now, that “L.C.D.” may very well be the Raspberry Pi 4. The single board computer’s mix of tinker-friendly IO at an astonishingly affordable entry price has made it a natural home for emulators, but at fifty bucks what options unlock within the emulation scene?

Continue reading “Raspberry Pi 4 And The State Of Video Game Emulation”

Node-RED Laser Shooting Gallery Goes Anywhere

When you think of a shooting gallery, you might envision a line of tin cans set up along a split-rail fence, or a few rows of ducks or bottles lined up at a carnival. But what do these have in common? You, standing in one spot, and shooting in the same general direction. You’re exposed! If those targets could shoot back, you’d be dead within seconds. Wouldn’t it be more fun if the targets were all around you in 360°? We think so, too.

So how could you possibly set up a shooting gallery this way? [Another Maker] already solved that problem for you with ESP32s and Node-RED (YouTube). Each target has an ESP32, a laser sensor, and an LED that lights up when the target is ready, and turns off once it’s been hit. They all make an enticing ‘shoot me’ sound that goes with their graphics, and a second mp3 plays upon direct hit.

The PVC gun houses an ESP8266, a laser module at the end of the barrel, and runs on a cylindrical USB battery slipped down in the secondary grip. [Another Maker] can spread the targets out far and wide, as long as they all stay in range of the localized WiFi access point.

The best part is that the Node-RED system is target-agnostic — it doesn’t care how many you have or how they’re made, and it can juggle up to 250 of them. Because of the way the target objects are programmed, it would be quite easy to add actuators that make them drop down or fall backward when hit. You could also implement [Another Maker]’s fantastic suggestion of hitting arcade buttons with NERF darts instead. Charge those lasers and fire at the break button to see the demo and walk-through video.

If you plan to knock the targets down or over in your implementation, you’ll want an easy way to reset them. Here’s a scrap-built shooting gallery that uses a windshield wiper motor to set ’em back up.

3DBuzz Closes With A Final Gift

If you wanted to learn about creating modern computer games, 3DBuzz had some of the best tutorials around. In fact, some of the tutorials about C#, C++, Android, and math would be useful for anyone, while the ones about game art and modeling in Maya are probably mostly for game developers. While these were once available only by subscription, the company — now defunct — has left them available for download via this BitTorrent file.

We don’t know enough about things like Blender and Maya to evaluate the material, but it is well regarded and the ones we do know something about seem very high quality. There are, for example, many videos about C++ and C# that are very professional and cover quite a few topics.

Continue reading “3DBuzz Closes With A Final Gift”

3D Printable Stick Shift For Your Racing Simulator

If you don’t get enough driving in your real life, you can top it off with some virtual driving and even build yourself a cockpit. To this end [Noctiluxx] created a very nice 3D printable stick shifter you can build yourself.

The design is adapted for 3D printing from an older aluminium version by [Willynovi] over on the X-Simulator forums. Every version uses an off-the-shelf ball joint for the main pivot, below which is a guide plate with the desired shift pattern.  Each position has a microswitch, which can be connected to a USB encoder from eBay which acts as a HID. The position is held in the Y-axis position by a clever spring-loaded cam mechanism above the ball joint, while the X-position is held by the bottom guide plate. The gear knob can be either 3D printed or the real deal of your choice.

This design is the perfect example of the power of the internet and open source. The original aluminium design is almost a decade old, but has been built and modified by a number of people over the years to get us to the easy to build version we see today. [amstudio] created an excellent video tutorial  on how to built your own, see it after the break.

For more awesome cockpits check out this one to fly an actual (FPV) aircraft, and this dazzling array of 3D printable components for your own Garmin G1000 avionics glass cockpit. Continue reading “3D Printable Stick Shift For Your Racing Simulator”