Four Years Later, Off-Grid Office Shed Still Rocks

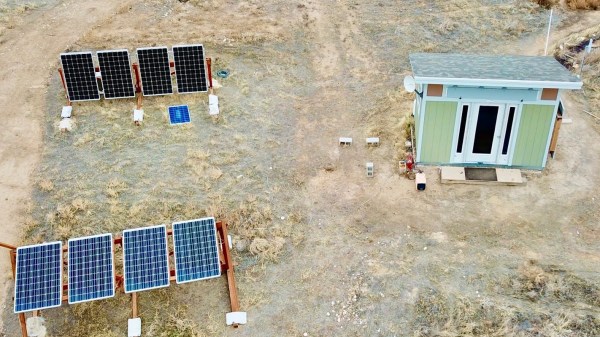
About four years ago, [Russell Graves] created what was, to him, the ultimate work-from-home environment: an off-grid office shed. The shed might look a bit small, but it’s a considerably larger workspace than most people in an office are granted. Four years later, in the middle of a global pandemic, working from home has become much more common and [Russel] shares some thoughts on working from home and specifically reflects on how his off-grid, solar powered shed office (or “shoffice” as he likes to call it) has worked out. In short, after four years, it rocks hard and is everything he wanted and more.

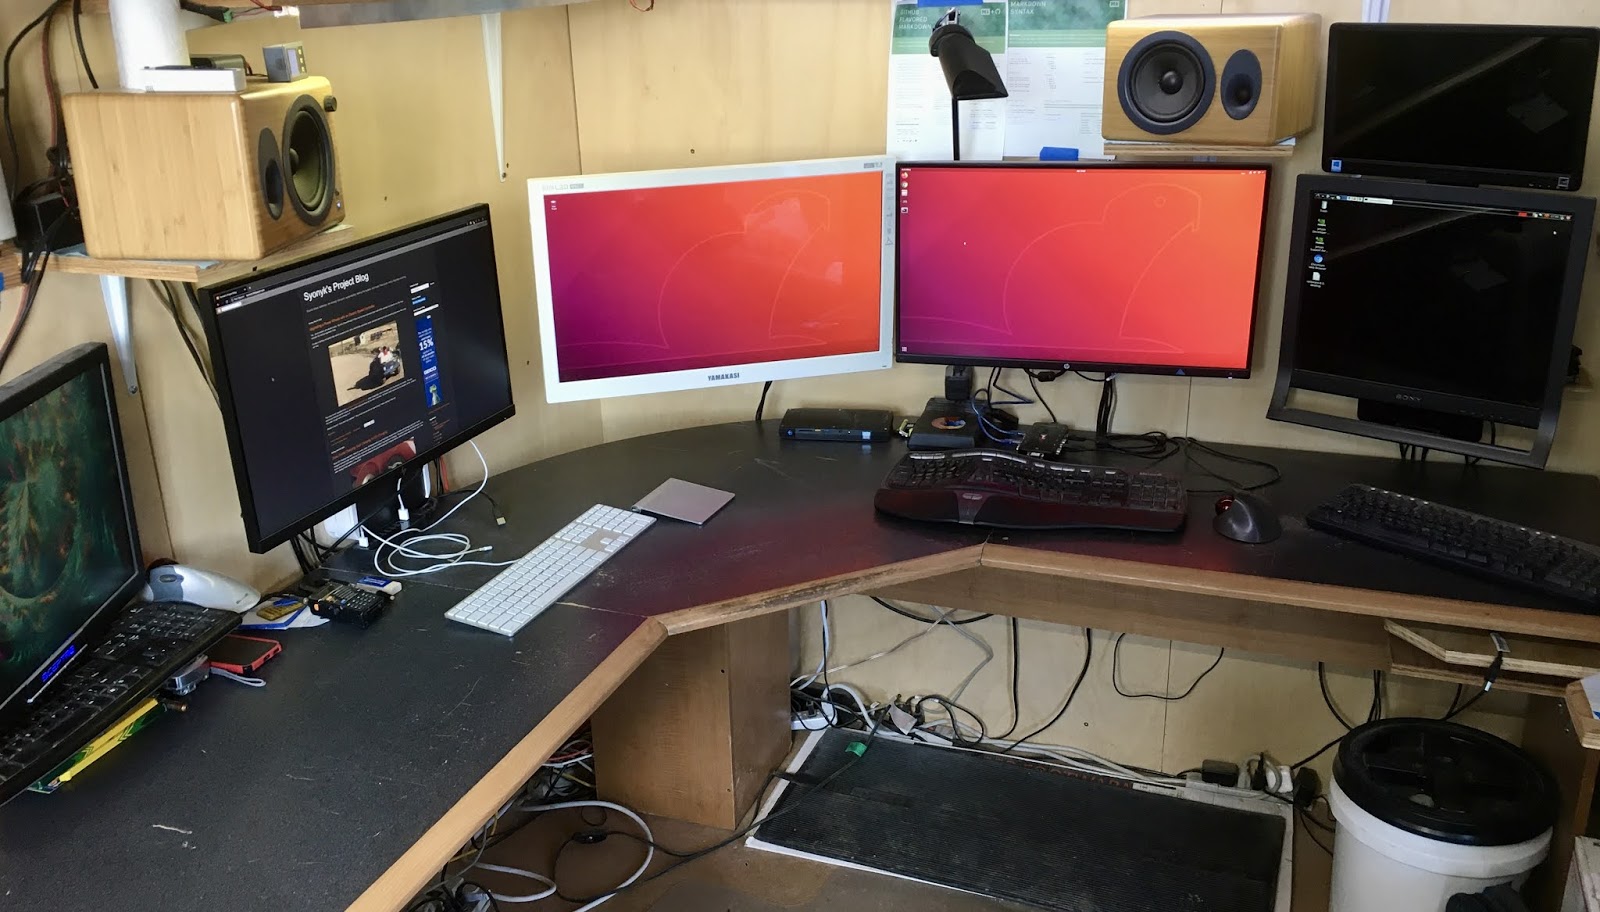
Its well-insulated plywood walls let him mount monitor arms and just about anything else anywhere he wants, and the solar power system allows him to work all day (and into the night if he wants, which he doesn’t) except for a few spells in the winter where sunlight is just too scarce and a generator picks up the slack. Most importantly, it provides a solid work-life separation — something [Russell] is convinced is critical to basic wellness as a human being.

That’s not to say an off-grid solar shed is the perfect solution for everyone. Not everyone can work from home, but for those who can and who identify with at least some of the motivations [Russell] expressed when we covered how he originally created his office shed, he encourages giving it some serious thought.

The only thing he doesn’t categorically recommend is the off-grid, solar powered part. To be clear, [Russell] is perfectly happy with his setup and even delights in being off-grid, but admits that unless one has a particular interest in solar power, it makes more sense to simply plug a shed office into the grid like any other structure. Solar power might seem like a magic bullet, but four years of experience has taught him that it really does require a lot of work and maintenance. Determined to go solar? Maybe give the solar intensity sensor a look, and find out just how well your location is suited to solar before taking the plunge.

Mixing Up Your Own Supersized Sidewalk Chalk

When folks started quarantining, chalk art spilled onto driveways and sidewalks to remind us that there’s still beauty and creative people doing what they always do. Now it’s time to strut your stuff and show your neighbors that things are greener on your slab of concrete. [friedpotatoes] has shared their giant sidewalk recipe with the world so you can paint the town red. With chalk.

Name brand sidewalk chalk is expensive considering how easy it is to make. What Big Chalk doesn’t want you to know is that the ingredients are just water, plaster of Paris, and tempera paint; meaning this project should be safe enough for the junior hackers to get some hands-on time. Some folks use food coloring instead of paint, but we know what happens to clothing when kids get their mitts on food coloring. [friedpotatoes] also includes extensive repurposing of recyclables, which is commendable.

The instructions suggest filling potato chip (crisp) tubes through a milk jug funnel to make giant pieces, but you can use any mold you like. If you have a CNC machine, it should be no trouble to make stamp-like pieces of chalk for tagging on the go, or shapes like arrows when you have to direct a miniature parade.

For permanent and precise sidewalk decorations, you can check out a graffiti paint machine and for totally temporary messages there is a water-dispensing writer.

Encouragement Machine Battles Your Inner Bully

We would be preaching to the choir if we told you that fear is the action killer when it comes to the challenge of new projects in uncharted territory. Everyone who reads Hackaday knows that it takes mettle to forge through the self-doubt as we push ourselves to new engineering heights.

[JBV Creative] hears the voice, too: the one that says you can’t build that thing, it’s too difficult/useless. He knows that both creativity and anti-creativity stem from the same source — the powerful human mind that dreams up these projects in the first place.

The Encouragement Machine combines the two in a piece that engineers art from garbage, aka negative thoughts. It works by first acknowledging the most basal of discouraging thoughts — an important step of the process — and then it simply trims away the negativity.

This machine uses a stepper motor to feed receipt paper underneath a custom stamp that says YOU CAN’T DO IT. Then it passes the paper through a pair of servo-driven scissors that snip off the apostrophe-t.

Ironically or not, [JBV Creative] ran into a few issues with this build, but managed to muster up enough moxie to work through the problems without encouraging slips of paper. We have to wonder how much more smoothly the next project will go given all the positivity he now has on-demand.

[JBV] doesn’t delve into the electronics much, but it looks like an Arduino and a motor driver to us. We totally dig the design — it looks like an electrical substation or rocket launch pad that happens to have a Ferris wheel. Step right up and check out the build video after the break.

Generic encouragement is great all-purpose attitude adjuster, but what if you want more specific sentiments? Here’s an affirmation mirror that will help you believe whatever you program into the scrolling display.

Continue reading “Encouragement Machine Battles Your Inner Bully”

Helmet Decal Charger Keeps Them Ready To Glow

When firefighters are battling a blaze, it’s difficult for them to find each other in the smoky darkness. To help stand out they wear glow-in-the-dark decals on their helmets, but since they spend so much of their down time stowed away in a dark locker, they don’t always have a chance to charge up.

[Bin Sun]’s firefighter friend inspired them to build a portable charging system that can stuff those helmet decals full of photons in a matter of minutes. Although phosphorescent materials will charge in any light, they charge the fastest with ultraviolet light. This uses a pair of UV LED strips controlled by an off-the-shelf programmable timer, and powered with an 18-volt drill battery stepped down to 12 V. The timer makes it easy for [Bin Sun]’s friend to schedule charge times around their shifts, so the battery lasts as long as possible while keeping the decals ready to glow.

We love that [Bin Sun] seems to have thought of everything. The light strips are nestled into 3D-printed holders that also house small magnets. This makes it easy to position the lights on either side of the locker so both the front and back decals soak up the light.

Phosphorescent materials are great as a reusable display medium, especially when they’re designed to look like Nixie tubes.

Tired Of Regular Keebs? Might Be Time To Split

No matter how much geek cred your old vintage keyboard pulls, it’s not worth suffering through wrist pain or any other discomfort while using it. Especially now, when there are so many points of entry into the rabbit hole world of DIY mechanical keebs.

Once the wrist pain started, [Ben Congdon] switched from a big old Apple keeb to a Kinesis Freestyle — it’s basically a regular keyboard, but in two halves that can be placed far enough apart that [Ben]’s wrists are straight while typing. Comfortable as that split rectangle may be, it’s just not that cool looking, and he was ready to build something new, as long as it had enough keys.

[Ben] settled on building a Keebio Sinc, a new board which comes mostly soldered already and supports a handful of layouts. In the spirit of leaving doors open, [Ben] soldered in hot-swap sockets instead of permanently attaching the key switches to the PCB. This way, those Gateron reds can be easily switched out for something else, for instance should [Ben] want to try a little tactility down the road.

We think the Sinc is a cool offering precisely because it is such a full keyboard. Not everyone is ready to jump into 60% layouts or thumb clusters, and it’s nice to have options. This is entry-level ergo and DIY all at once. What’s not to like? Even if you want to go for something small and ortholinear, there are options. Here’s a build we saw recently that starts with a breakaway PCB that lets you choose between small and smaller.

Via reddit

Panic Button Is An Audio-Visual Parachute Out Of Zoom Calls

Everyone has been learning how to stream this year whether they want to or not. This has given rise to the embarrassment paradox, which states that the more urgently you need to kill your camera and microphone feeds in a videoconference call, the more difficult and time-consuming it will be. Zoom in particular will toggle the mic and camera with keyboard shortcuts, but when your toddler waddles into the room swinging a used diaper around in the air, keyboard shortcuts will seem woefully under-powered.

What you need is a single sturdy button that sends both of these toggle commands as quickly as possible. [Simon Prickett]’s panic switch does exactly that. It’s a delightfully tactile arcade button connected to a Trinket M0, which can emulate a keyboard quite easily as an Arduino or CircuitPython device.

This little keyboard doesn’t send these macros directly, because that would be way too risky. What if you were reading Hackaday instead of staring into the tiled faces of your coworkers? Then it wouldn’t work, because Zoom is out of focus.

Instead, it sends an obscure four-key macro to the computer that triggers an AppleScript. [Simon]’s AppleScript checks to see if Zoom is running. If not, it has the system announce the fact. If it is running, then the script sends cmd+shift+a and cmd+shift+v to Zoom directly to toggle the audio and video. Check out the demo after the break.

As you might expect, we’ve seen a couple of videoconference survival hacks over the past few months. Need to show something or work with your hands, but only have one camera? All you need is a mirror, a clothespin, and a length of wire for a simple split-screen setup.

Continue reading “Panic Button Is An Audio-Visual Parachute Out Of Zoom Calls”

Quickly Mute And Unmute Yourself Using The Physical Mute Button

With many conferences moving to fully virtual this year, video conferencing will continue to be a mainstay in our lives for the foreseeable future. [Elliot] wanted to spice up his video conferencing experience just a bit and make his experience a bit more ergonomic. We’ve all had the problem of looking for our Zoom window buried behind any number of other applications, desperately searching for the mute button. Furthermore, when we get called on, we’re desperately trying to give the impression that we’ve been paying attention the entire time, even when we haven’t been.

To solve all these problems, he built a physical mute button to easily toggle the mute option on and off during Zoom calls. The device takes advantage of the native USB feature of his Digispark board, and a few built-in keyboard shortcuts in Zoom. With native USB, the Digispark board can act like a keyboard, making it really simple to emulate keyboard presses using the microcontroller. Throw in an arcade-style button and do a bit of handcrafting and you have yourself your own physical mute button.

We were really impressed by the simplicity of the design as well as the elegance of the mechanical assembly. [Elliot] even made a revamped version with a second button allowing him to control his video as well. Cool button(s) [Elliot]!

What’s your favorite work-from-home hack? Check out some of our favorites here on Hackaday.

Continue reading “Quickly Mute And Unmute Yourself Using The Physical Mute Button”